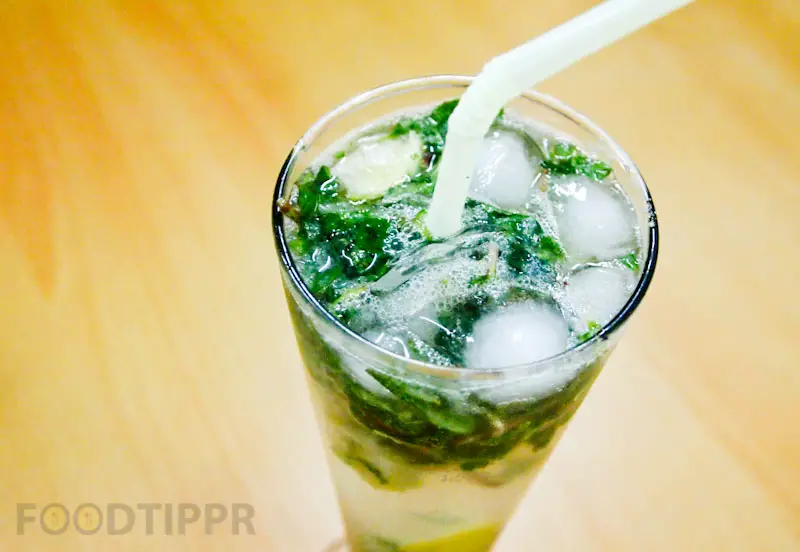
Want to enjoy the unlimited supply of Mojito? It’s easy, just learn how to make it. It really doesn’t take much time to learn. Even the ingredients are easily available.
*This is the Non-Alcoholic Mojito
Ingredients
1/2 cup Mint leaves
pinch Salt
2 tbsp Sugar
2 Lemon
1 glass Club soda
Pestle and Mortor
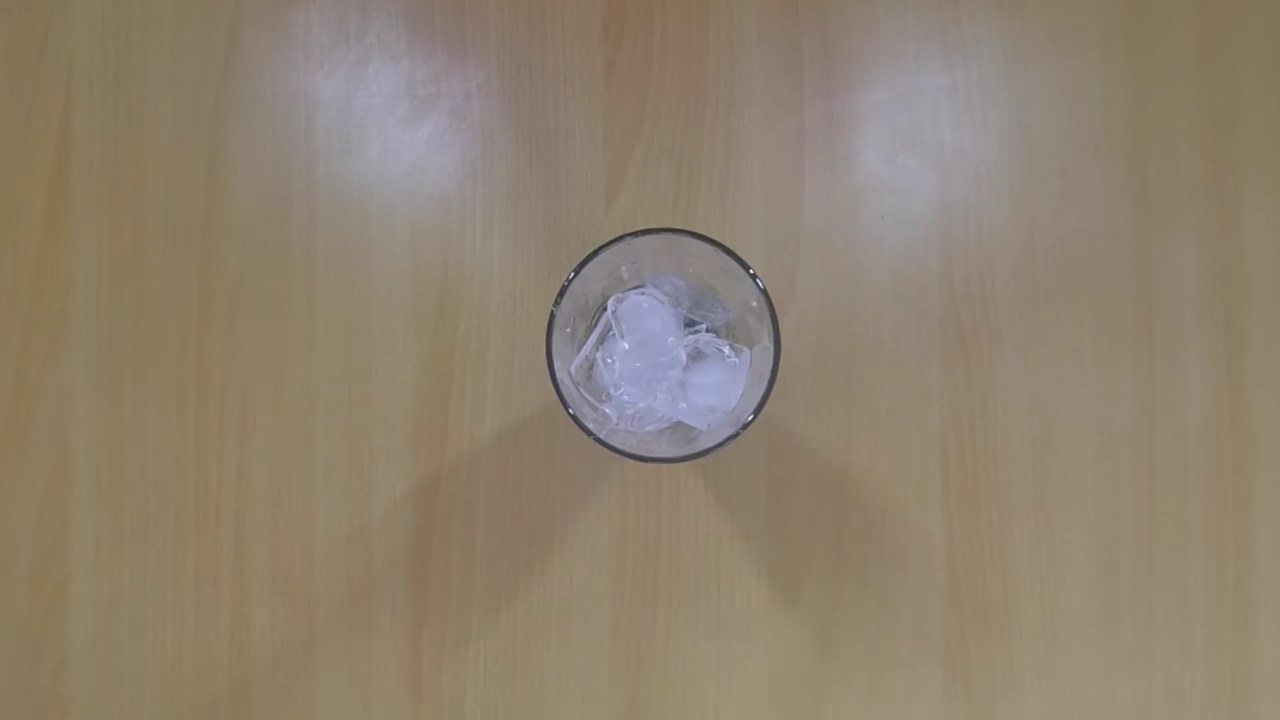
4-5 Ice cubes
Find the step by step preparation method below, or simply watch the video.
Steps
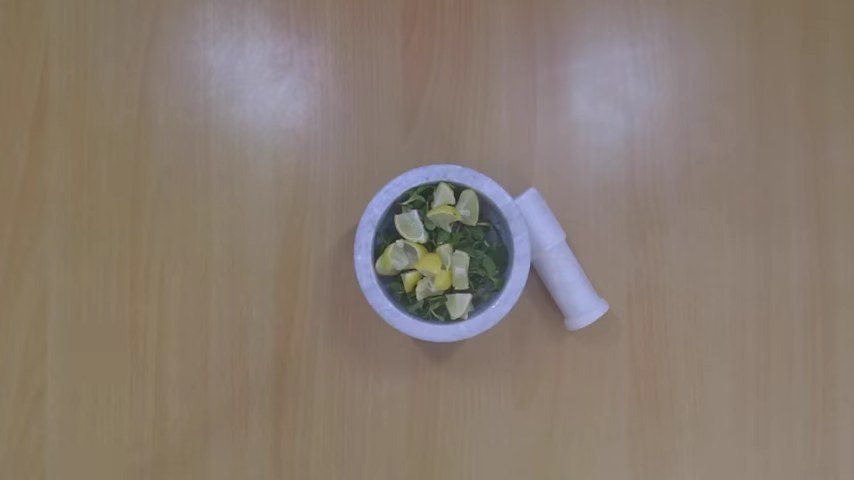
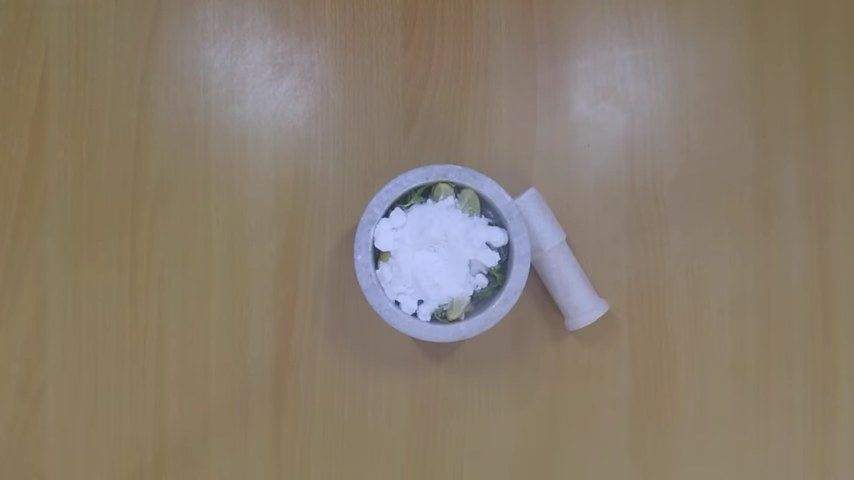
Add mint leaves, lemon cubes, salt and sugar in a pestle and mortar.
Crush it well.
Keep crushing till sugar dissolves completely.
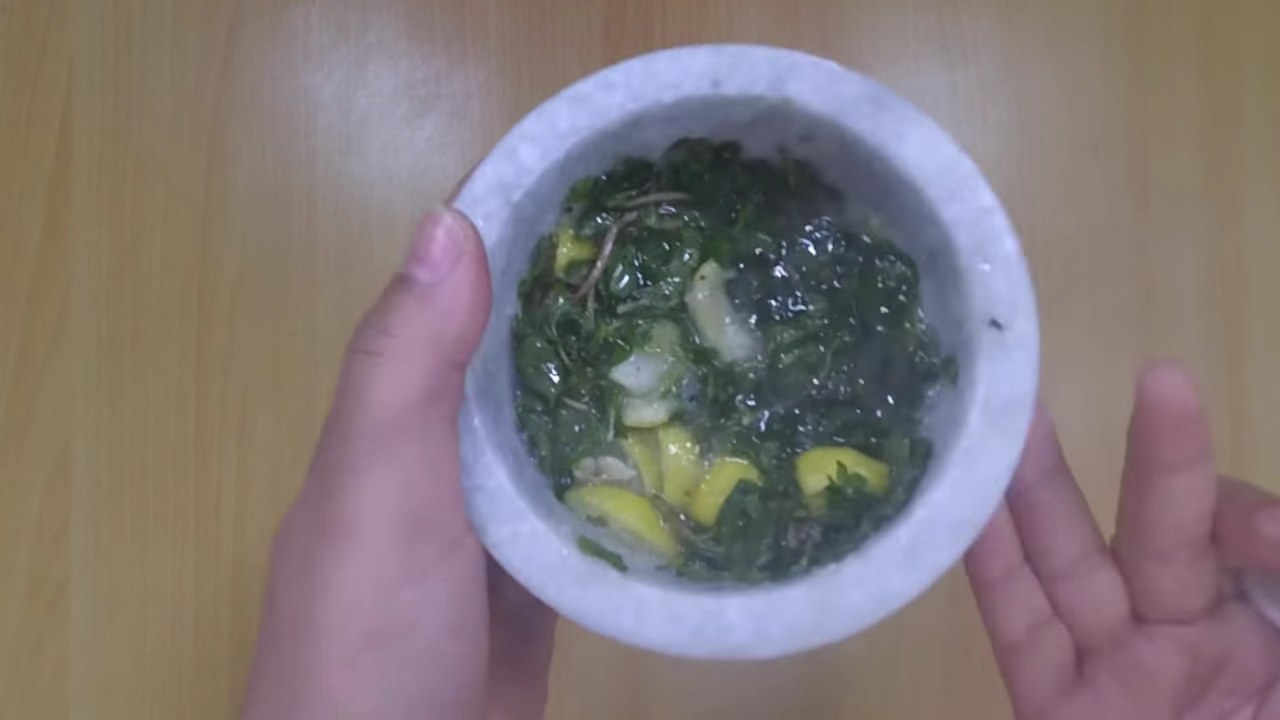
Well crushed.
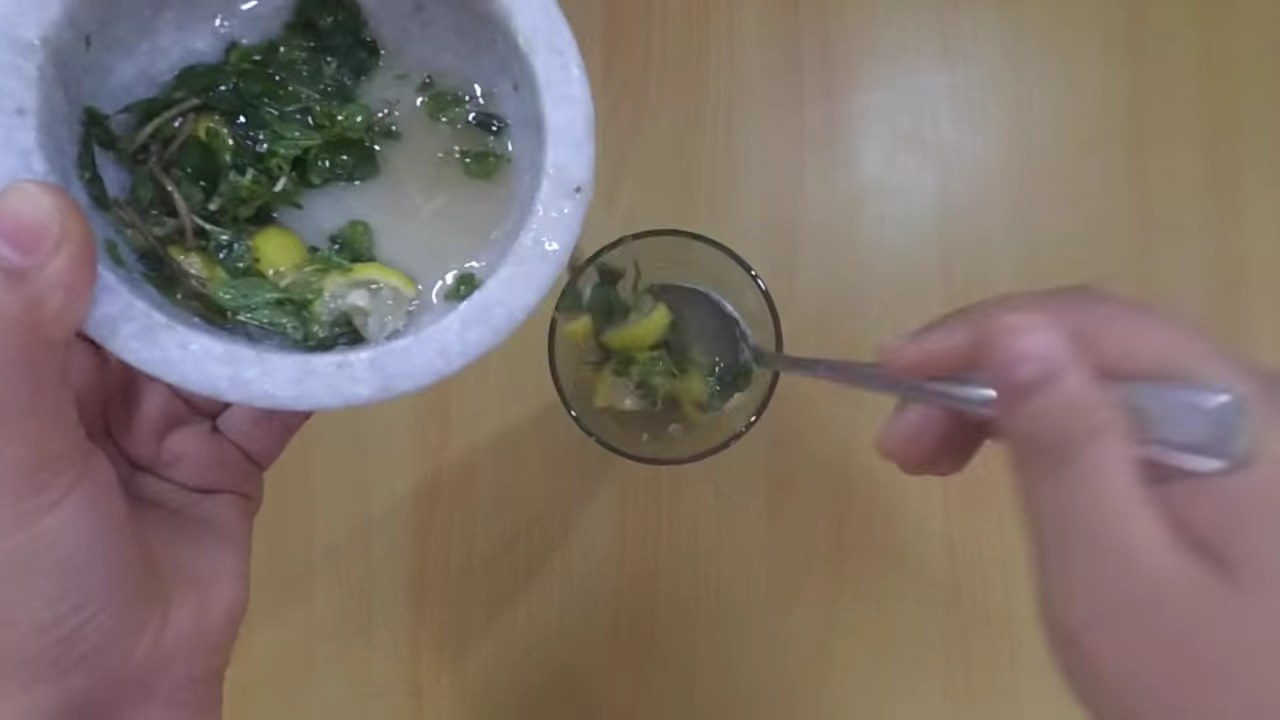
Crushed mint leaves -sugar mixture is transfer it to a glass.
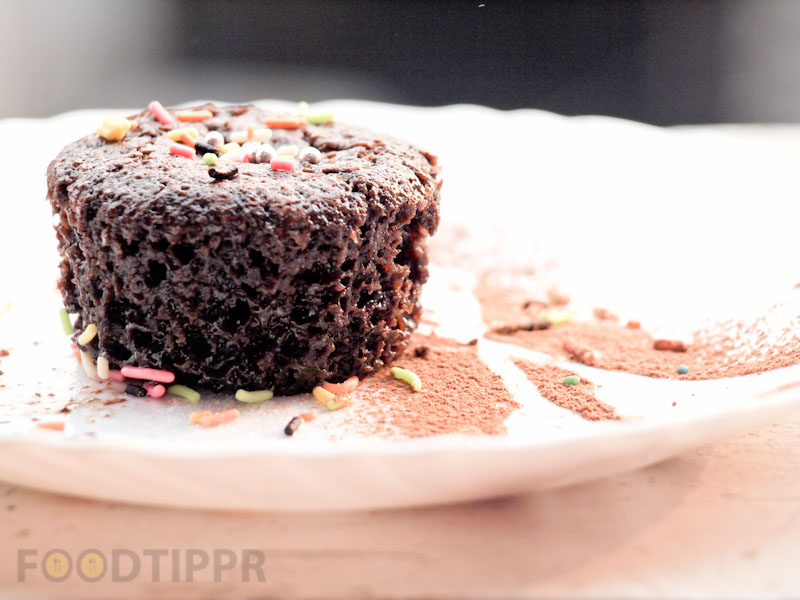
Presenting the delicious Chocolate Muffins Recipe. I created a few more muffins recipes to build the confidence to try something like this.
It was purely an experiment that turned out so well that it makes it to the blog, else, I had promised myself I won’t let anyone even taste this if it goes wrong, thankfully I didn’t happen and everything was great. Everybody loved it.
Ingredients
3 tbsp All purpose flour
1/4 cup Butter
1/3 cup Sugar
1/4 cup Dark chocolate
1 medium size Dairy milk
150 ml Milk
1 tbsp Baking powder
1/8 teaspoon Cooking soda
1 teaspoon Vanilla essence
Follow the step by step recipe below or watch the video preparation.
Steps
In a wok, add 100 ml water and put a stand under the water. Put mixing bowl on the stand.
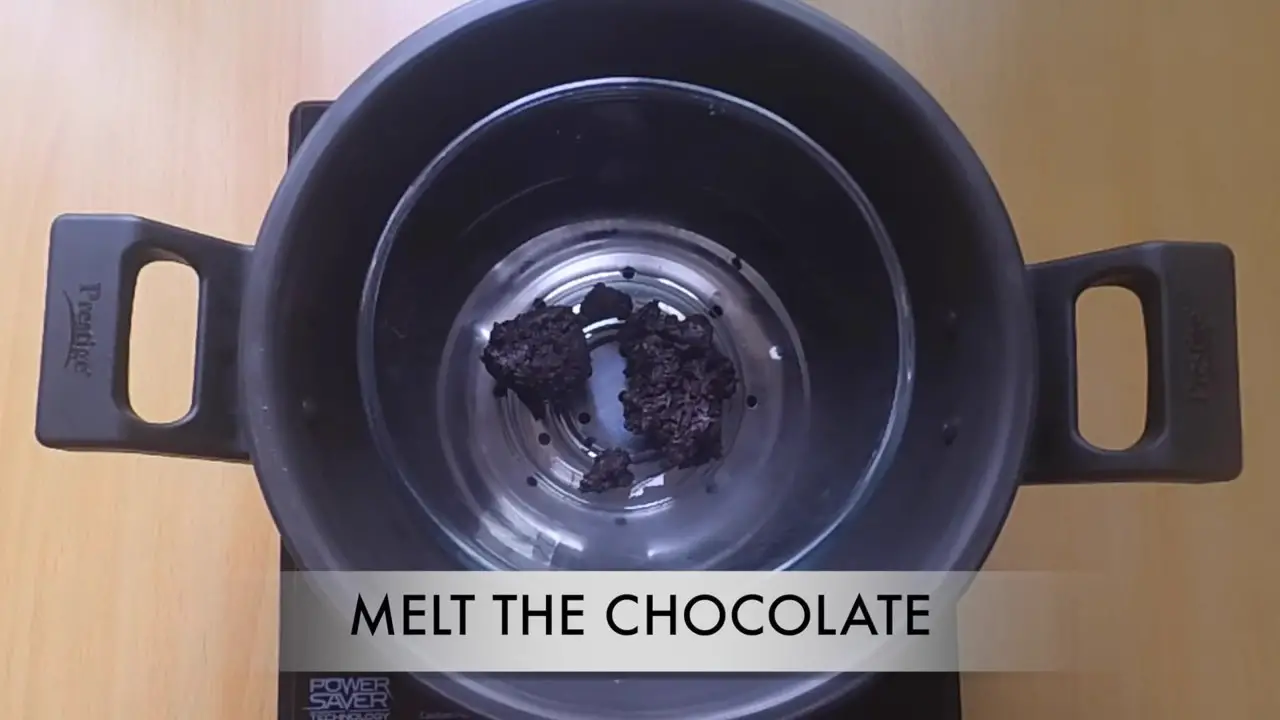
Add dark chocolate and some dairy milk in the bowl.
Add 2 tbsp milk. Cook it on a high flame till the chocolates melt. Keep mixing it. (We have to melt the chocolates in steam process)
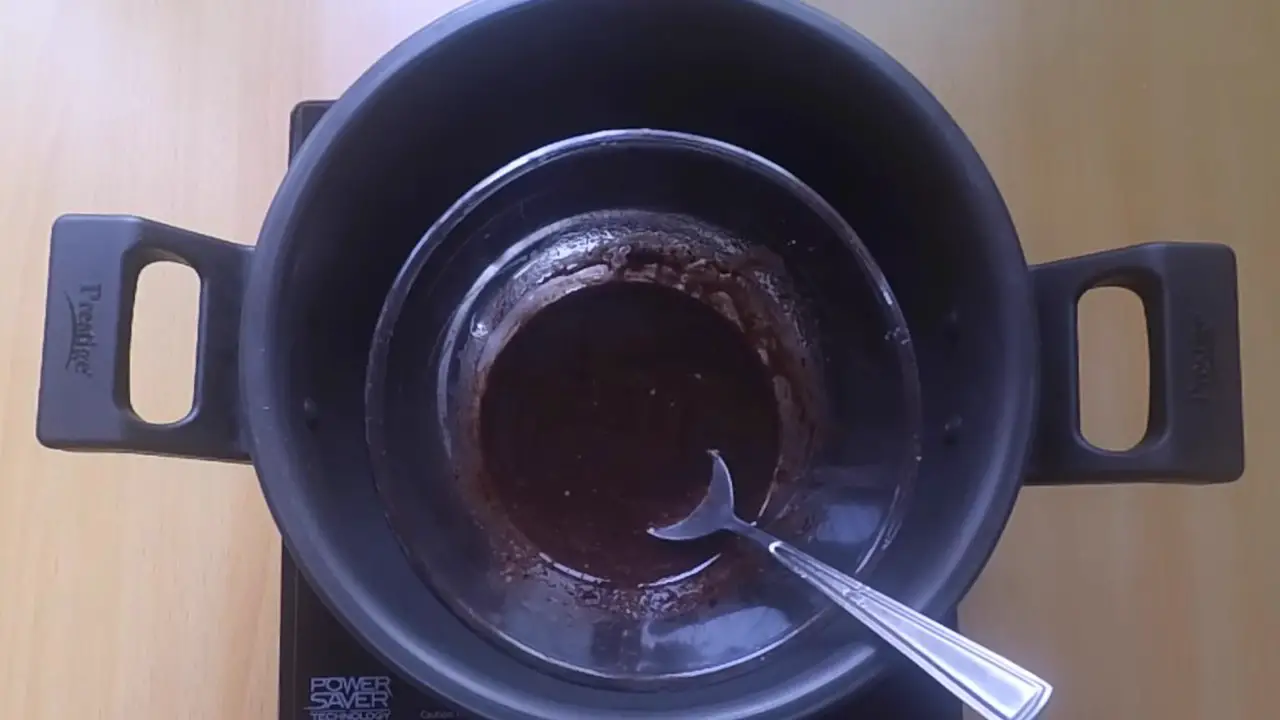
Add butter and mix it well till the chocolates melt completely.
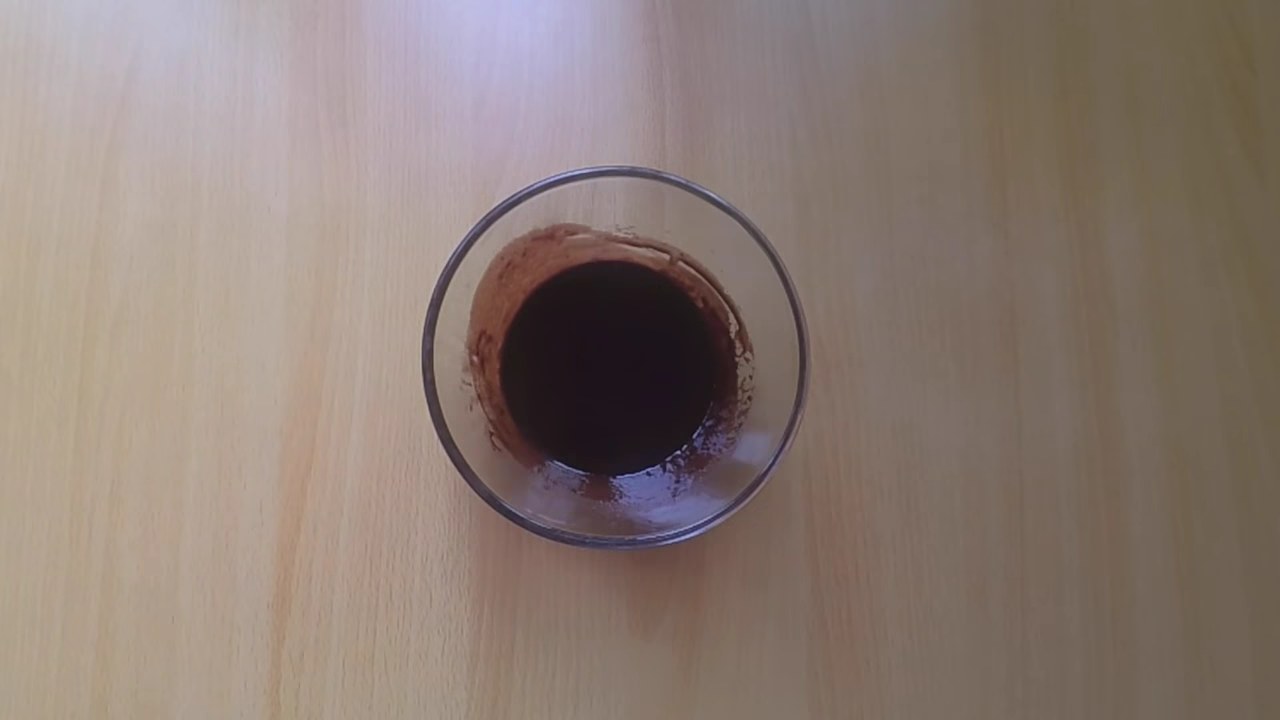
The chocolates are melted.
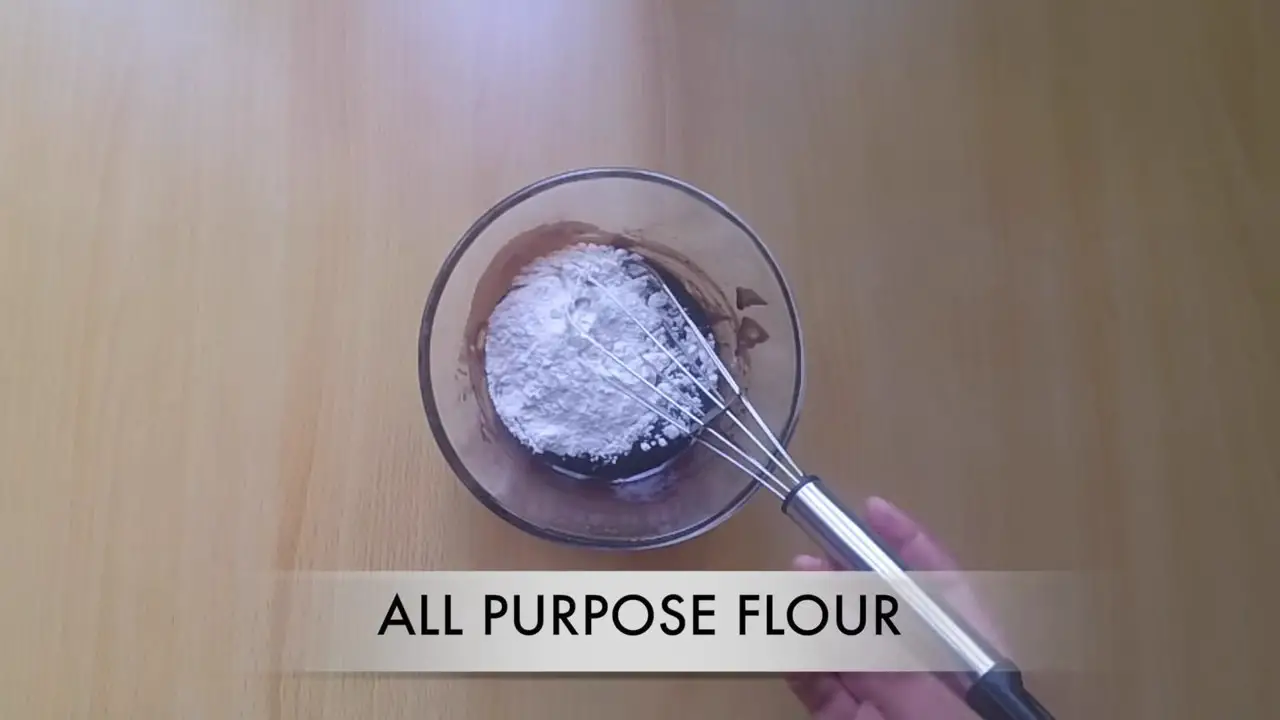
Add all purpose flour.
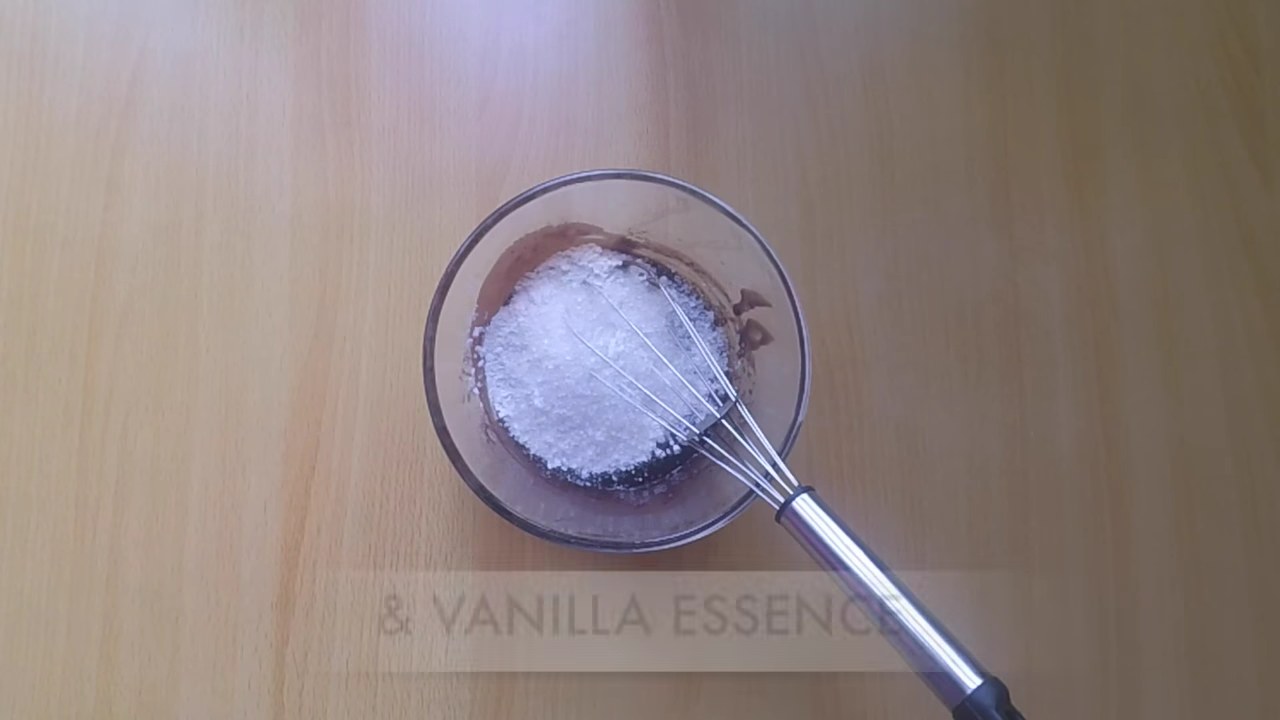
Add baking powder, sugar, cooking soda and vanilla essence. Mix it well.
Add milk and mix it well. The batter is ready to bake.
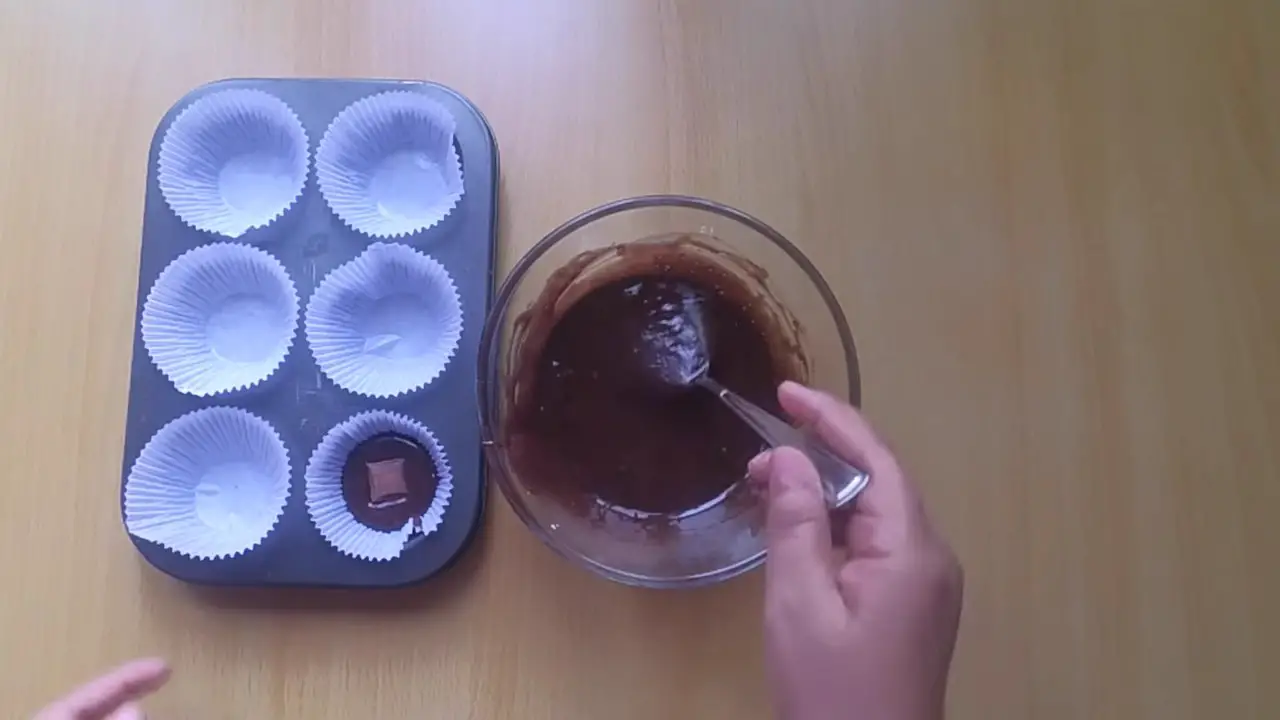
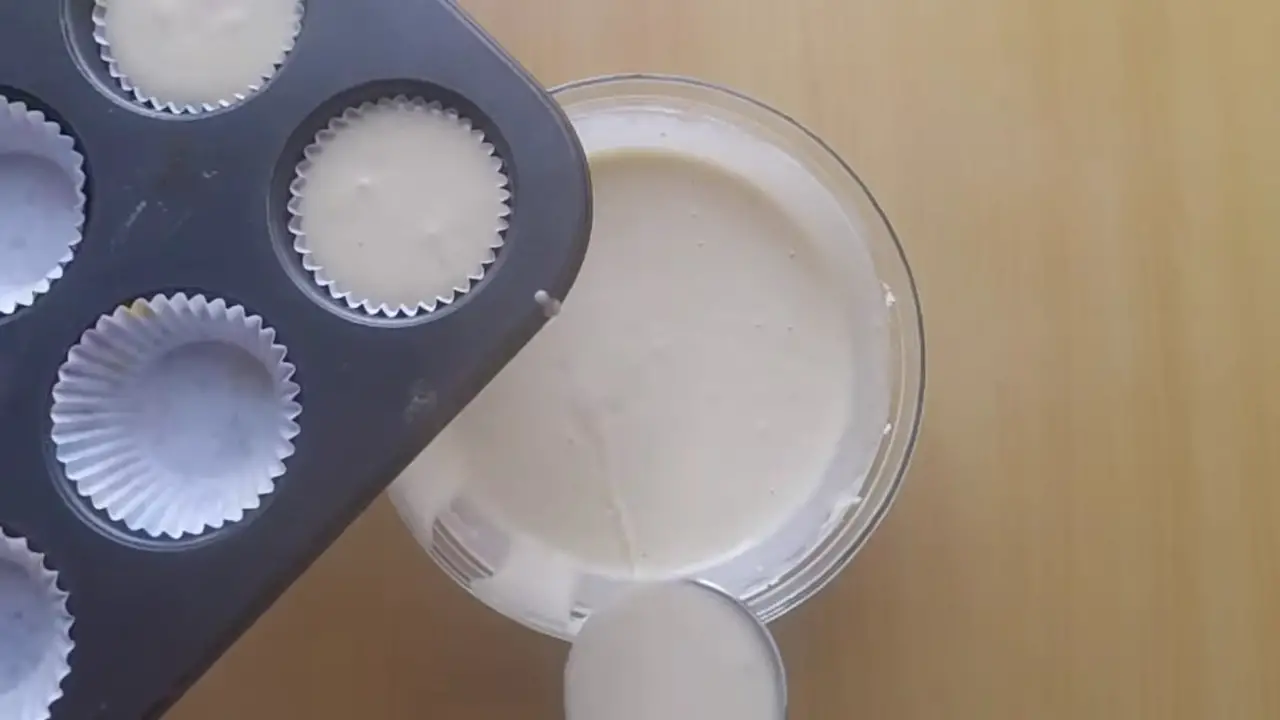
Grease the baking mold with butter and pour a teaspoon of batter in each of the mold. Then put a cube of dairy milk chocolates on each mold and put a teaspoon of batter on it. Preheat microwave oven at 170C.
Bake it for 20-25 minutes at 170C. Delicious muffins are ready. Enjoy.
I try posting videos on our channel on almost daily basis (Monday to Friday) so Please Subscribe to the Foodtippr channel if you watch YouTube videos.
Do you love Coffee? I am sure you do, this is why you are here in the first place right?
Well, thanks for checking out the best recipe for your Coffee, it takes a few minutes of your life to make it and you will remember it for the lifetime.
Well, at least for the entire for if not for the lifetime. Check out the step by step process of making your best coffee without using a Coffee Machine.
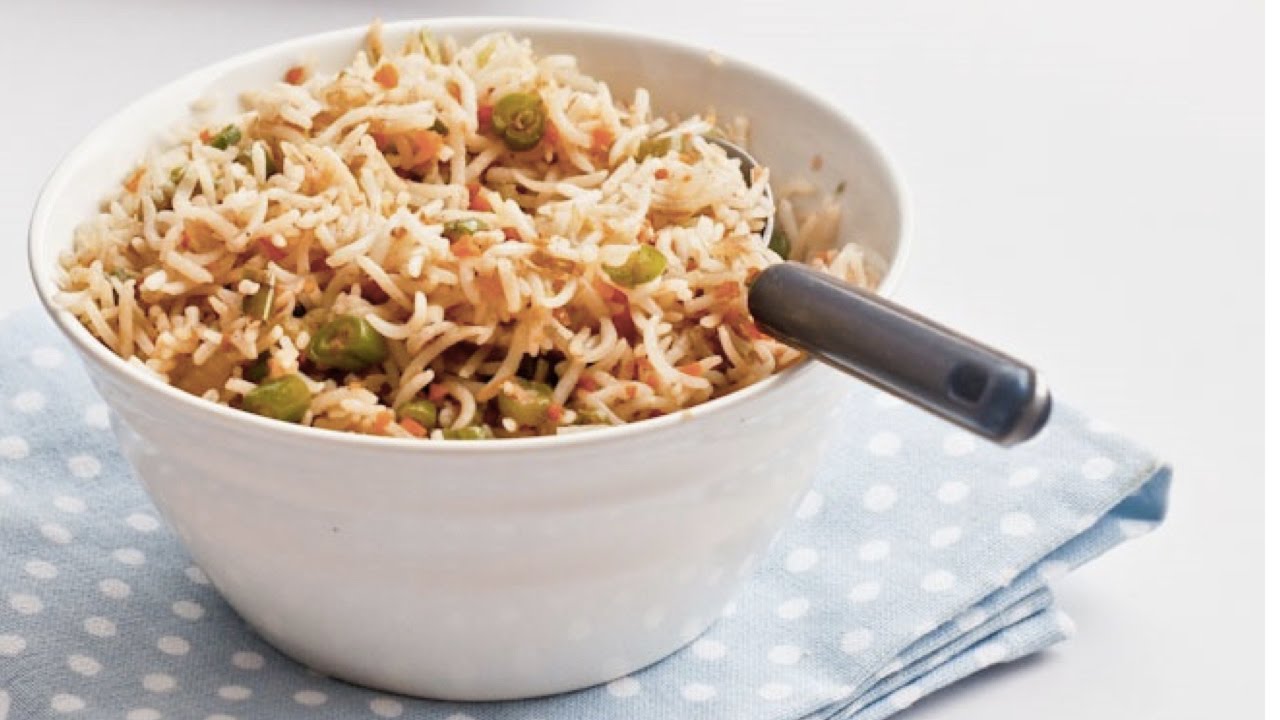
Check out the recipe of Fried Rice. A delicious food that is a mix of Chinese and Indian cuisines style, this type of fried rice is also pretty common in restaurants.
Do you love Chinese food? It’s actually my favourite type of food. Being a Foodie and a decent cook, I am efficient in cooking both Nonveg and Veg Indian Food, But when it comes to Chinese food like Noodles or Fried Rice, I used to never trust my cooking skills.
This happened because whatever I cooked, never matched any Chinese food we get in Restaurants.
But with some motivation from my family, I got the courage to start cooking food other than Indian cuisines, and after a while, after making a few mistakes, I have almost perfected some of the recipes. And will be sharing them on the blog.
Ingredients
1 cup, boiled Basmati RIce
1/2 cup, chopped Cabbage
1/2 cup, chopped Capsicum
1/4 cup, chopped Onion
2 tbsp, chopped Garlic
1 tbsp, chopped Ginger
1/3 cup, chopped Carrot
2 tbsp, chopped Green onion
2, chopped Green chili
1/2 tsp Pepper powder
to taste Salt
1 tsp Azinomoto
2 tbsp Vegetable oil
1 tbsp Soy sauce
1 tbsp Vinegar
Today, I am sharing Fried rice. I hope you guys will love it. Follow the step by step method mentioned below or watch the vieo preparation on our youtube channel.
Steps
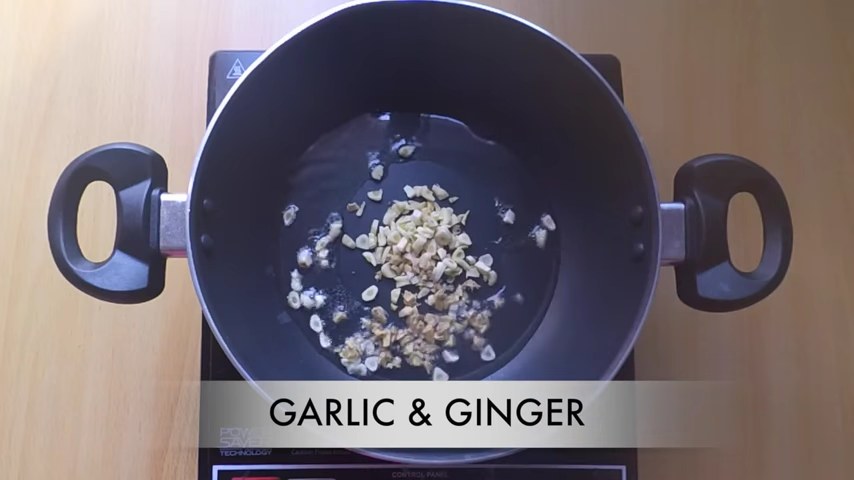
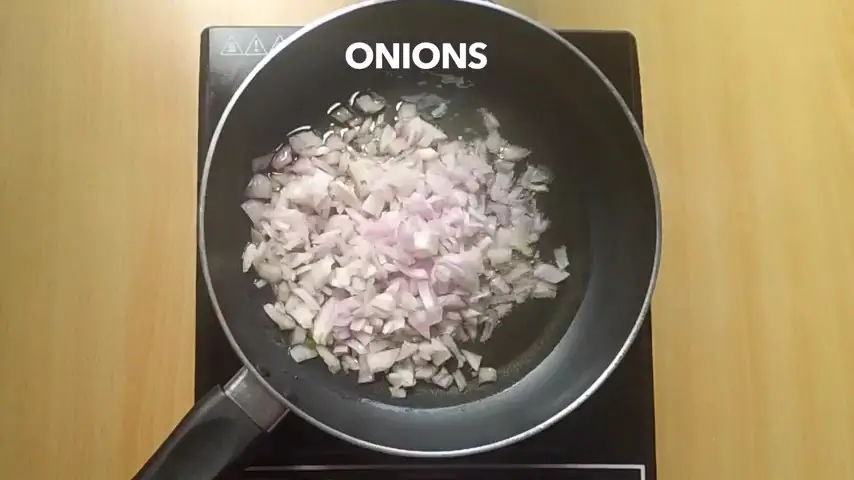
Heat oil in a wok, saute with ginger and garlic.
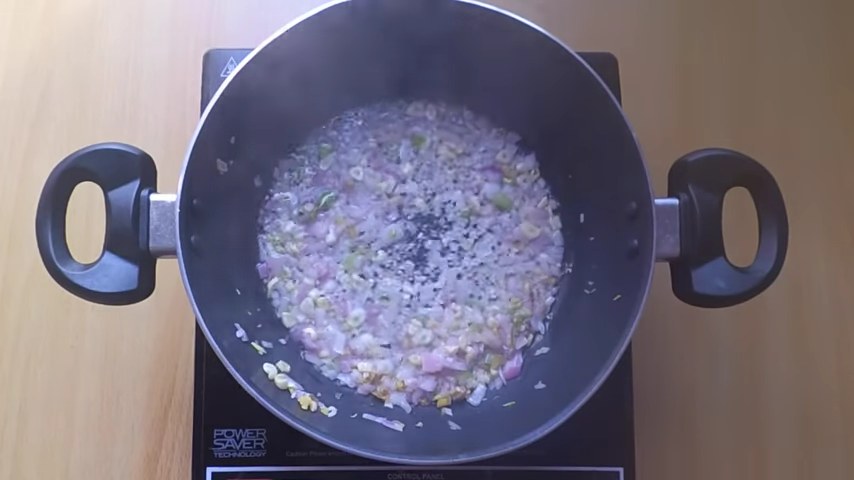
Add onion and fry till it is translucent in color.
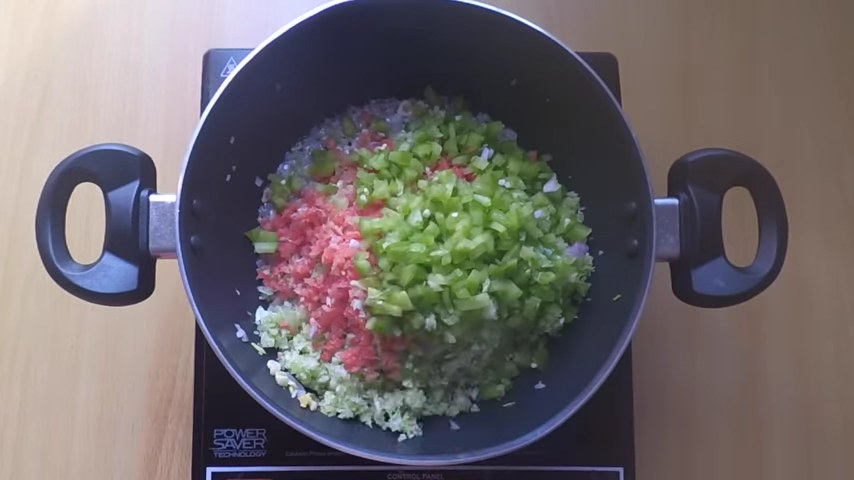
Add chopped cabbage, carrot and capsicum. Cook for 2-3 minutes with keep stirring with spatula.
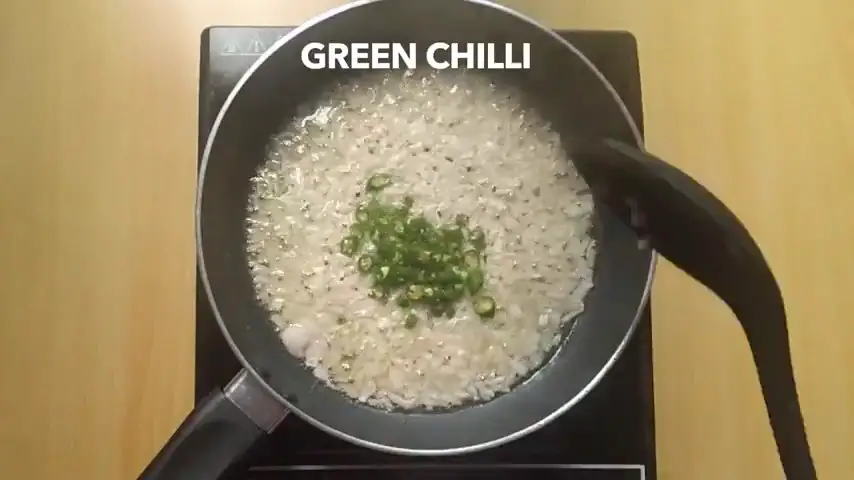
Add green onion, green chili and boiled rice.
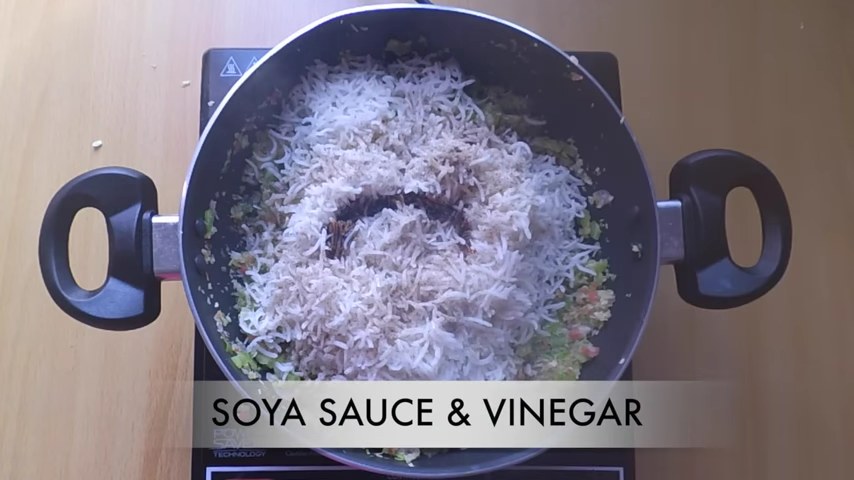
Add pepper powder, salt, azinomoto, soya sauce, and vinegar. Stir well and cook for another 2-3 minutes.
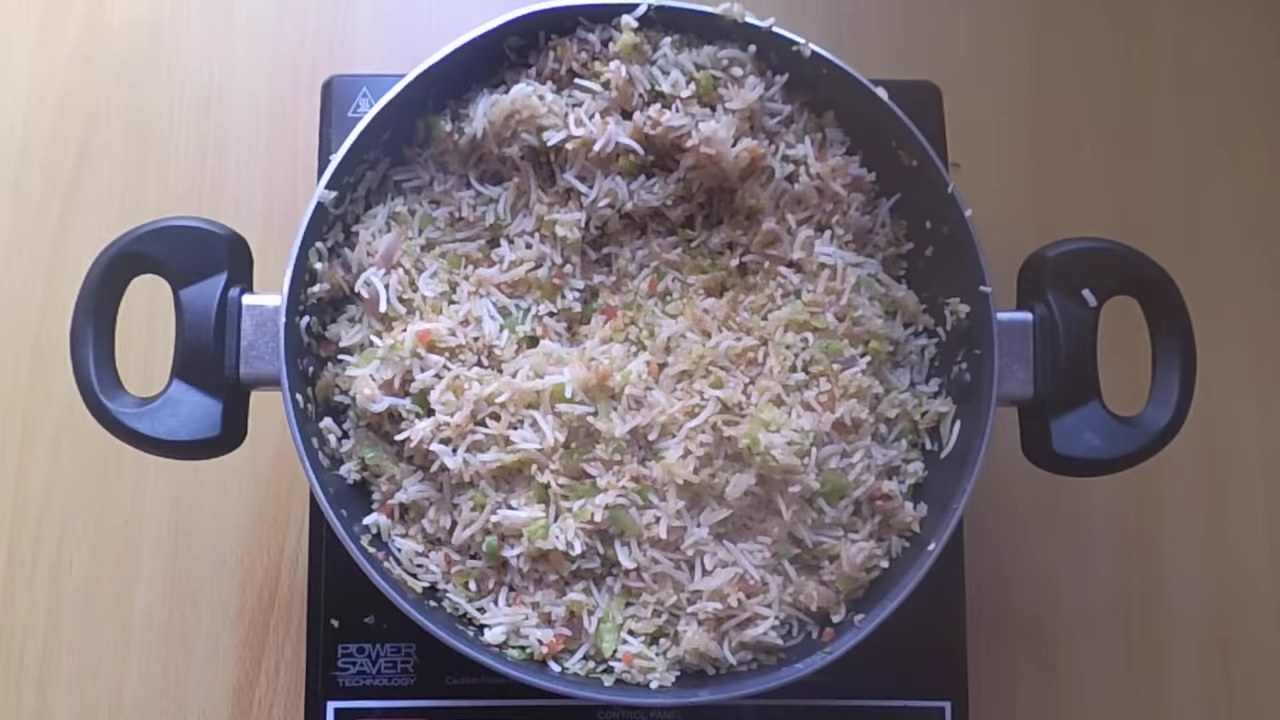
Delicious fried rice is ready to serve. Serve hot with fried paneer, chili paneer or Manchurian.
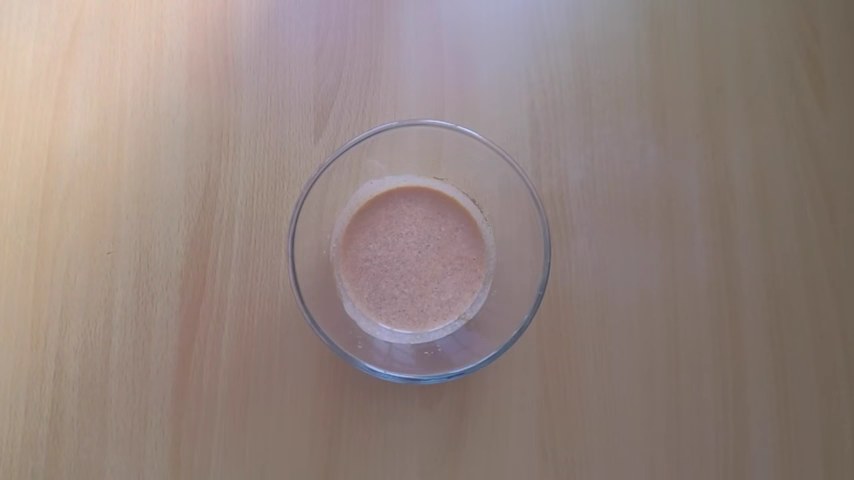
Anda Dopyaza or Egg Dopiaza is quite a useful recipe. And all the ingredients are easily available. You don’t need to have a stocked kitchen to enjoy this dish.
You just need a few eggs and onion as the key ingredient, both of which can be stored for longer periods of time. the Egg Dopiaza is loved by nonvegetarians, it is their go-to dish whenever the Chicken is not available for some reason.
It is also loved by vegetarians if they are okay with eating eggs, Like me. :-)
Follow the step by step process mentioned below or watch the video preparation on our YouTube channel where we post recipe videos almost every day.
I hope you will like this recipe for Anda Dopiaza.
Anda Dopyaza or Egg Dopiaza is quite a useful recipe. And all the ingredients are easily available. You don’t need to have a stocked kitchen to enjoy this dish.You just need a few eggs and onion as the key ingredient, both of which can be stored for longer periods of time. the Egg Dopiaza is loved by nonvegetarians, it is their go-to dish whenever the Chicken is not available for some reason.It is also loved by vegetarians if they are okay with eating eggs, Like me. ?Follow the step by step process mentioned below or watch the video preparation on our YouTube channel where we post recipe videos almost every day.
Prep Time10 minutesmins
Cook Time20 minutesmins
Total Time30 minutesmins
Course: Breakfast, dinner, lunch, Main Course
Cuisine: Indian
Keyword: ,Onion, Andapyaza, Egg
Servings: 4
Ingredients
4Onionsliced
3Eggs
2Bay Leaf
1/2inchpiece Cinnamon stick
1tspRed chili powder
1/2tspTurmeric powder
to taste Salt
1/2cupOil
1tspGaram masala powder
100mlWater
1tbspCoriander leaveschopped
1tspCumin seeds
10Black pepper
2Cloves
2Cardamom green
1Cardamom brown
1/2inchpiece Ginger
7-8clovesGarlic
Instructions
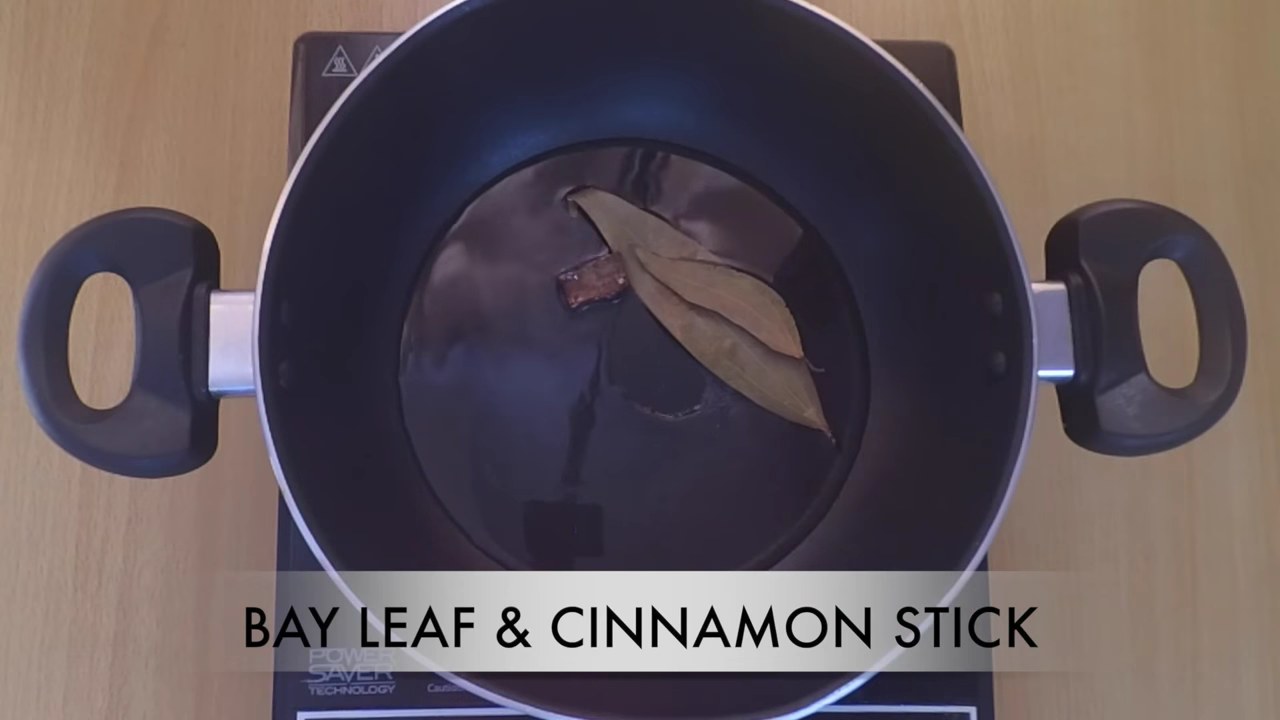
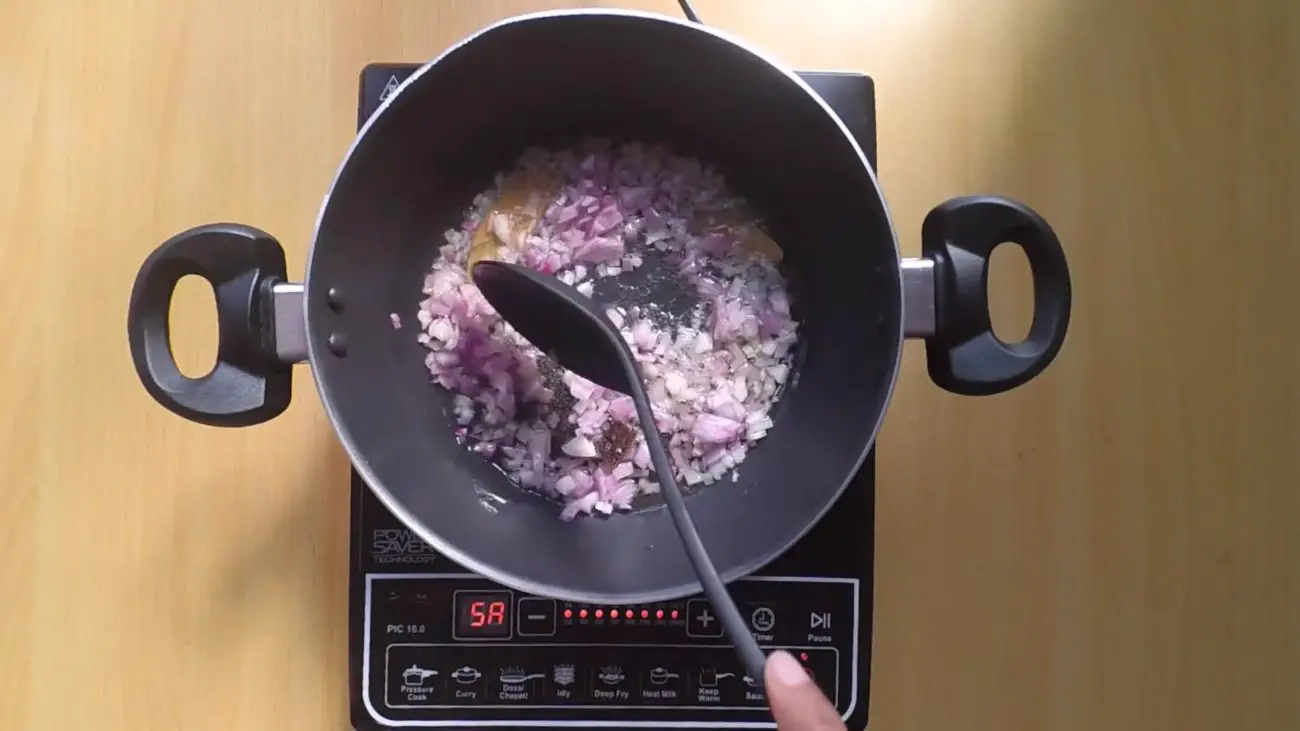
Heat oil in a wok and temper with bay leaf and cinnamon stick.
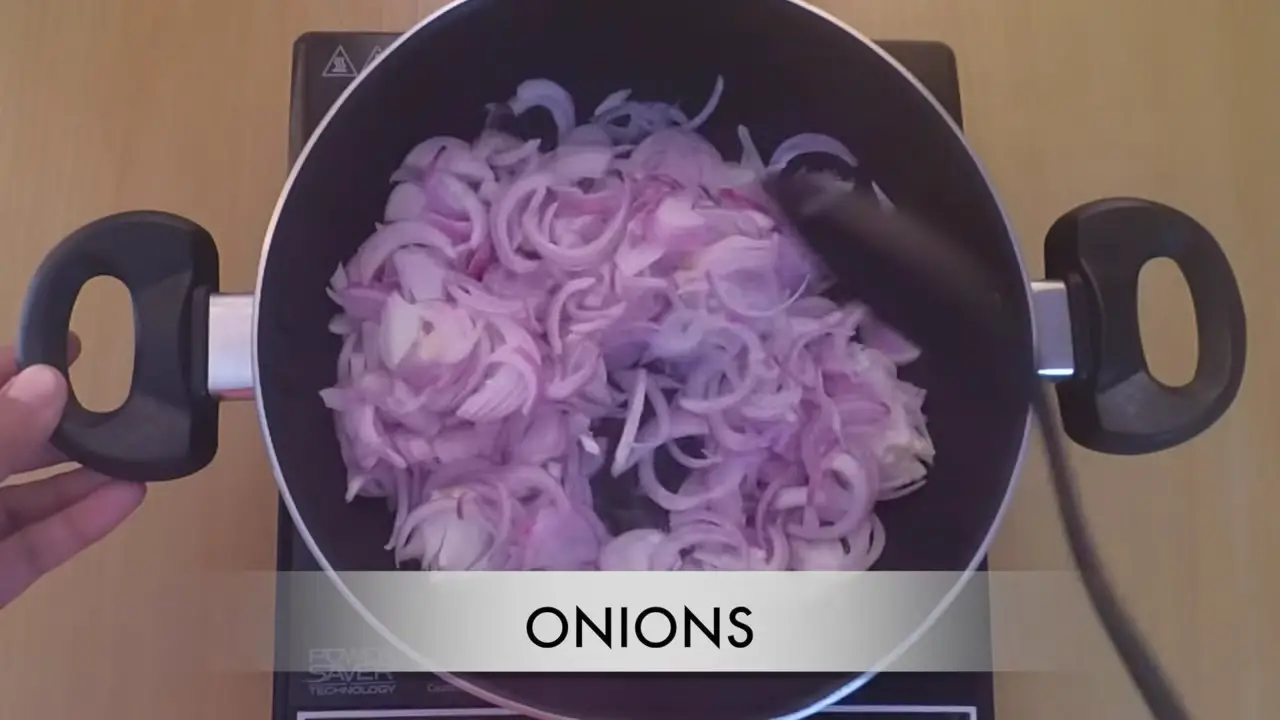
Add onion and fry till it is translucent in color.
Keep stirring in between the process.
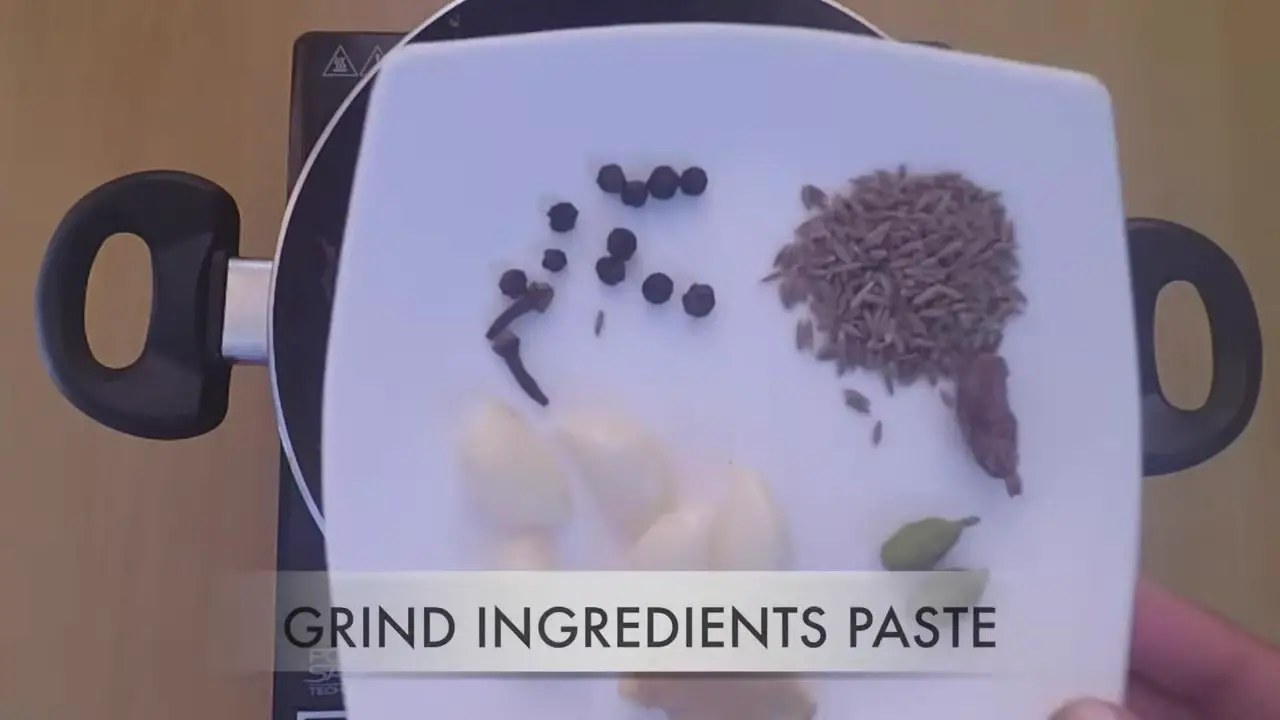
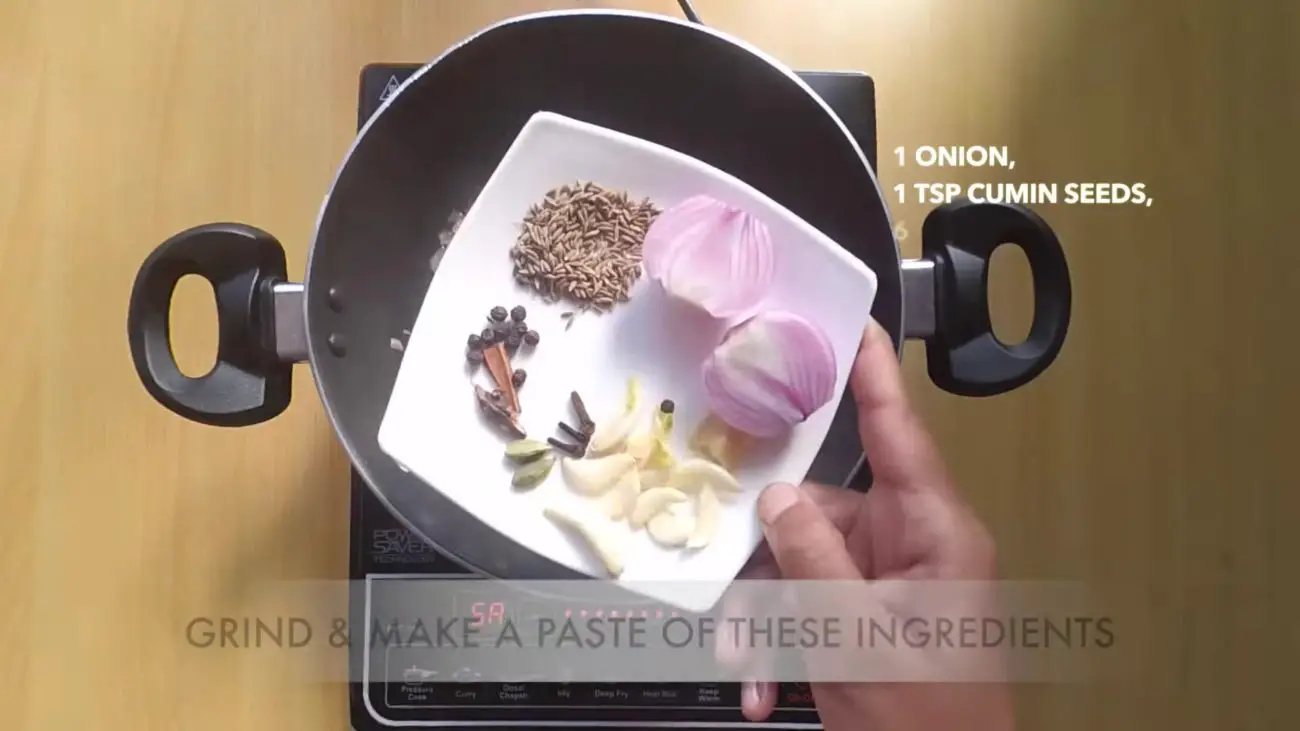
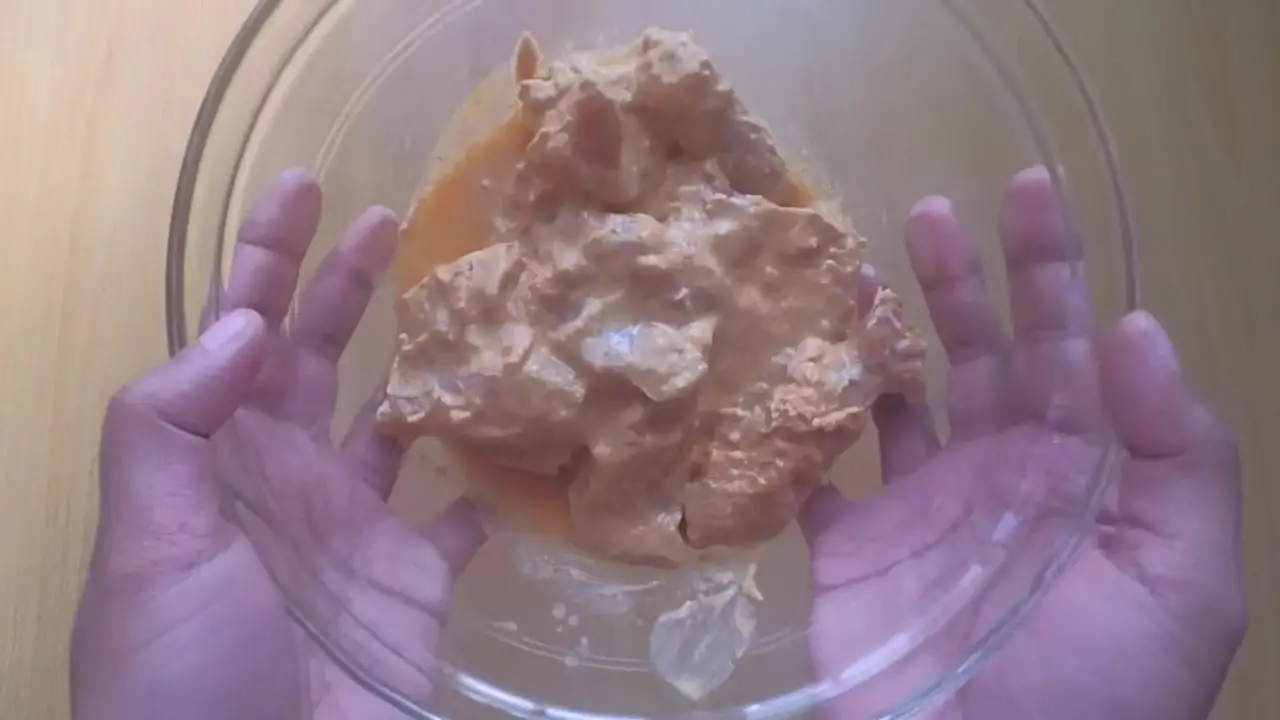
Grind all the ingredients given under the table “Ingredients for paste” to make a fine paste.
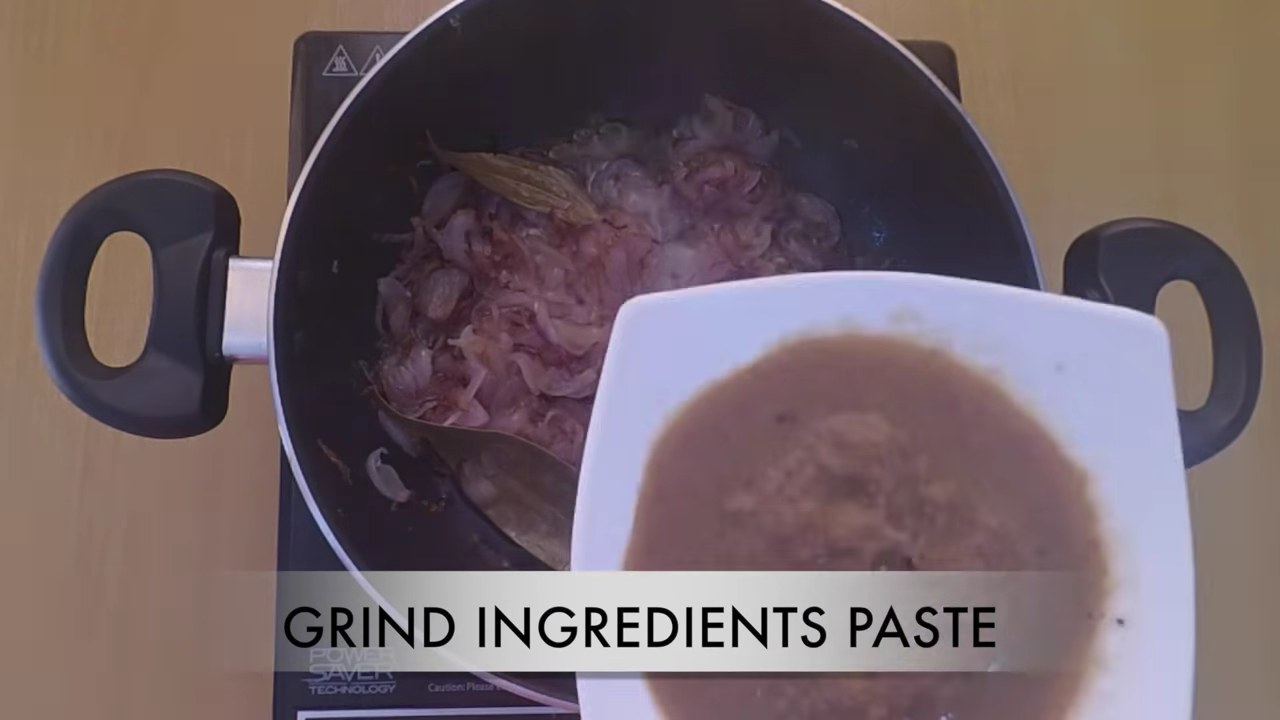
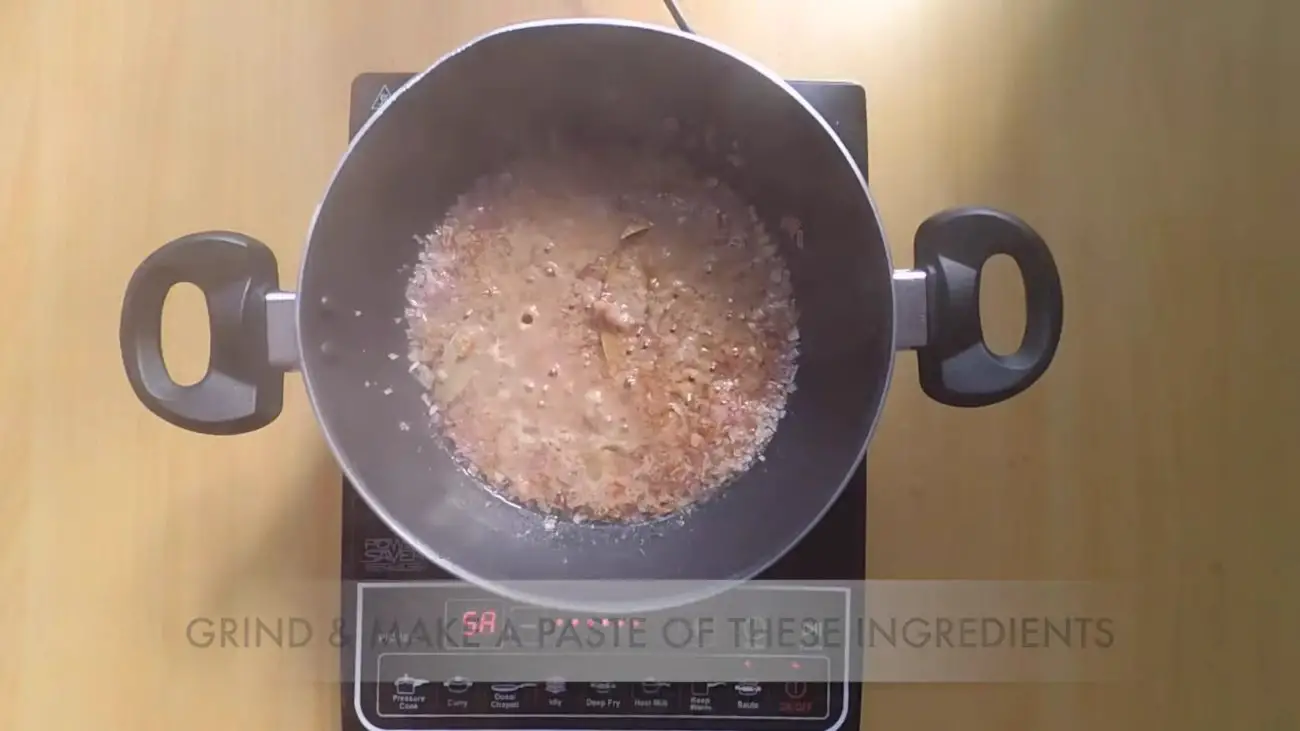
Add the ground paste in the wok.
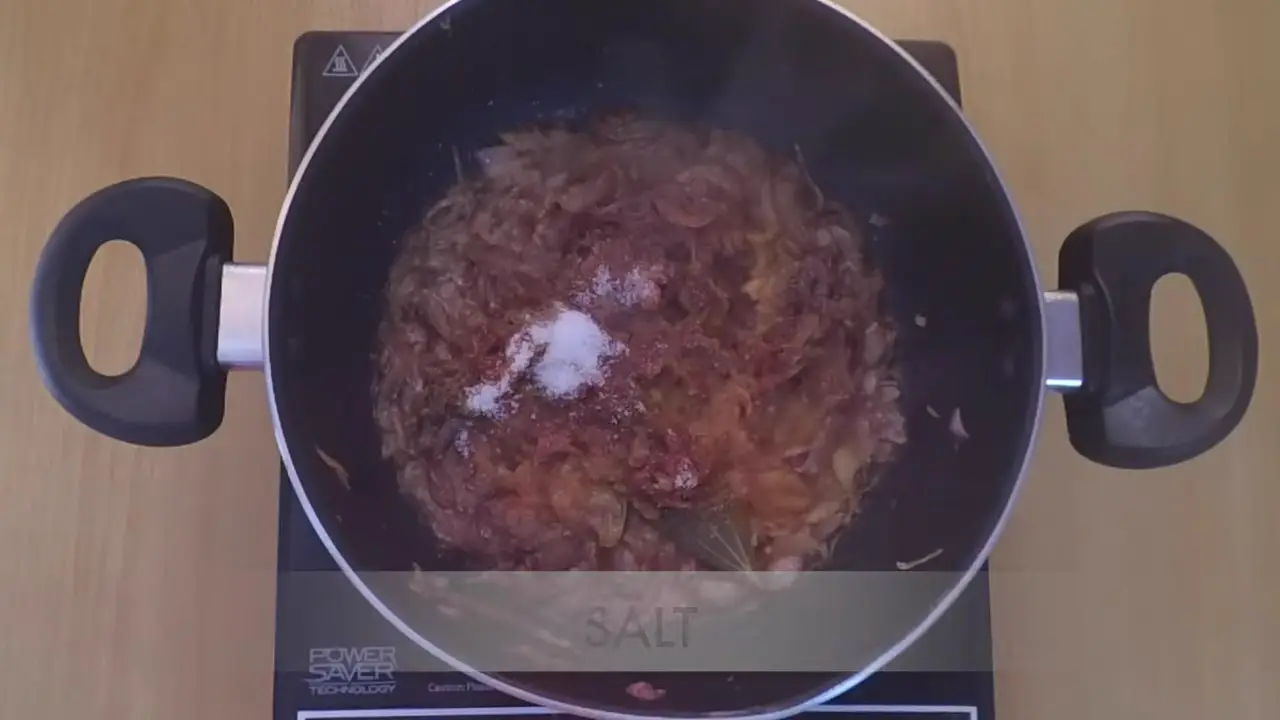
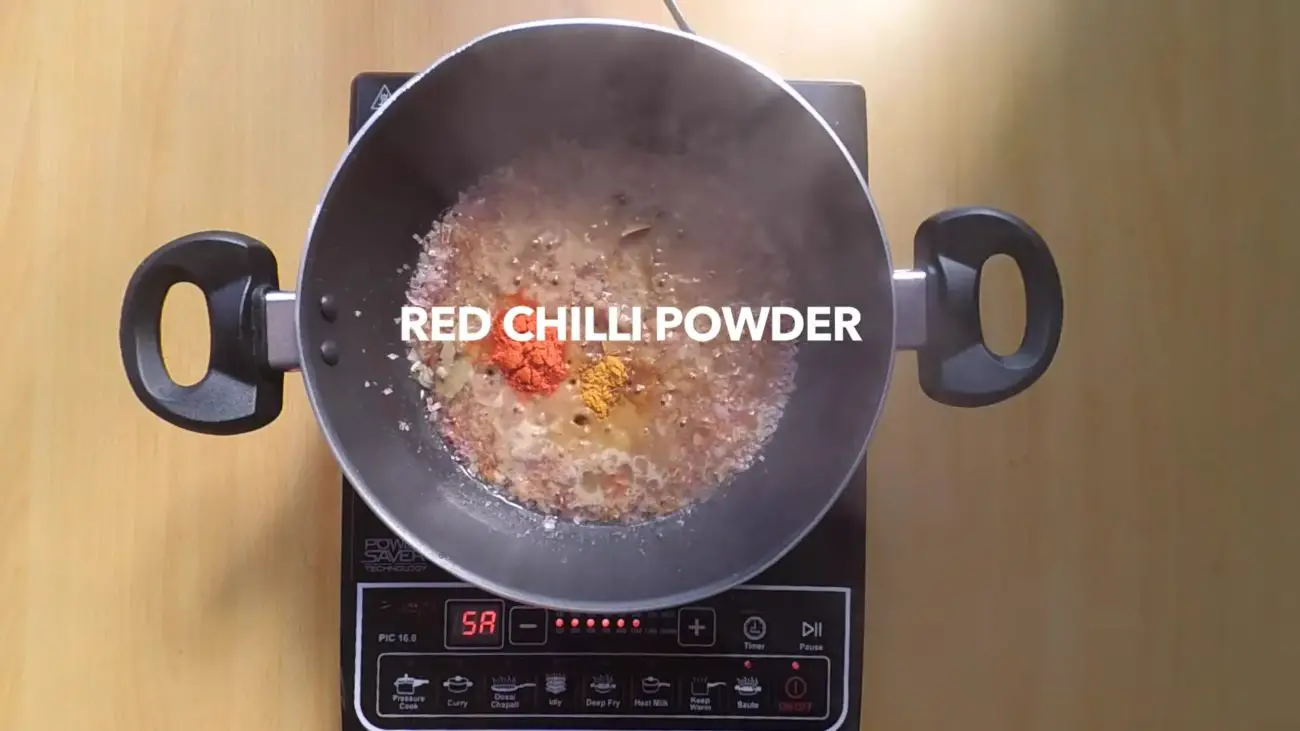
Add red chili, turmeric, salt, and garam masala powder. Cook for 1-2 minutes on a medium to low flame.
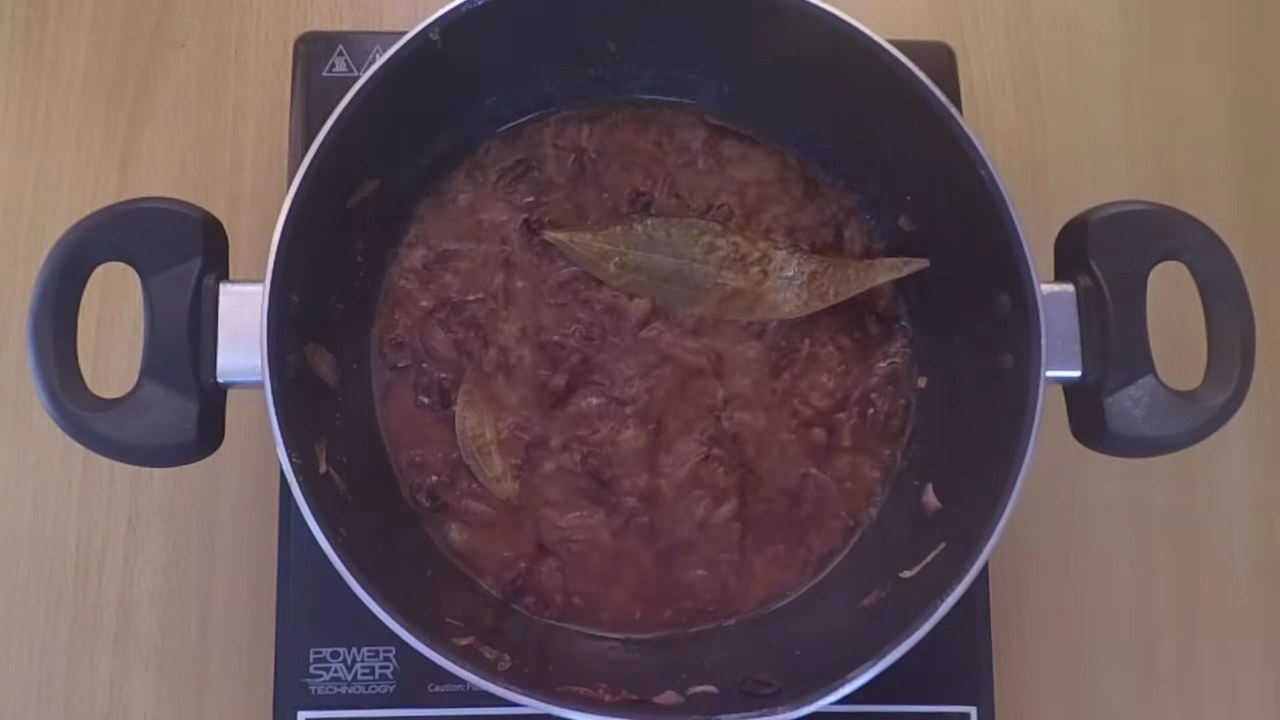
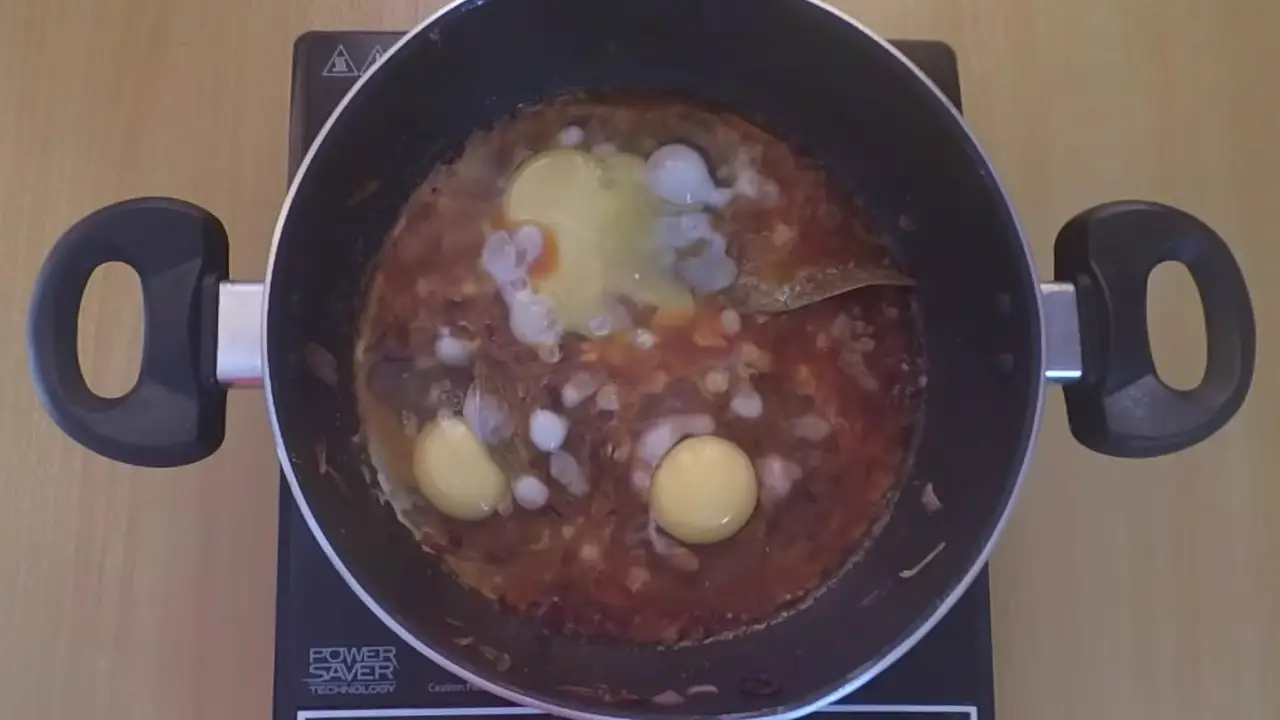
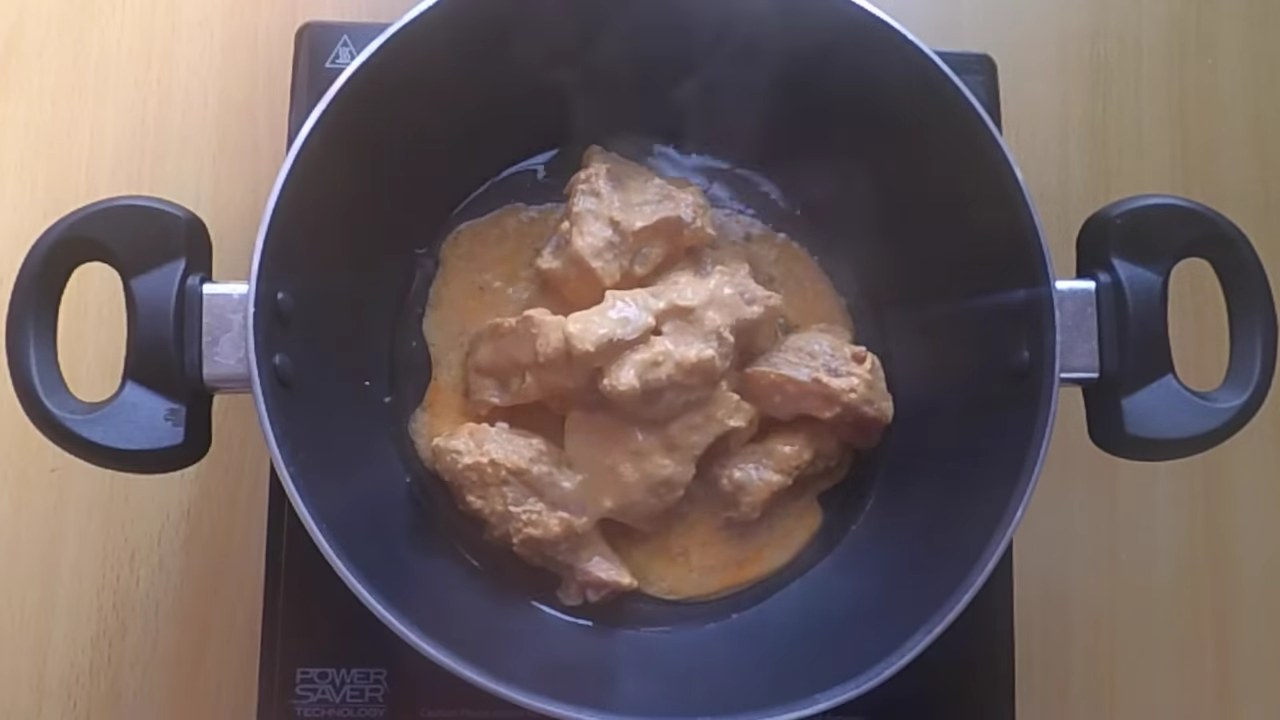
Add 100 ml water and mix it well.
Crack eggs in the wok, don’t mix it.
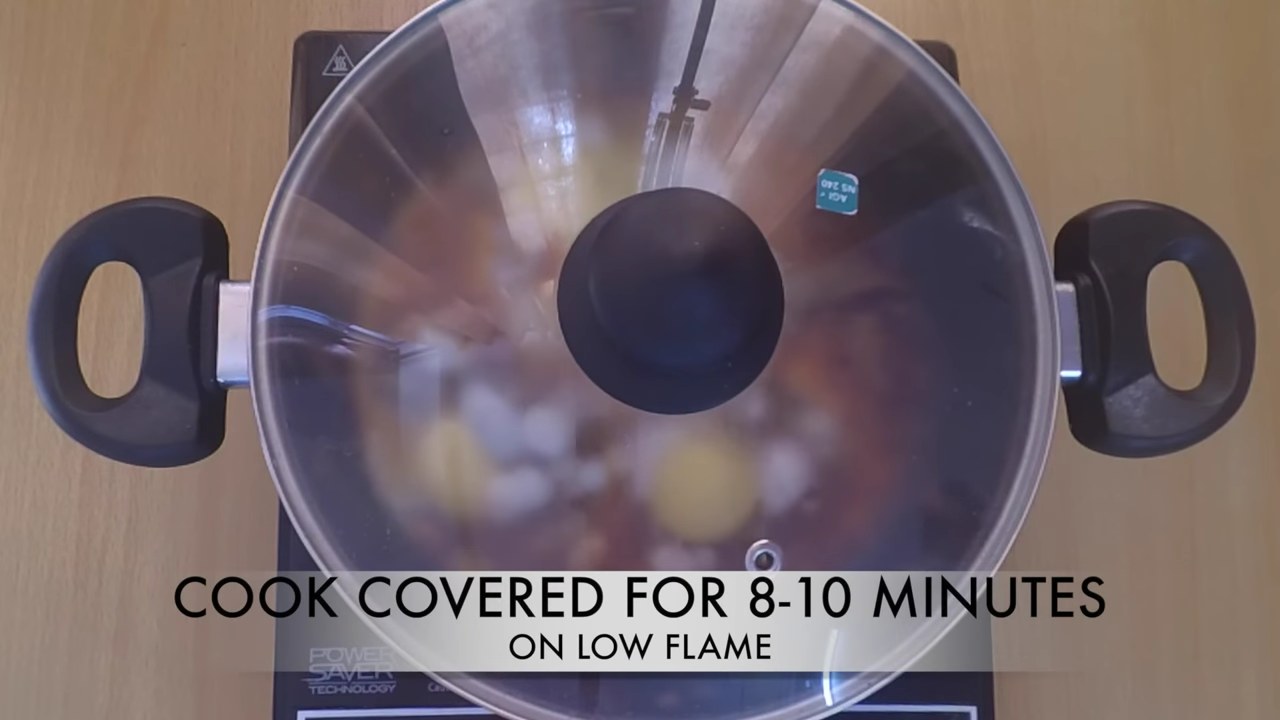
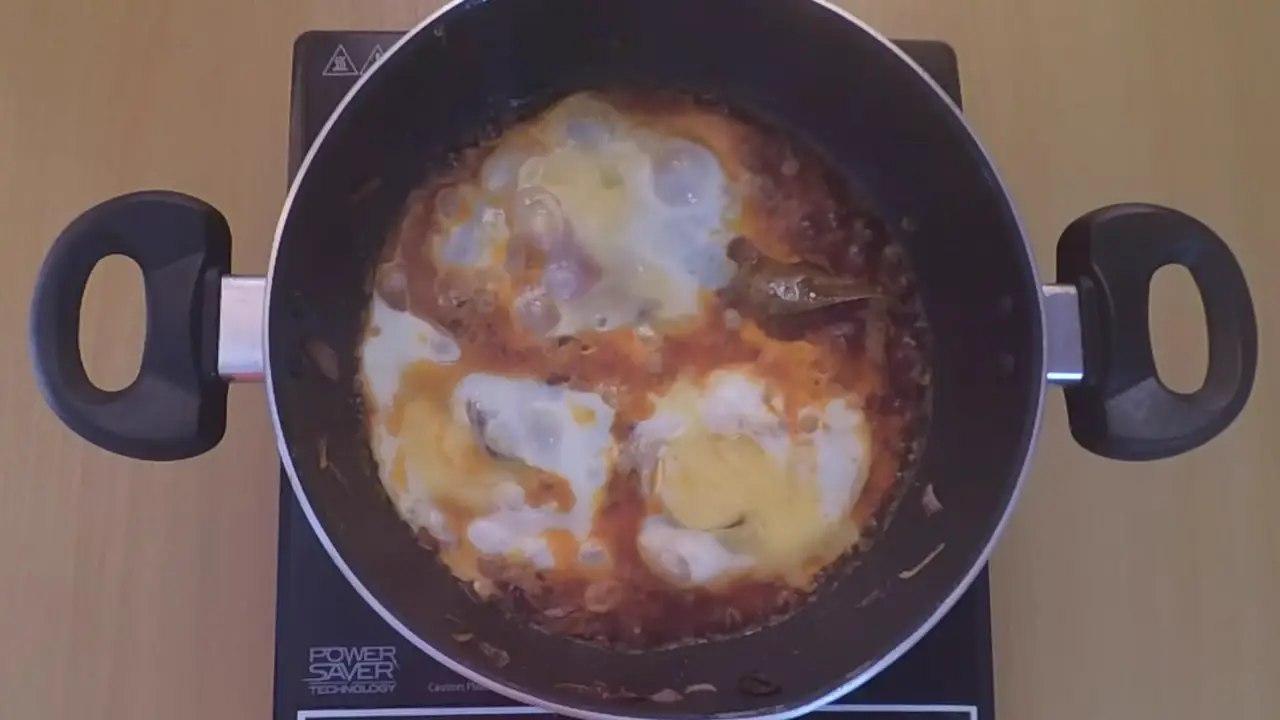
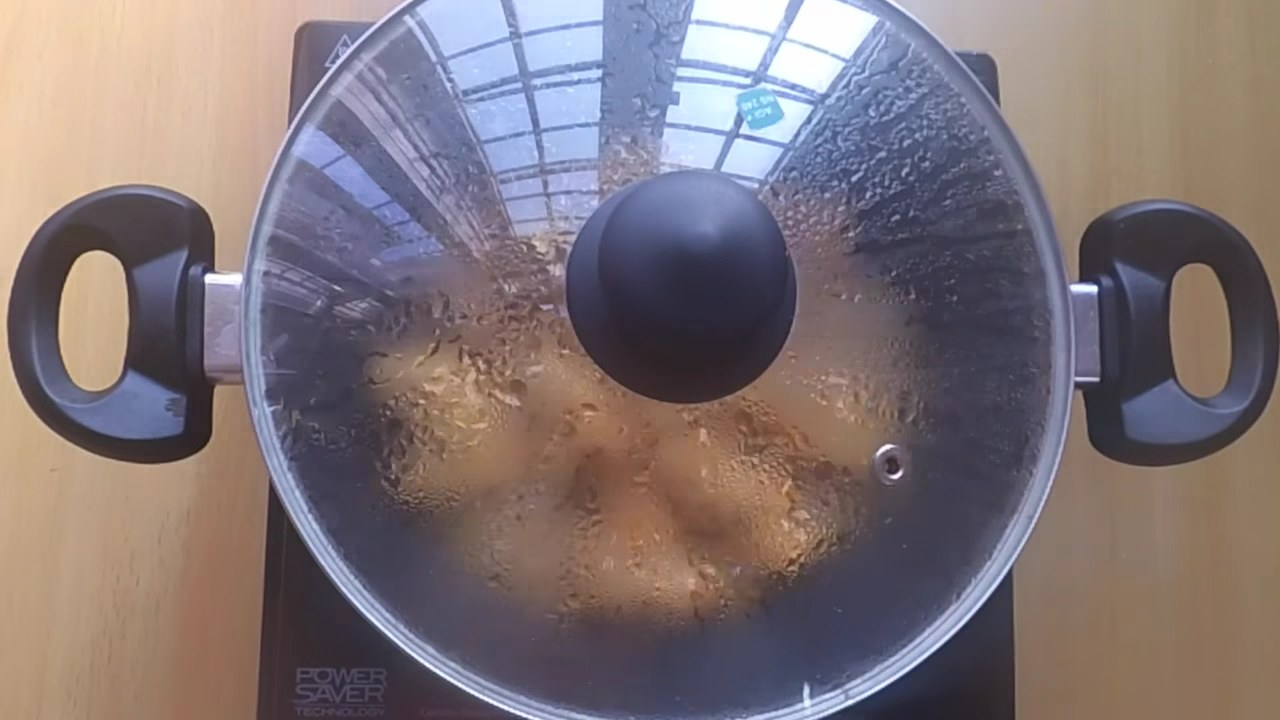
Cook covered on a low flame for 8-10 minutes or till the eggs cook properly and oil shows separately.
The egg pizza is ready to serve.
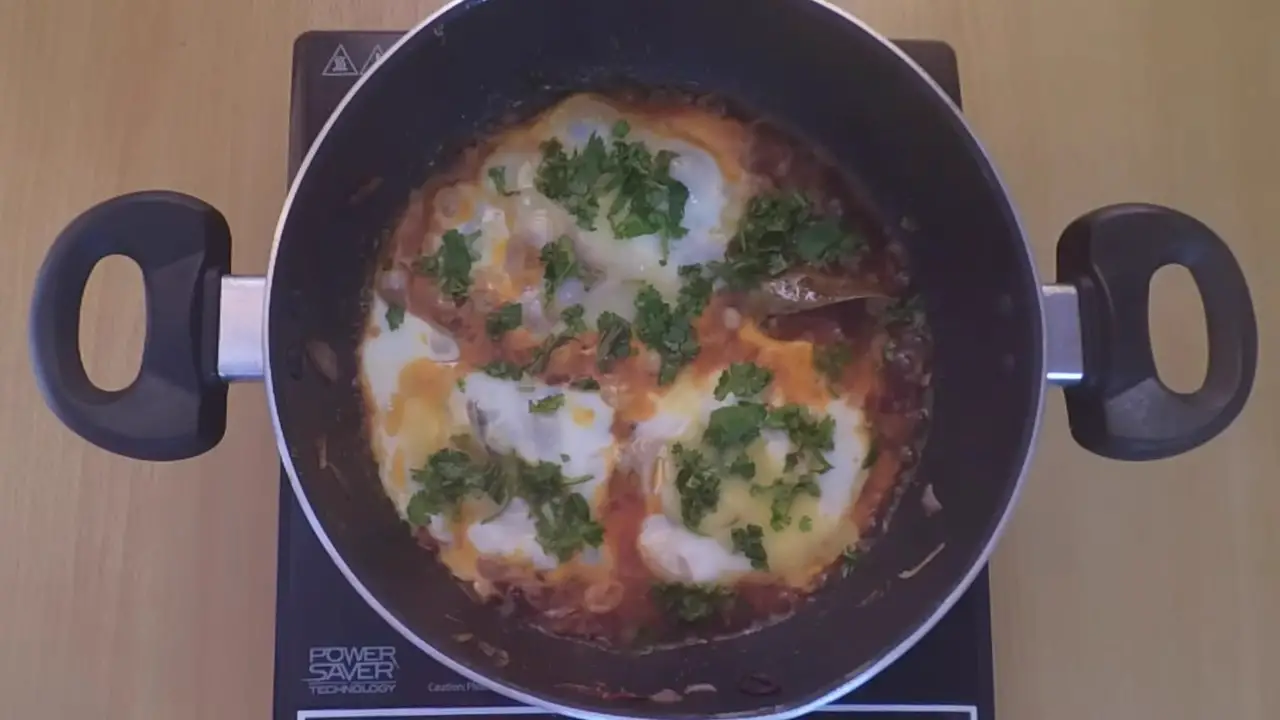
Garnish with chopped coriander leaves. Serve hot with chapatti or paratha.
Steps
Heat oil in a wok and temper with bay leaf and cinnamon stick.
Add onion and fry till it is translucent in color.
Keep stirring in between the process.
Grind all the ingredients given under the table “Ingredients for paste” to make fine paste.
Add ground paste in the wok.
Add red chili, turmeric, salt and garam masala powder. Cook for 1-2 minutes on a medium to low flame.
Add 100 ml water and mix it well.
Crack eggs in the wok, don’t mix it.
Cook covered on a low flame for 8-10 minutes or till the eggs cook properly and oil shows separately.
The egg pyaza is ready to serve.
Garnish with chopped coriander leaves. Serve hot with chapatti or paratha.
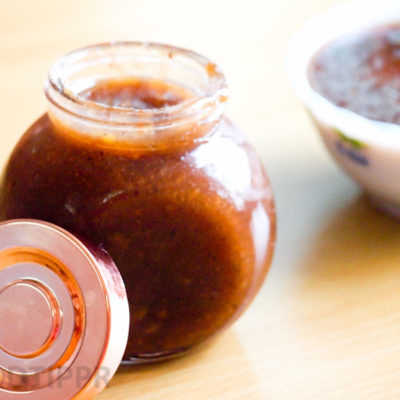
Check out the recipe of the Imli ki Chutney / Tamarind Chutney. It is quite a must have an item with any Snack that is popular in the north of India.
Be it the Samosa, or the Pakora, or Aloo Tikki, Imli ki Chutney simply enhances the deliciousness of these already so delicious snacks.
At Foodtippr we share quite a lot of popular Indian Snacks, if you are looking to make them at home, it is highly recommended that you prepare this Imli ki chutney in advance, and store it as it can be stored for longer period of times.
This Imli ki chutney recipe is pretty simple and easy, simply follow the steps mentioned below and make it at home. Or watch the preparation video on our YouTube channel.
Check out the recipe of the Imli ki Chutney / Tamarind Chutney. It is quite a must-have an item with any Snack that is popular in the north of India.Be it the Samosa, or the Pakora, or Aloo Tikki, Imli ki Chutney simply enhances the deliciousness of these already so delicious snacks.At Foodtippr we share quite a lot of popular Indian Snacks, if you are looking to make them at home, it is highly recommended that you prepare this Imli ki chutney in advance, and store it as it can be stored for longer period of times.
Prep Time10 minutesmins
Cook Time10 minutesmins
Total Time20 minutesmins
Course: Breakfast, Snack
Cuisine: Indian
Keyword: chutney, imli
Ingredients
100-gramTamarind
1cupSugar
8Dry dates
1/2tspRed chili powder
1tspor to taste Salt
200mlWater
Instructions
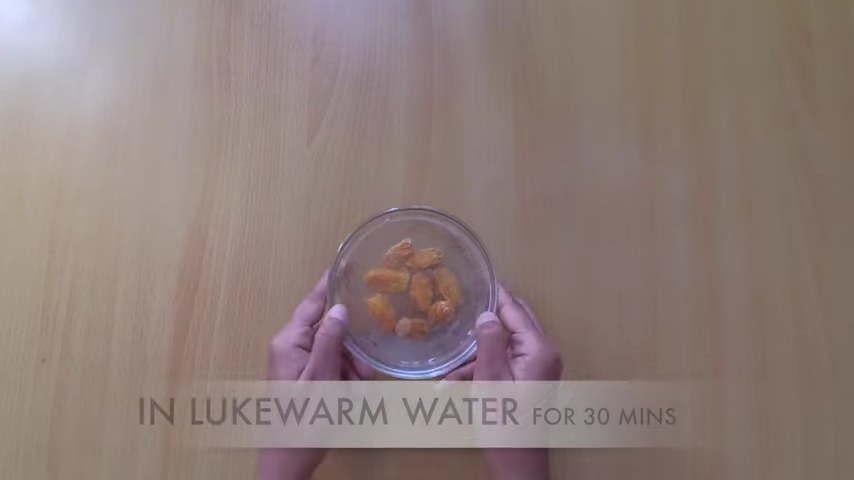
Soak tamarind in Luke-warm water for half an hour.
Soak dry dates in Luke-warm water for half an hour.
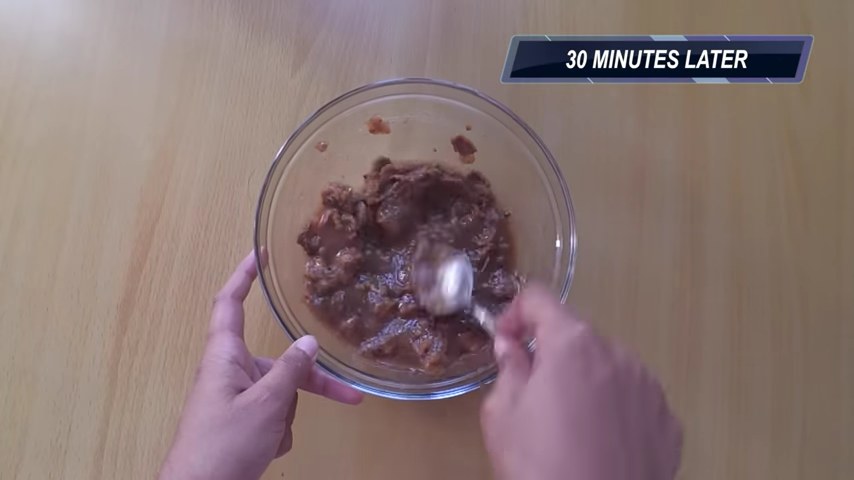
Mix it well, the soaked tamarind with a spoon.
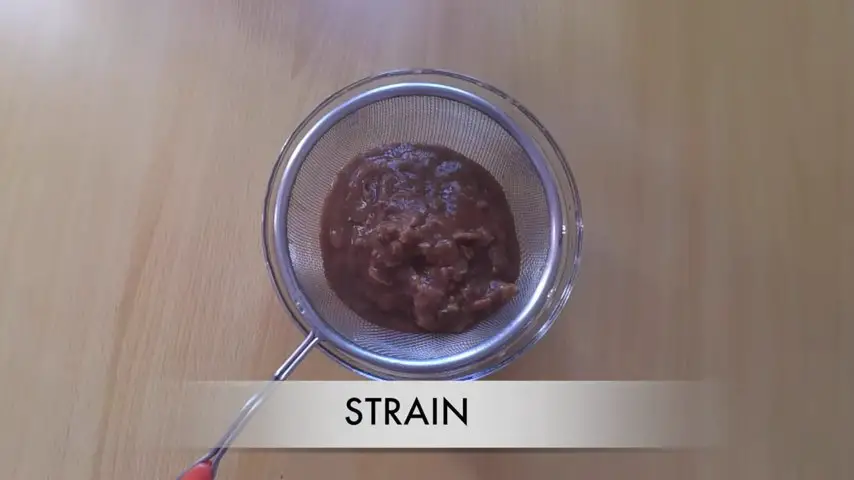
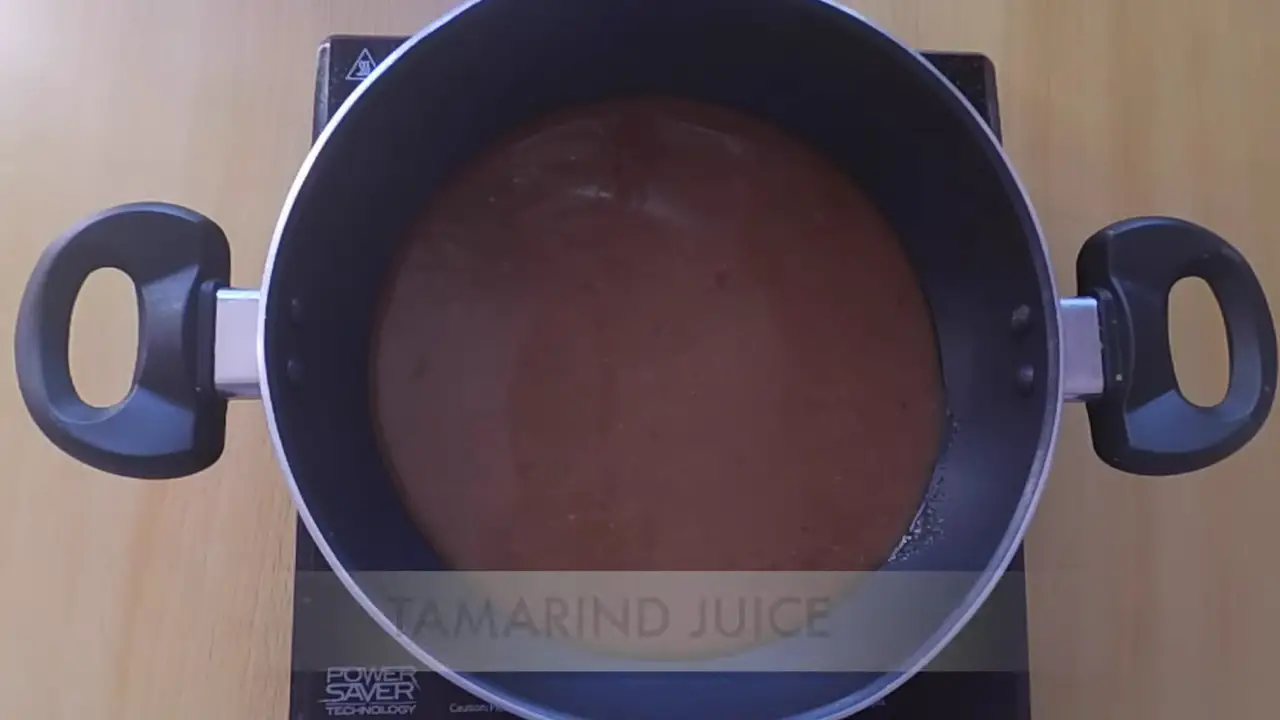
Strain it using a strainer. Discard the seeds and rough parts and keep the juice aside.
Now, we have got the tamarind juice.
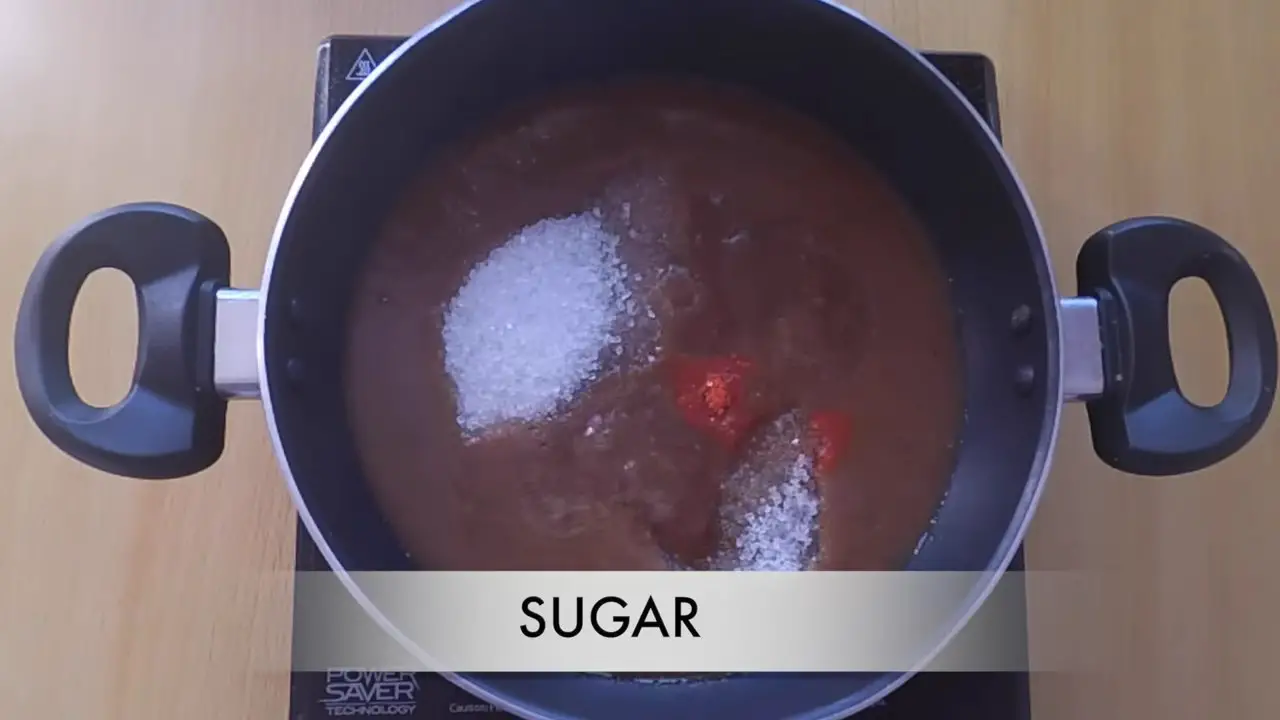
Add tamarind juice in a wok/pan.
Add sugar, red chili powder, water, and salt. Mix it well and cook for 6-7 minutes on medium flame.
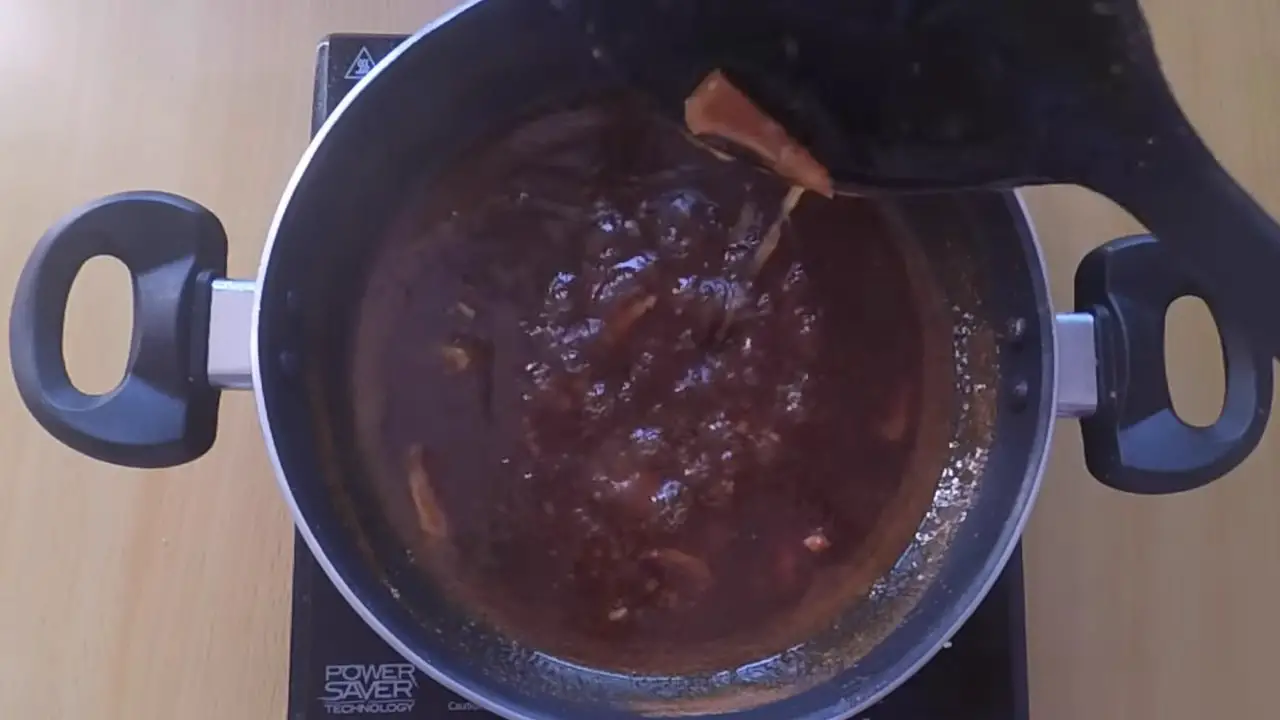
Remove the seeds of the dry dates and chop them finely. Add it to the wok. Cook for another 1-2 minutes. Switch off the stove. Let it cool at room temperature. Pour it in an airtight container and keep it in the fridge for later use.
Steps
Soak tamarind in Luke-warm water for half an hour.
Soak dry dates in Luke-warm water for half an hour.
Mix it well, the soaked tamarind with a spoon.
Strain it using a strainer. Discard the seeds and rough part and keep the juice aside.
Now, we have got the tamarind juice.
Add tamarind juice in a wok/pan.
Add sugar, red chili powder, water, and salt. Mix it well and cook for 6-7 minutes on medium flame.
Remove the seeds of the dry dates and chop it finely. Add it to the wok. Cook for another 1-2 minutes. Switch off the stove. Let it cool at the room temperature. Pour it in a airtight container and keep it in the fridge for later use.
Presenting the recipe of Banana Muffins. These Banana Muffins are easy to bake. If it’s your first attempt at baking or if you are not yet confident, this Banana Muffins recipe is one of the recipes you can get started with as it quite a straightforward recipe.
I previously shared the recipe of Muffins so this one compliments it, we are slowly adding more baking recipes to the blog. You can check it out here.
Follow the step by step recipe mentioned below or simply watch the video embedded below to learn how to easily make Banan Muffins at home. I am sure you are going to like it.
Also, make sure you bookmark this website to keep coming back as we post new recipes almost every day.
Presenting the recipe of Banana Muffins. These Banana Muffins are easy to bake. If it’s your first attempt at baking or if you are not yet confident, this Banana Muffins recipe is one of the recipes you can get started with as it quite a straightforward recipe.I previously shared the recipe of Muffins so this one compliments it, we are slowly adding more baking recipes to the blog. You can check it out here.Follow the step by step recipe mentioned below or simply watch the video embedded below to learn how to easily make Banan Muffins at home. I am sure you are going to like it.Also, make sure you bookmark this website to keep coming back as we post new recipes almost every day.
Prep Time10 minutesmins
Cook Time35 minutesmins
Total Time45 minutesmins
Course: Baking, cake, Dessert, Snack
Cuisine: Indian
Keyword: banana, Cake, muffin
Servings: 6
Ingredients
1cupAll-purpose flour
1/2cupSugar
1tbspBaking powder
1tspVanilla essence
1/2tspSalt
1tspVanilla extract
1/8tspCooking soda
1/2cupVegetable
2Banana
3egg Egg whites
250mlMilk
Instructions
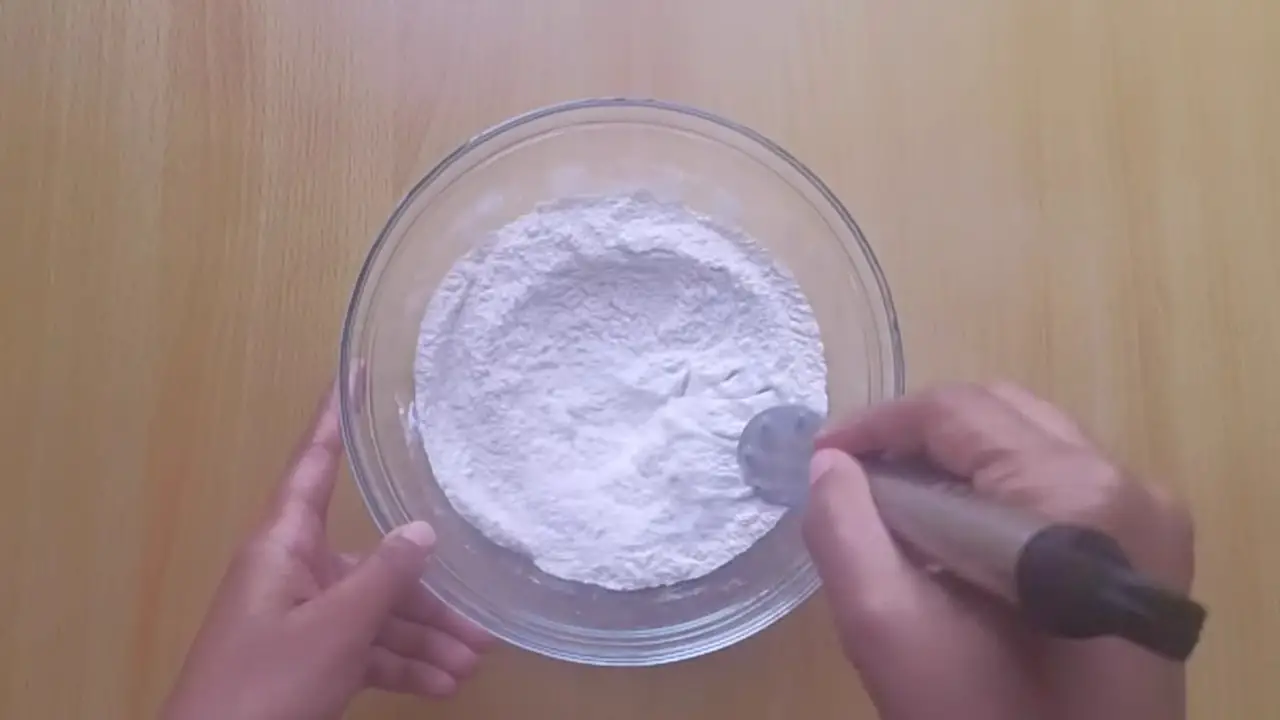
In a mixing bowl, add all-purpose flour, baking powder, cooking soda, salt, and vanilla extract.
Mix it well, keep it aside.
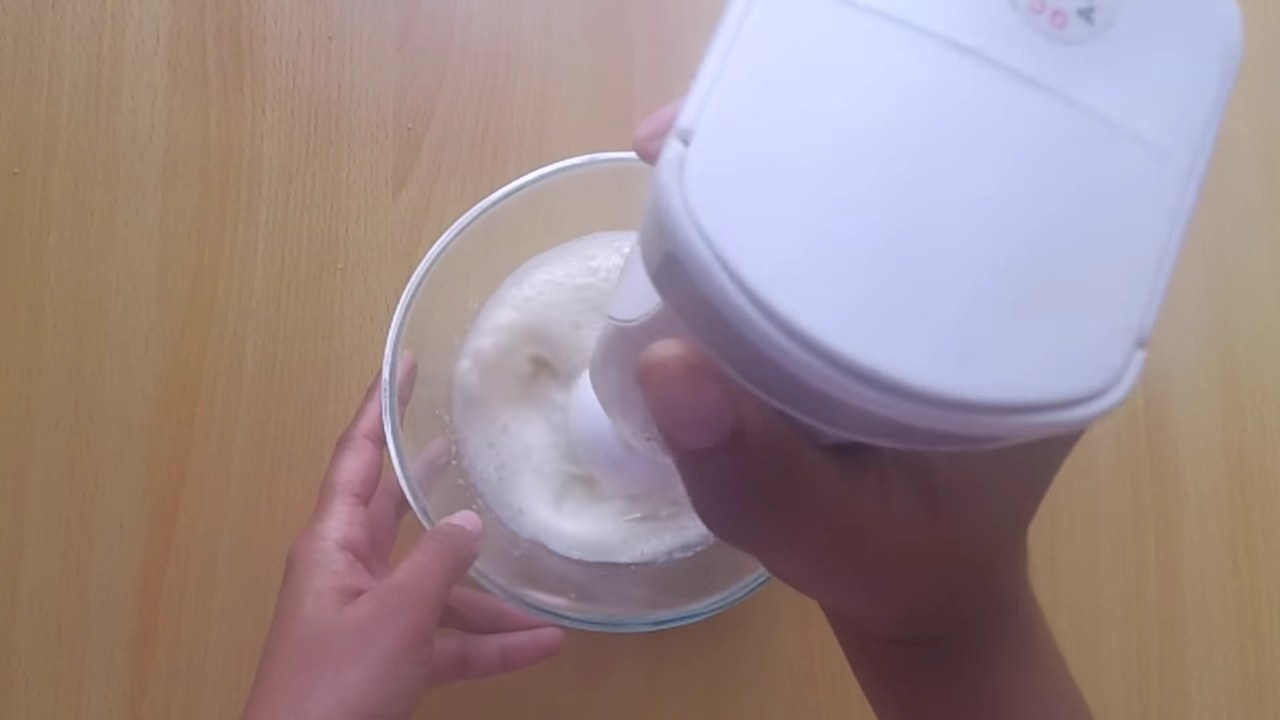
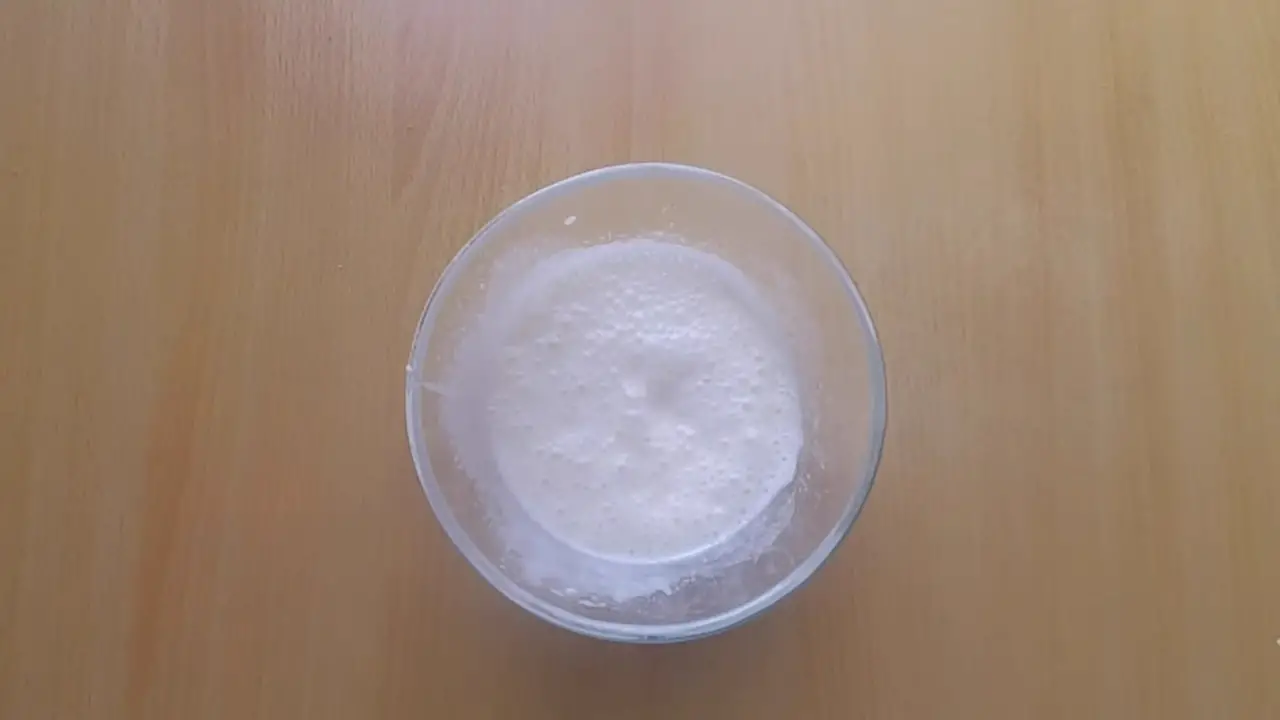
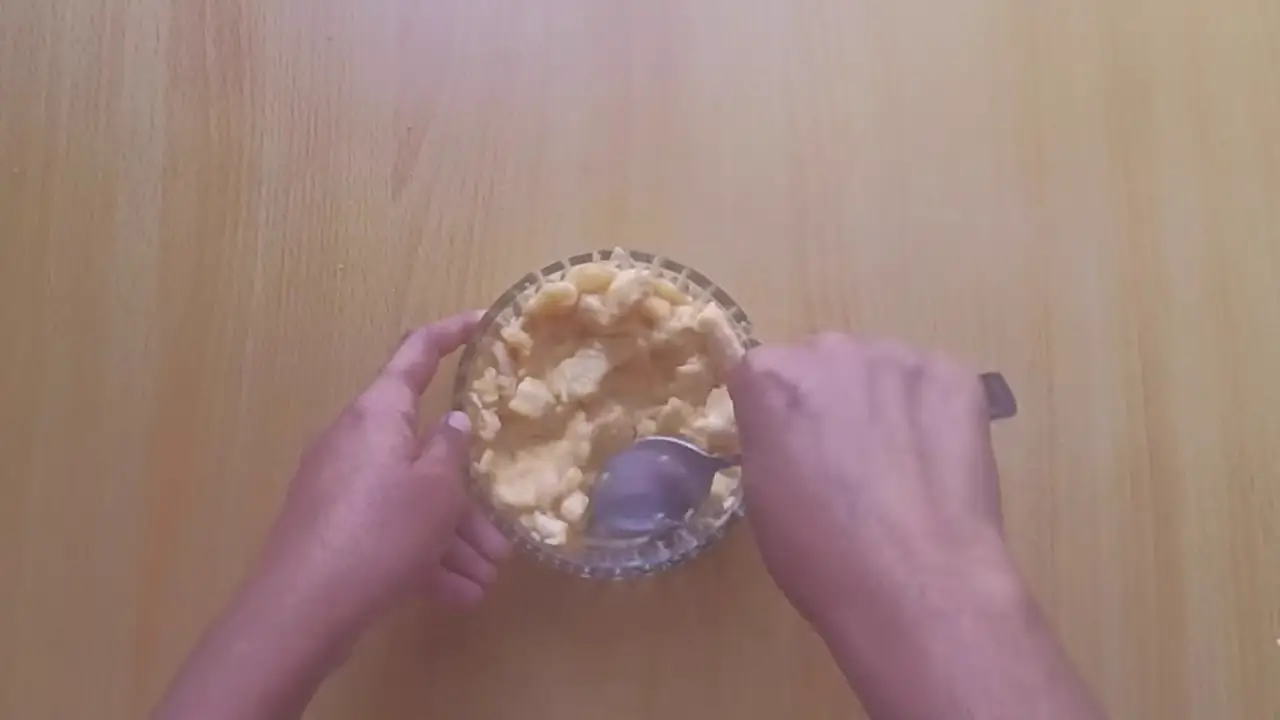
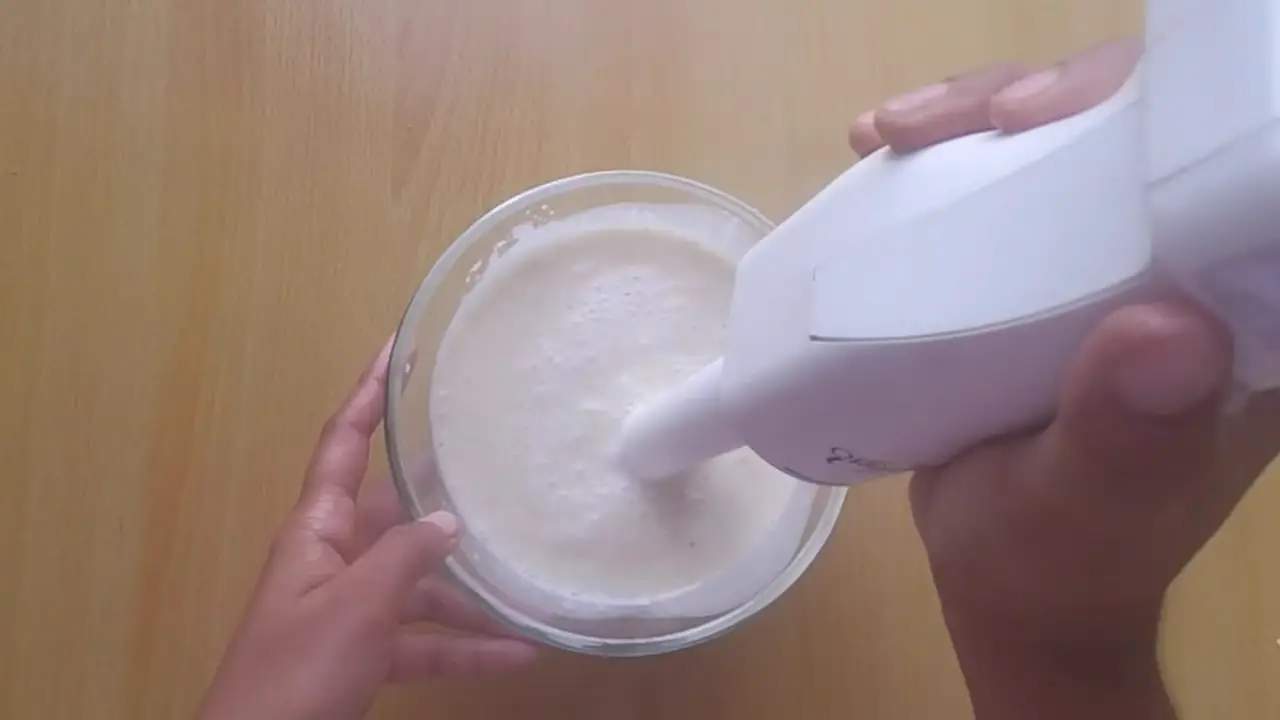
In a separate bowl, add egg whites, vanilla essence, vegetable oil, and sugar. Blend it well till the mixture is foggy.
Add milk and mix it well.
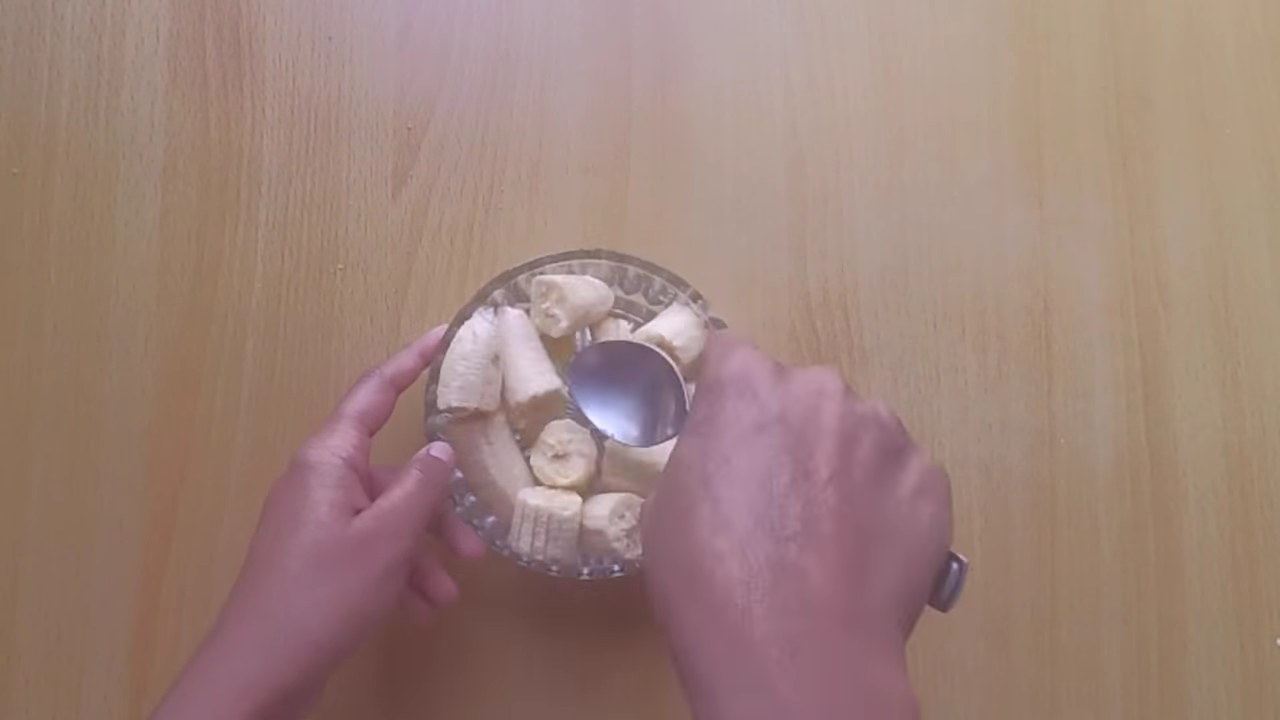
Peel off the skin of a banana and mash it with using a fork or spoon.
Now, the banana is mashed.
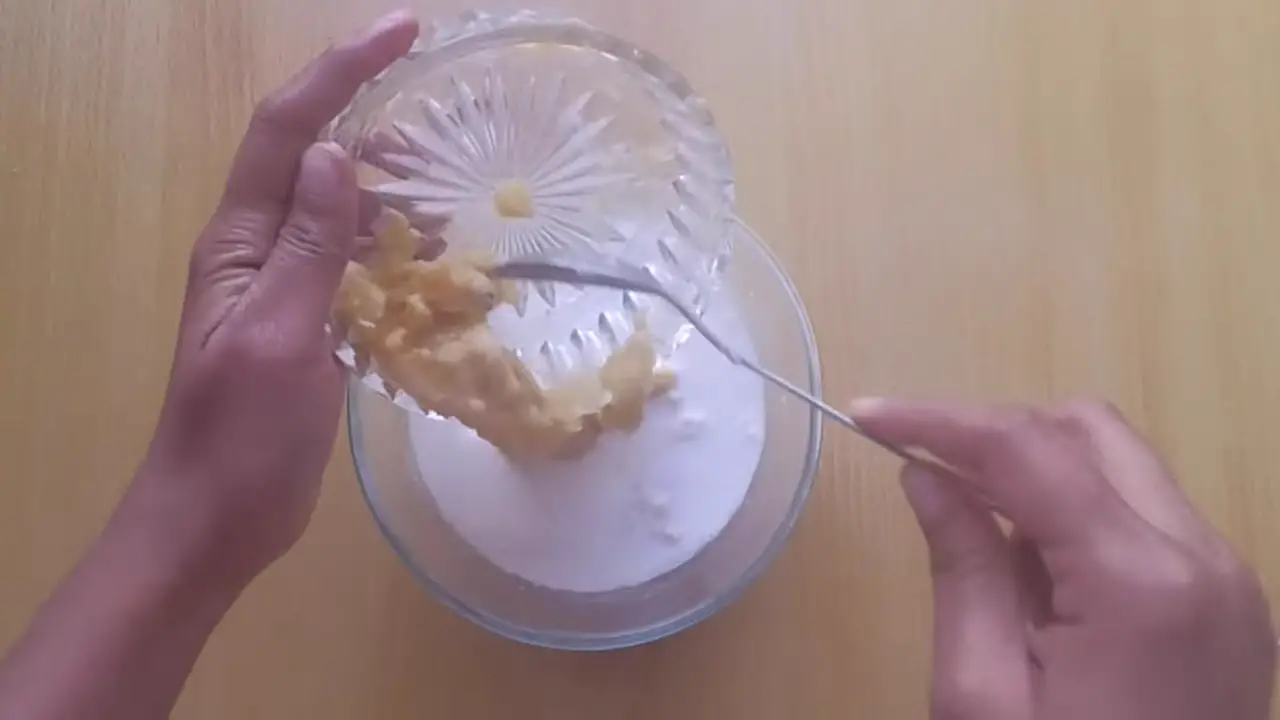
Add mashed banana to the liquid mixture.
Blend it again till the mixture is foggy.
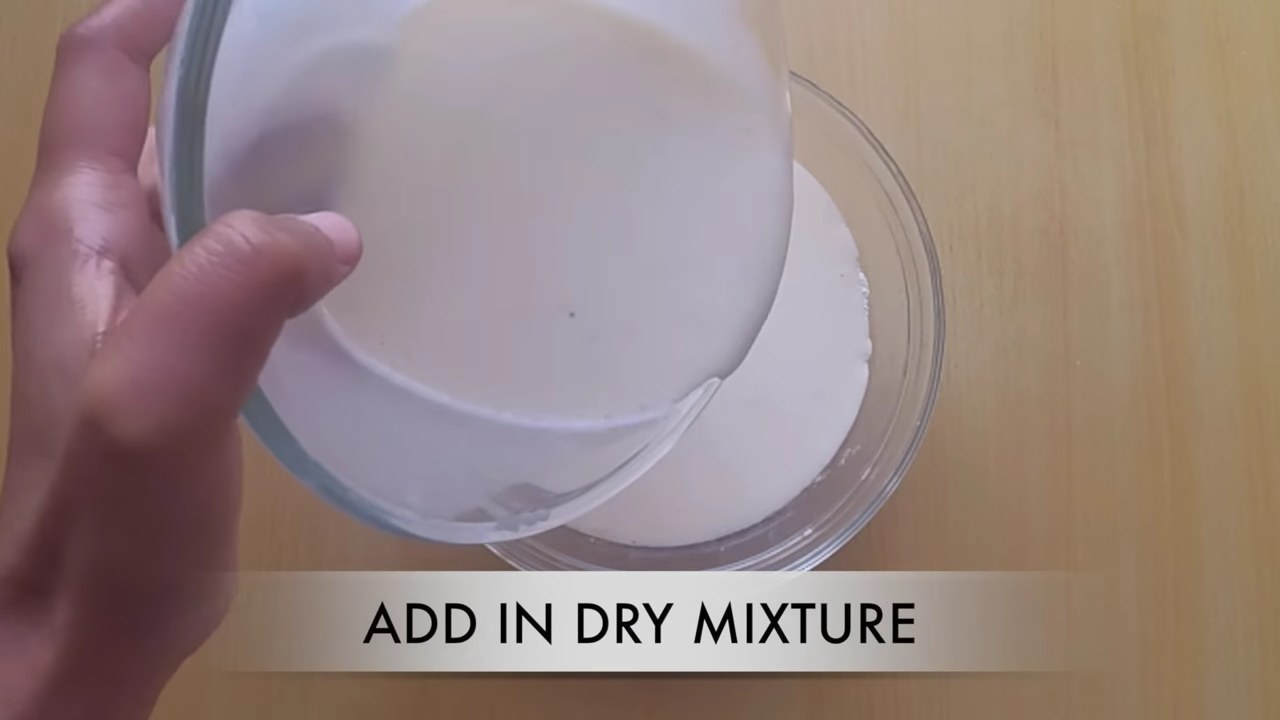
Add liquid mixture to the dry mixture and mix it well. Preheat microwave oven at 170C.
Grease the muffin mold and put 3 tbsp of batter in each mold.
Bake it at 170C for 25 Minutes. Delicious Banana muffin is ready to serve.
Steps
In a mixing bowl, add all purpose flour, baking powder, cooking soda, salt and vanilla extract.
Mix it well, keep it aside.
In a separate bowl, add egg whites, vanilla essence, vegetable oil, and sugar. Blend it well till the mixture is foggy.
Add milk and mix it well.
Peel off the skin of a banana and mash it with using a fork or spoon.
Now, the banana is mashed.
Add mashed banana to the liquid mixture.
Blend it again till the mixture is foggy.
Add liquid mixture to the dry mixture and mix it well. Preheat microwave oven at 170C.
Grease the muffin mold and put 3 tbsp of batter in the each mold.
Bake it at 170C for 25 Minutes. Delicious Banana muffin is ready to serve.
If you love Paneer like we do, then I recommend you check out our Paneer section, which is some of the most amazing recipes in the world, and more are being added regularly.
Also, here is a way to make Paneer at home, the Paneer is made from Milk, which is quite a known fact to everyone, even those who know nothing about cooking know this.
But what exactly is the process? it is not known to everyone.
So, I decided to write about it here on the blog, because we make so many recipes, we want our Paneer to be fresh, good quality and always available. What is better than having prepared it at home. It’s cool. Check it out.
Below is the step by step process of preparing Paneer at Home or shall we say extracting Paneer from Milk. Or watch the video.
f you love Paneer as we do, then I recommend you check out our Paneer section, which is some of the most amazing recipes in the world, and more are being added regularly.Also, here is a way to make Paneer at home, the Paneer is made from Milk, which is quite a known fact to everyone, even those who know nothing about cooking know this.Check out Paneer Recipes by FoodtipprBut what exactly is the process? it is not known to everyone.
So, I decided to write about it here on the blog, because we make so many recipes, we want our Paneer to be fresh, good quality and always available. What is better than having prepared it at home. It’s cool. Check it out
Prep Time5 minutesmins
Cook Time10 minutesmins
Total Time15 minutesmins
Course: Appetizer, Breakfast, Snack
Cuisine: Indian
Keyword: cheese, cottagecheese, paneer
Servings: 2
Ingredients
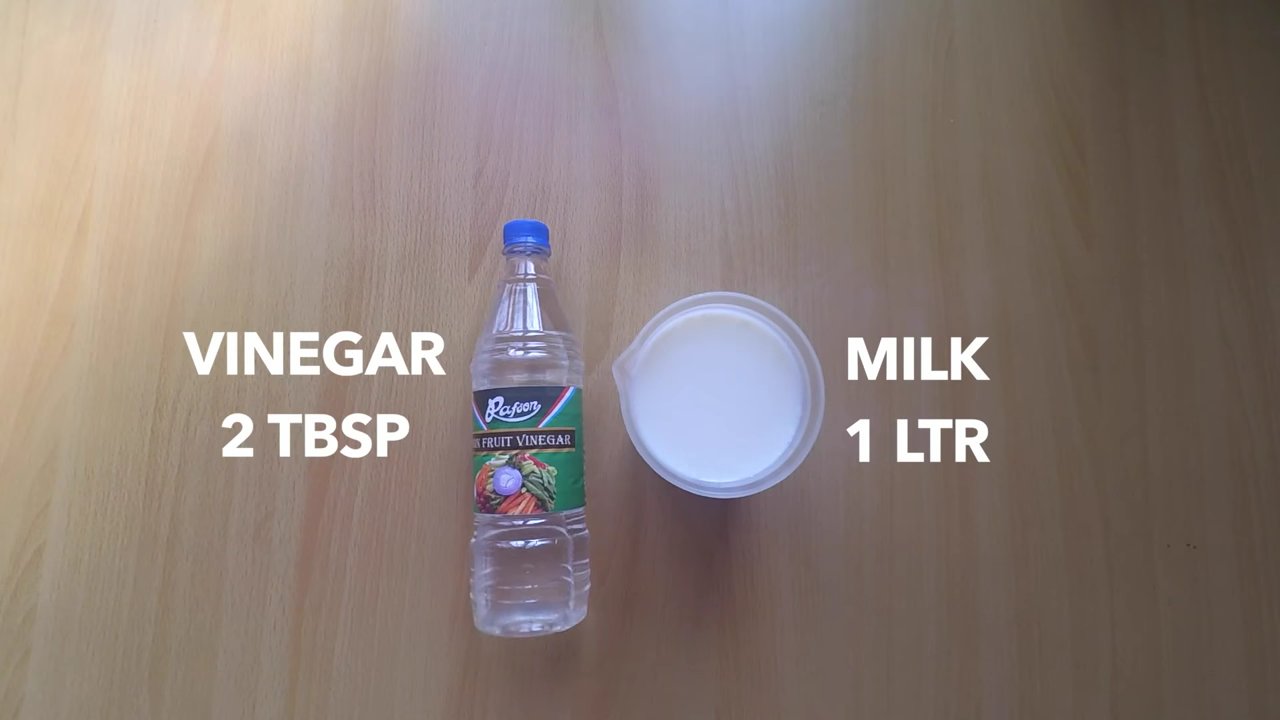
1literMilk
2tbspWhite Vinegar
1pieceMuslin cloth
Instructions
Keep the ingredients ready for paneer.
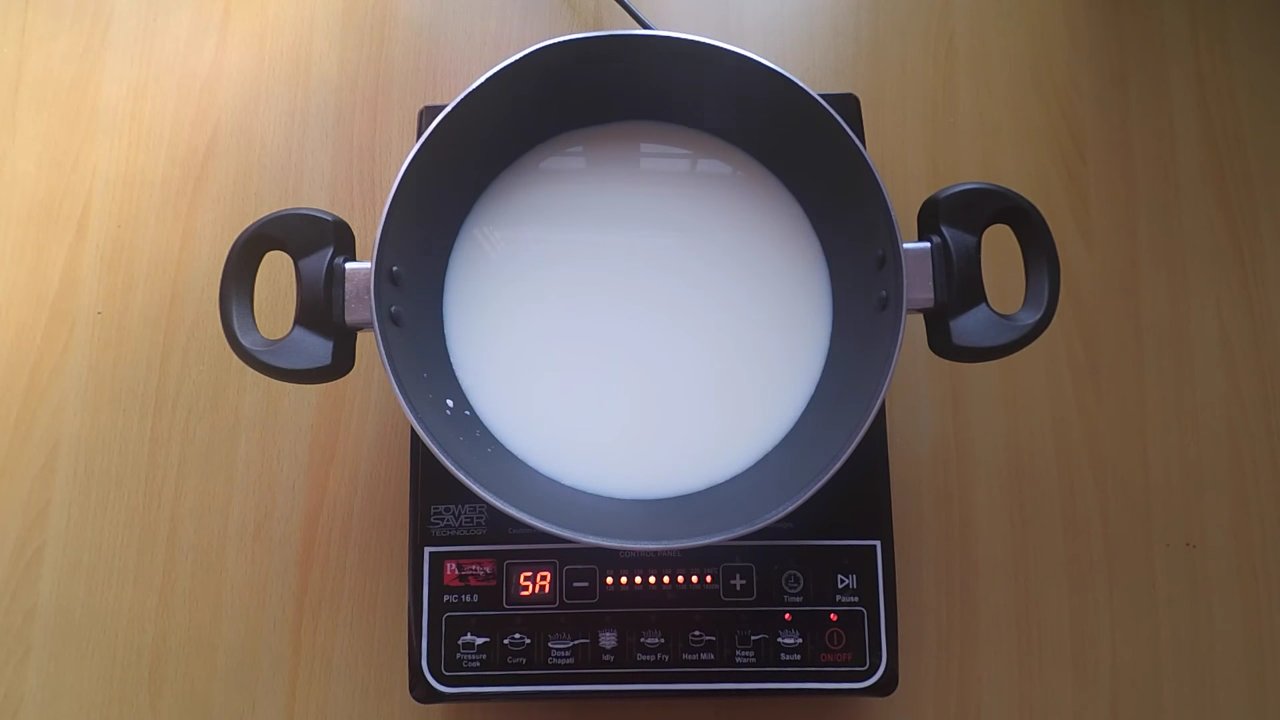
In a wok, add milk and boil it.
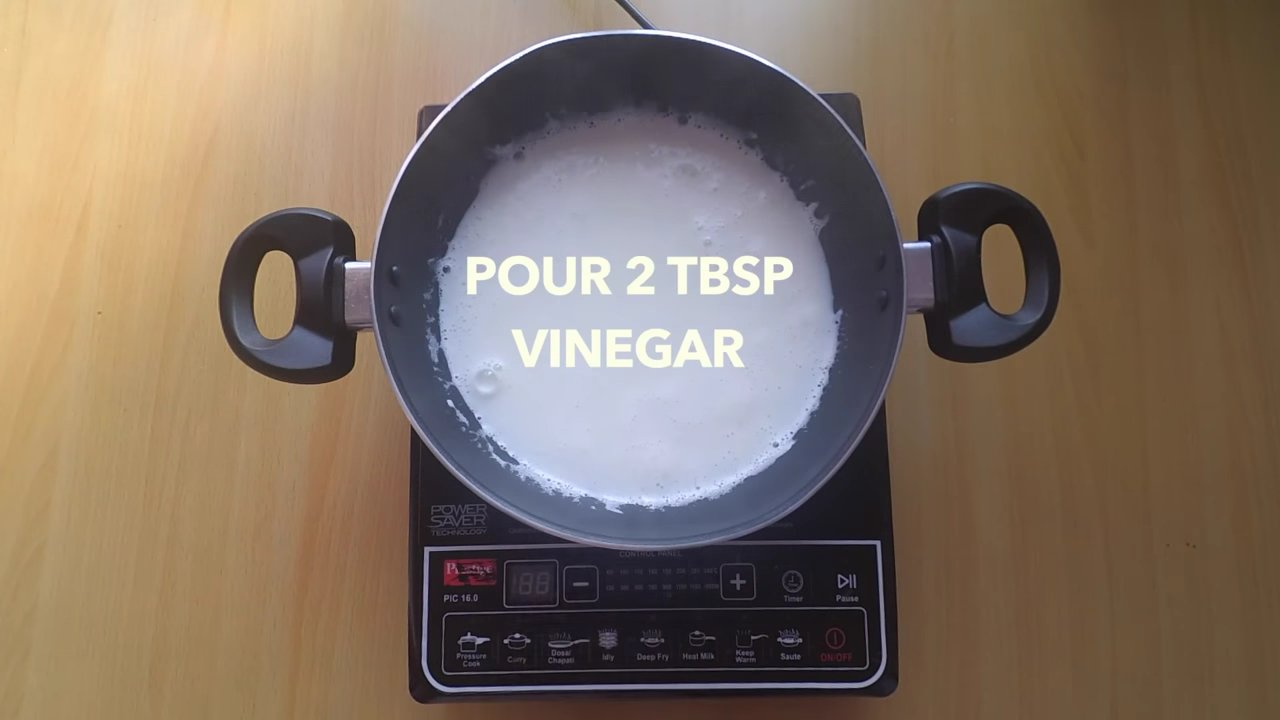
Switch off the flame. Add 2 tbsp vinegar and mix it well. You will notice the milk is started curdling after 30 seconds to 1 minute. You can add 1 more tbsp vinegar if need.
Notice, the milk curdles.
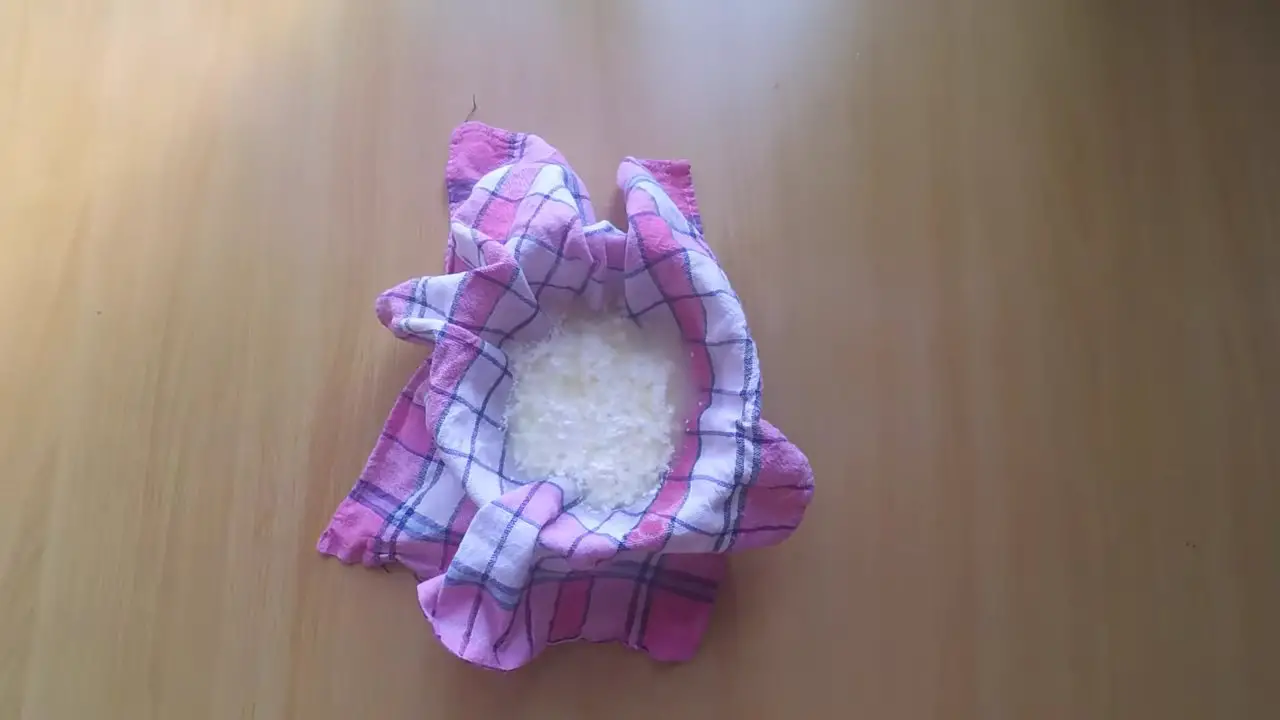
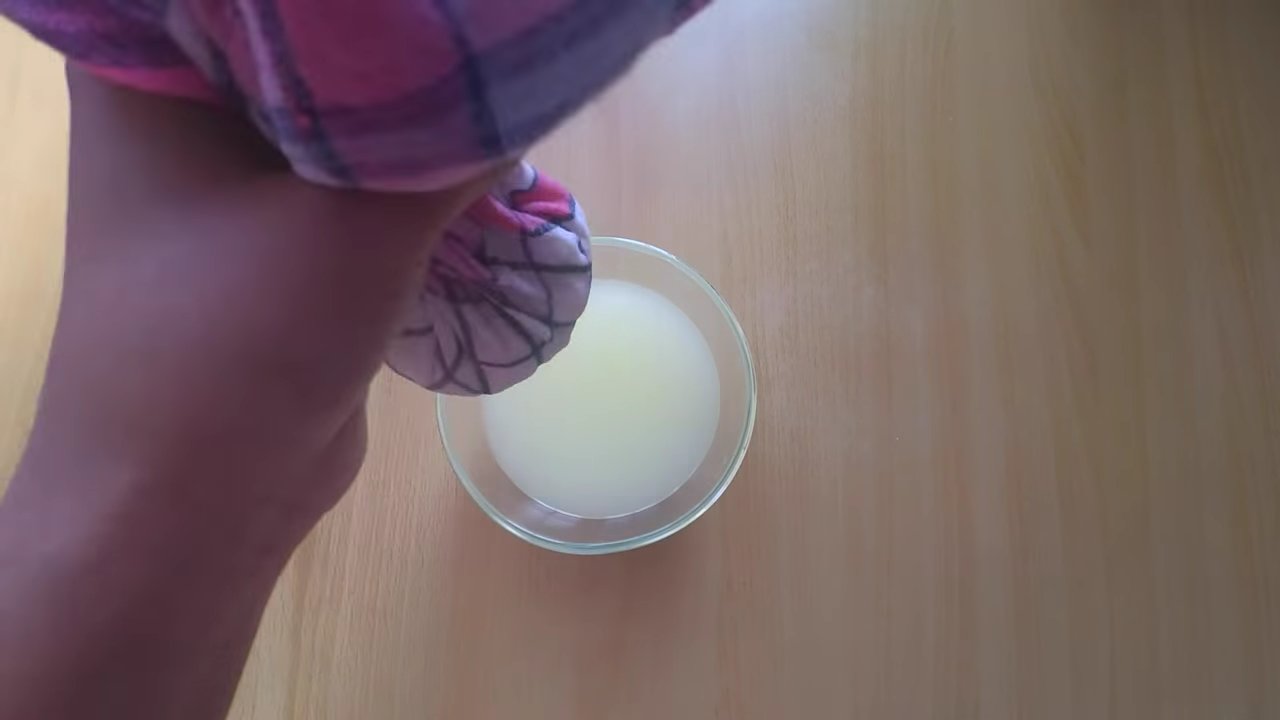
Strain it in a muslin cloth and, and store the liquid, because the liquid is healthy and you can use it for making the dough or soup.
Squeeze the water completely.
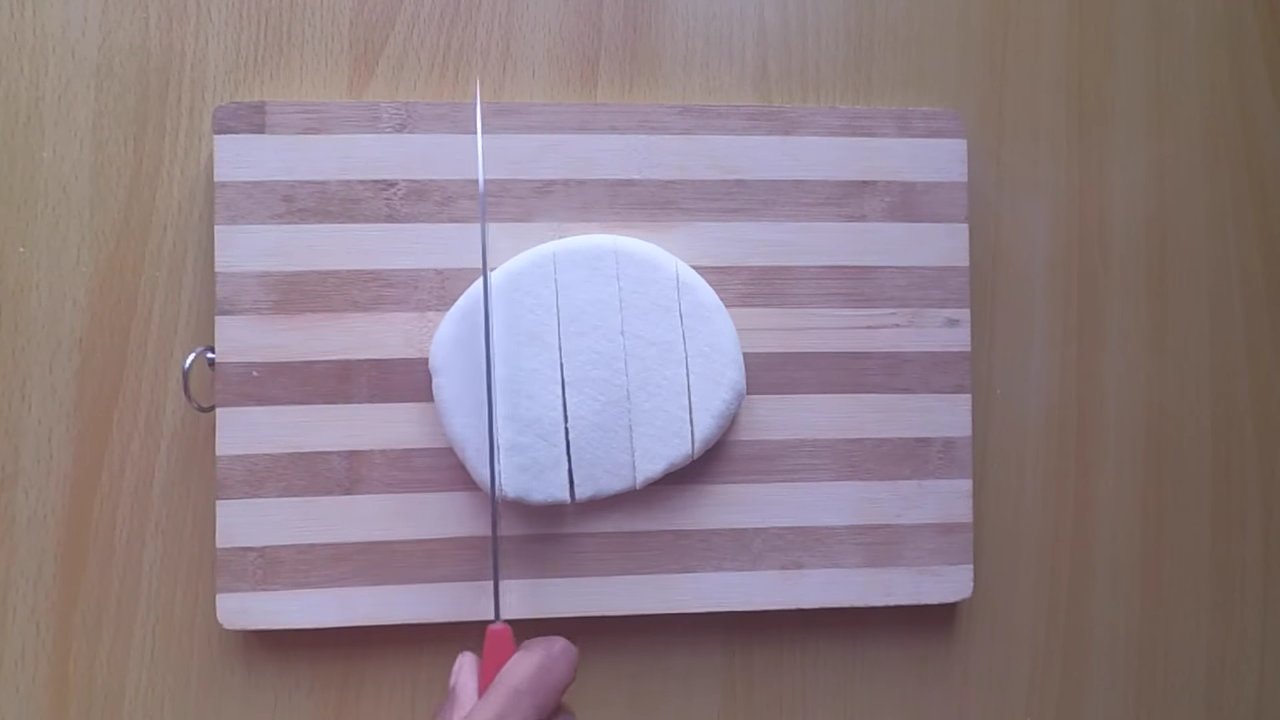
Flatten it and place under a heavy thing for 1 hour.
Delicious homemade fresh paneer is ready.
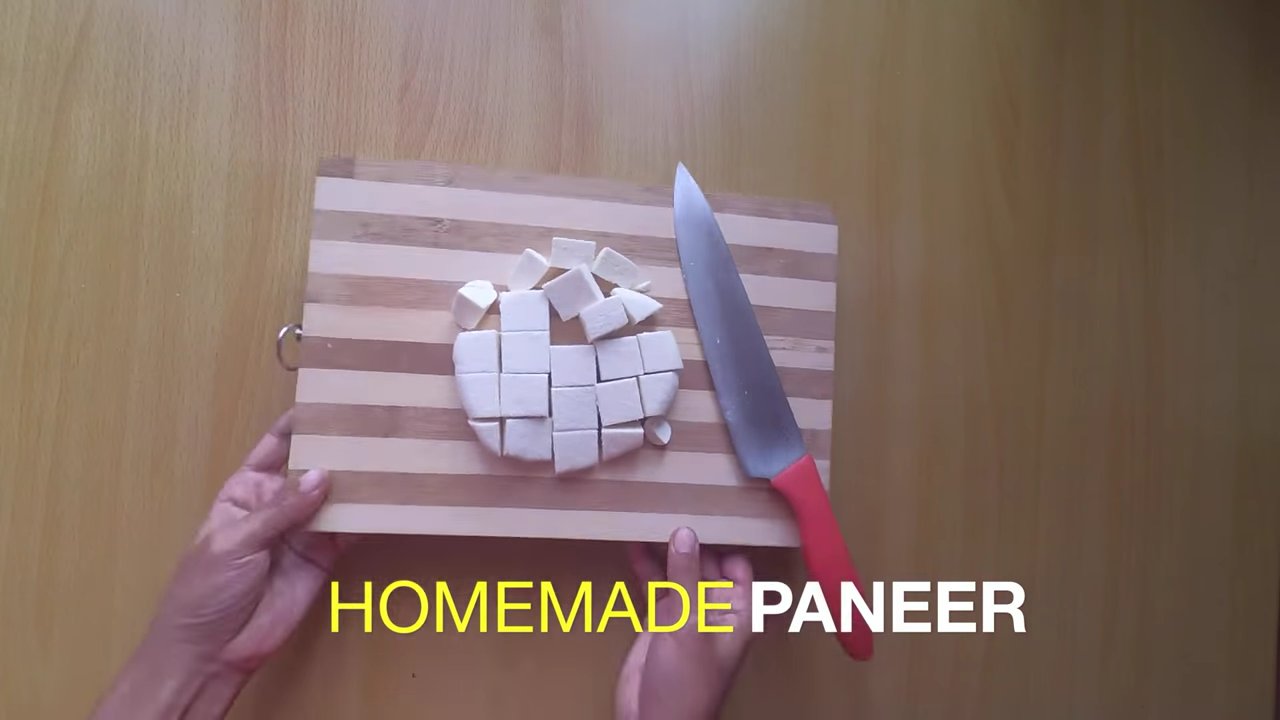
Cut it into a square shape.
You can use fresh paneer for any type of curry or paratha. Enjoy!!
It’s delicious and fresh. Yummy
Steps
Keep the ingredients ready for paneer.
In a wok, add milk and boil it.
Switch off the flame. Add 2 tbsp vinegar and mix it well. You will notice the milk is started curdling after 30 seconds to 1 minute. You can add 1 more tbsp vinegar if need.
Notice, the milk curdles.
Strain it in a muslin cloth and , and store the liquid, because the liquid is healthy and you can use for making the dough or soup.
Squeeze the water completely.
Flatten it and place under a heavy thing for 1 hour.
Delicious homemade fresh paneer is ready.
Cut it into a square shape.
You can use fresh paneer for any type of curry or paratha. Enjoy!!
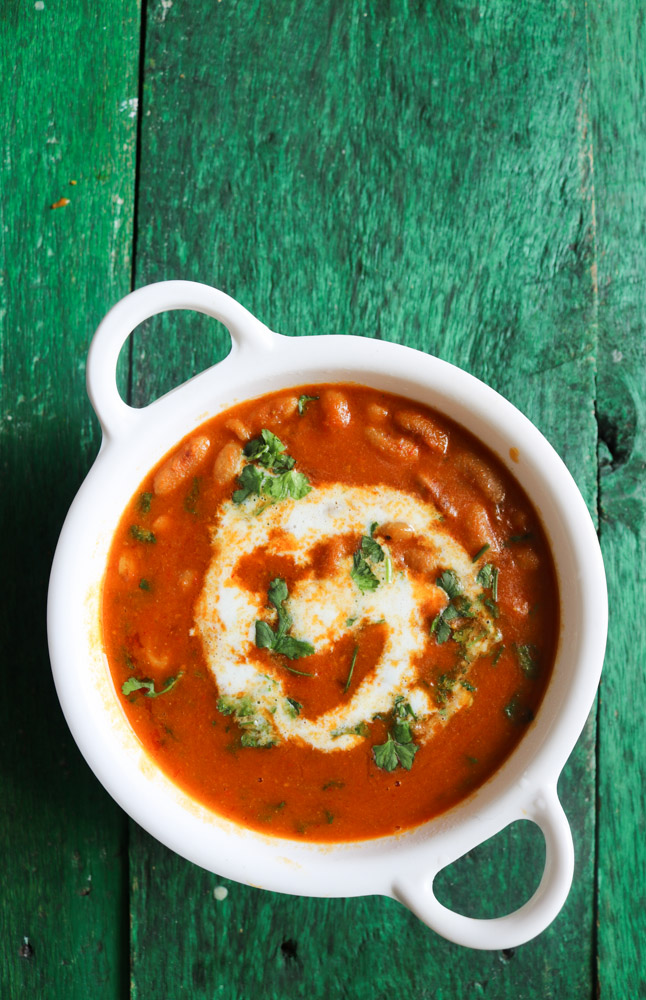
Check out the recipe of Rajma Curry. It’s a spicy one that goes well with both Roti as well as Rice. Recipes of the same are available on foodtippr.com.
Rajma Curry or the Kidney Beans Curry is a popular dish that is popular in Jammu & Kashmir and Himachal Pradesh region. In fact, the best Rajma I had was in Jammu & Kashmir on my way to Kistwar.
I tried to make this one similar to that. I hope you guys will like it.
Check out the step by step process mentioned below or watch video preparation.
Check out the recipe of Rajma Curry. It’s a spicy one that goes well with both Roti as well as Rice. Recipes of the same are available on foodtippr.com.Rajma Curry or the Kidney Beans Curry is a popular dish that is popular in Jammu & Kashmir and Himachal Pradesh region. In fact, the best Rajma I had was in Jammu & Kashmir on my way to Kistwar.I tried to make this one similar to that. I hope you guys will like it.
Prep Time10 minutesmins
Cook Time20 minutesmins
Total Time30 minutesmins
Course: dinner, lunch, Main Course
Cuisine: Indian
Keyword: curry, Kidneybean, rajma
Servings: 4
Ingredients
1cupRajmaKidney beans
1/2cupTomatoes
1/3cupOnion
1/4cupCoriander leaves
to taste Salt
1teaspoonRed chili powder
1/2teaspoonTurmeric powder
2Bay leaf
1/2inchCinnamon stick
1/2cupVegetable oil
1Onion
1teaspoonCumin seeds
6-7Black Pepper
3Cloves
2Cardamom green
1/2inchCinnamon stick
1/2inchpiece Ginger
6-7clovesGarlic
1/2pieceCardamom brown
Instructions
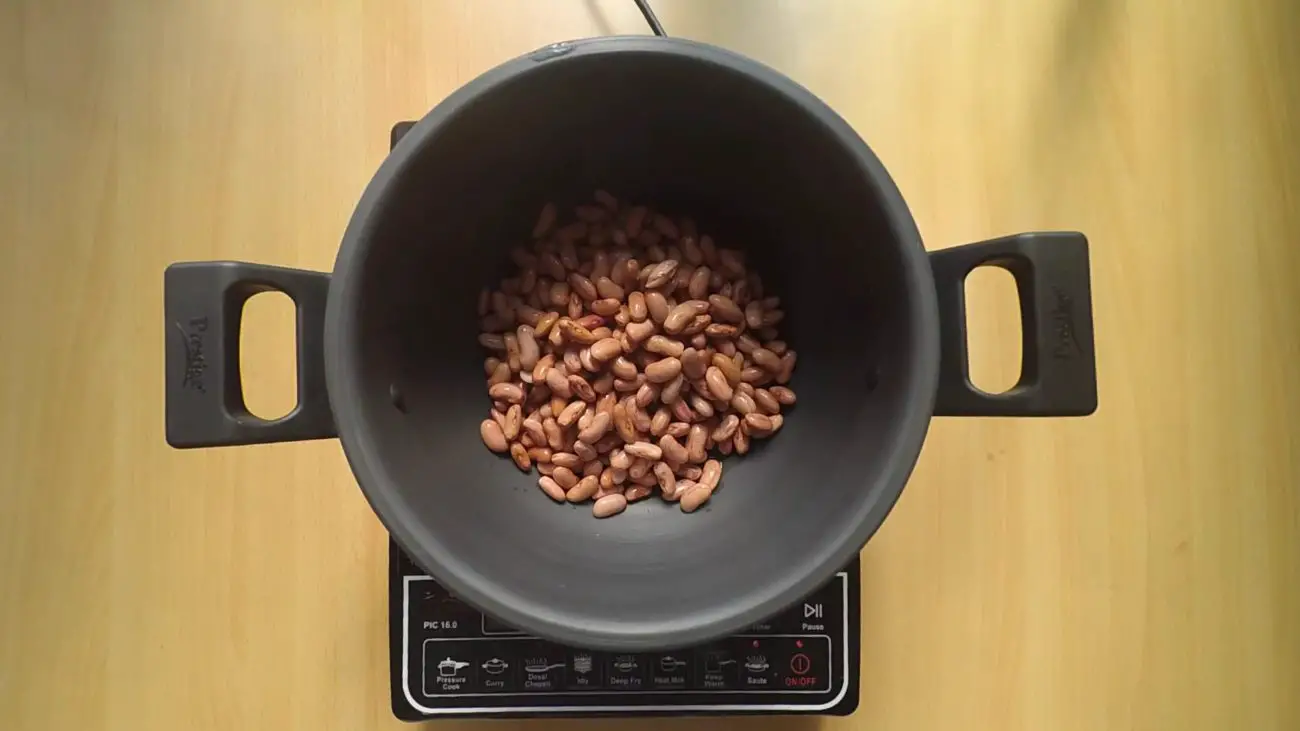
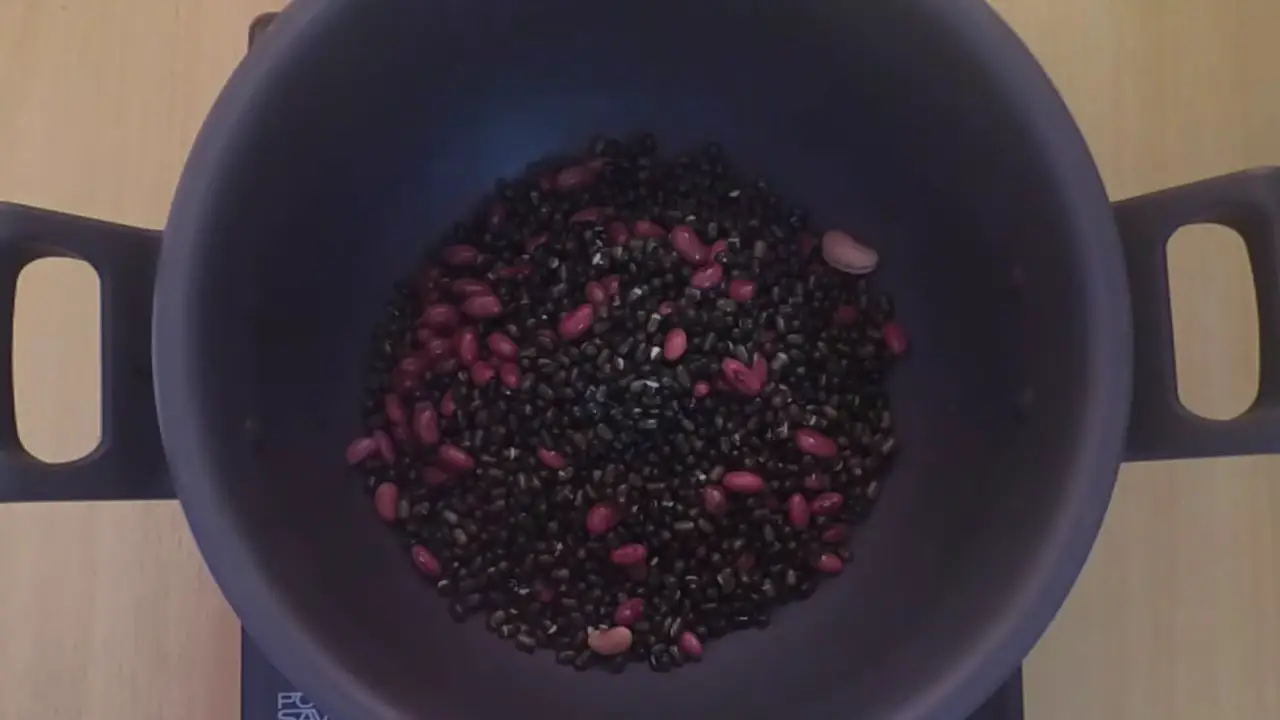
Clean, wash, and soak rajma overnight. In a pressure cooker, add soaked rajma.
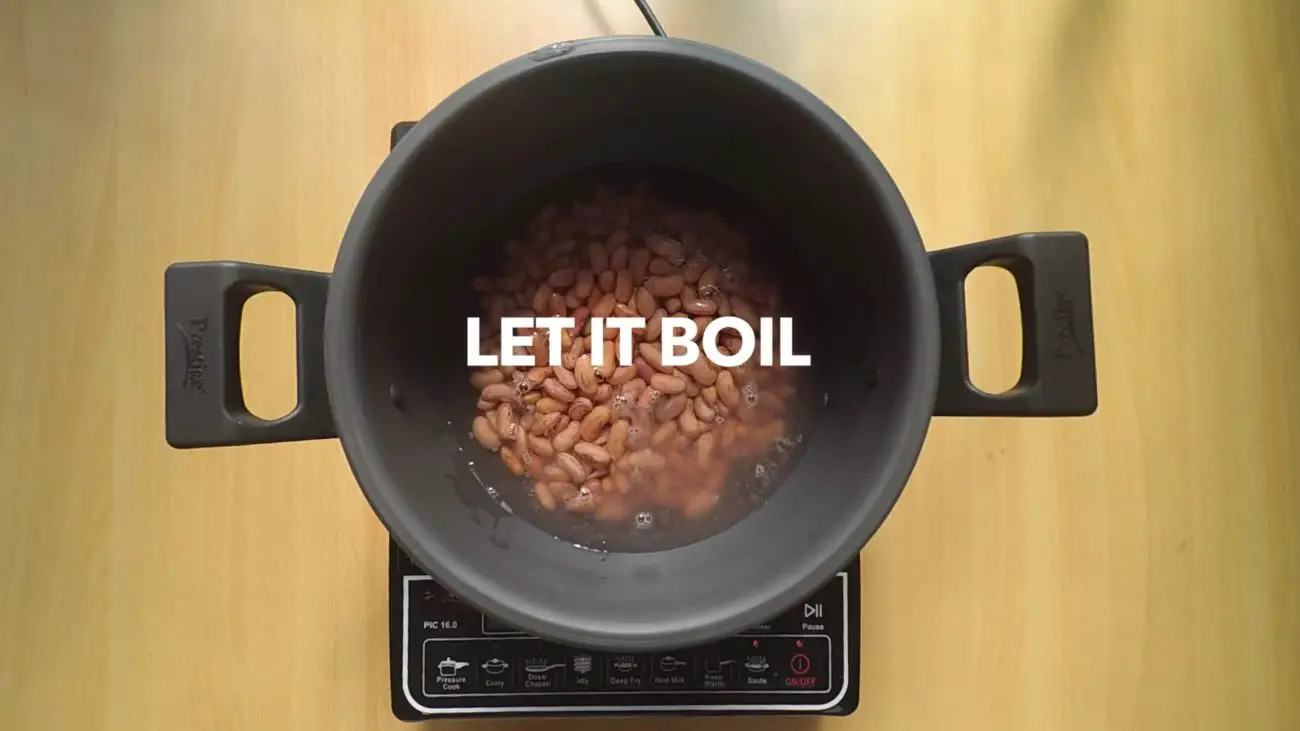
Add salt and 1-1.5 cup water and pressure cook it on a high flame for one whistle, then keep the flame low and cook for 6-7 minutes.
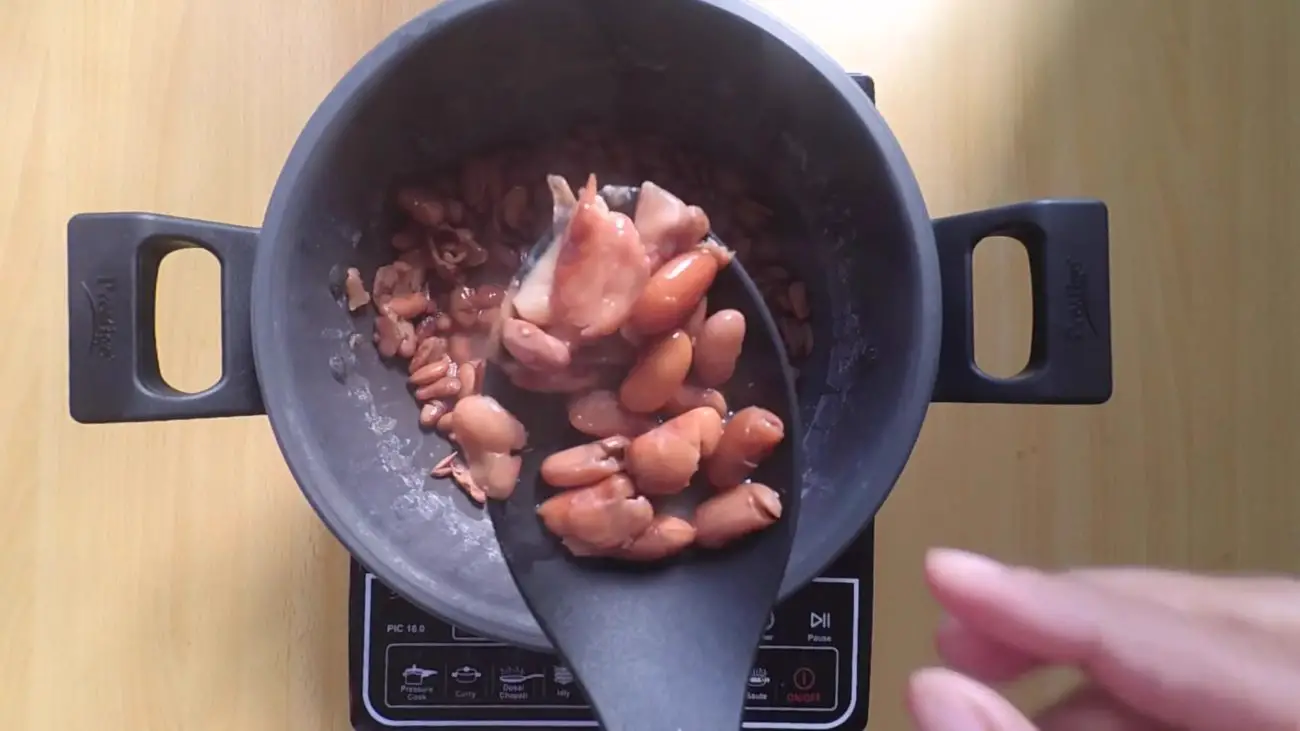
Open cooker, now the rajma has cooked properly.
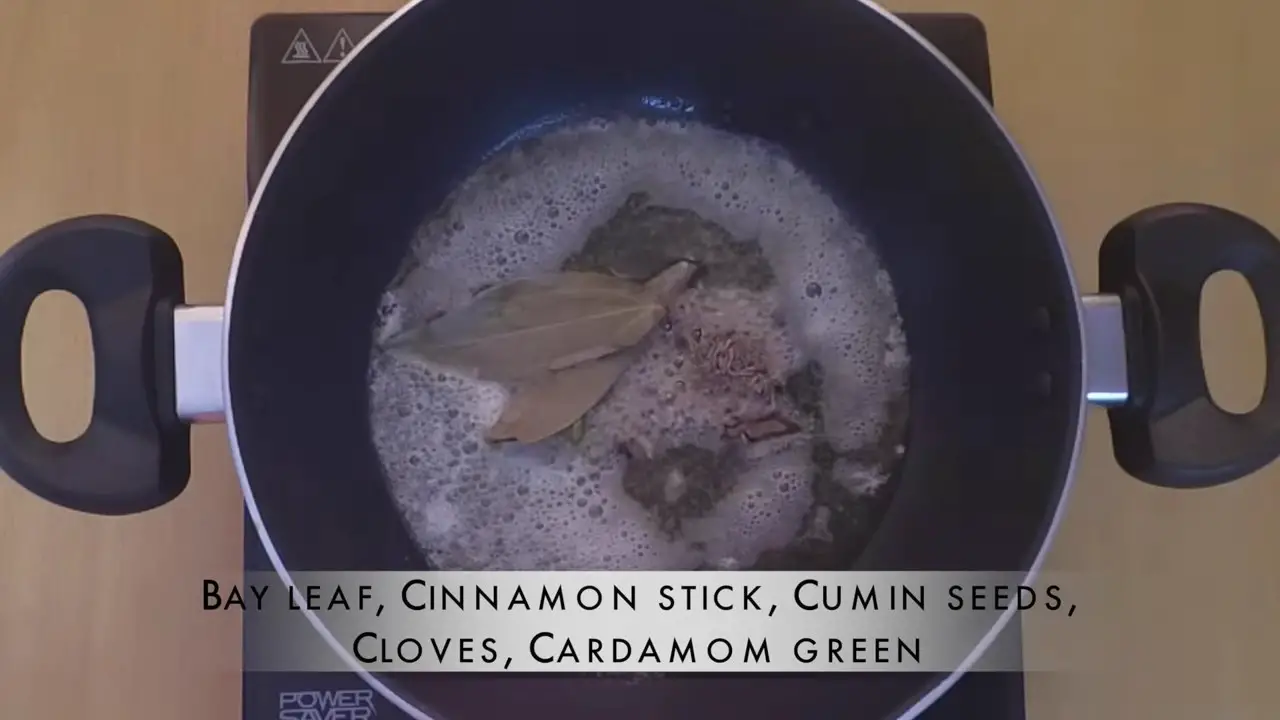
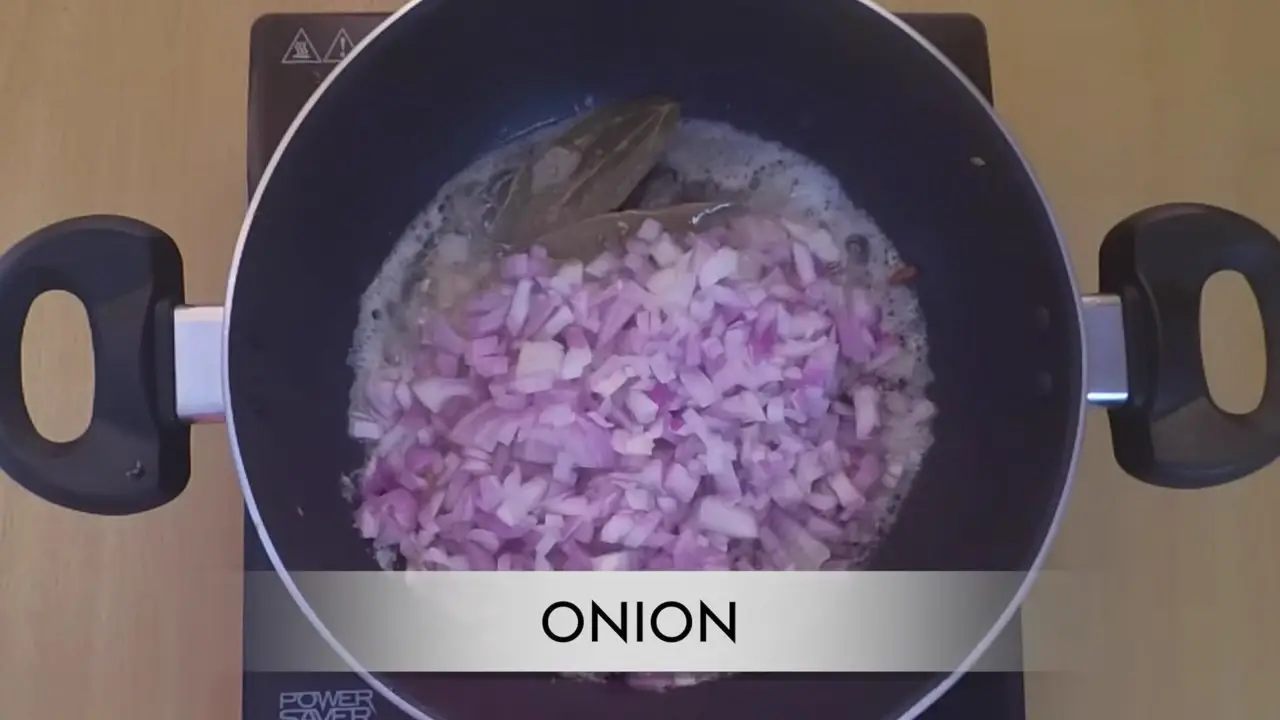
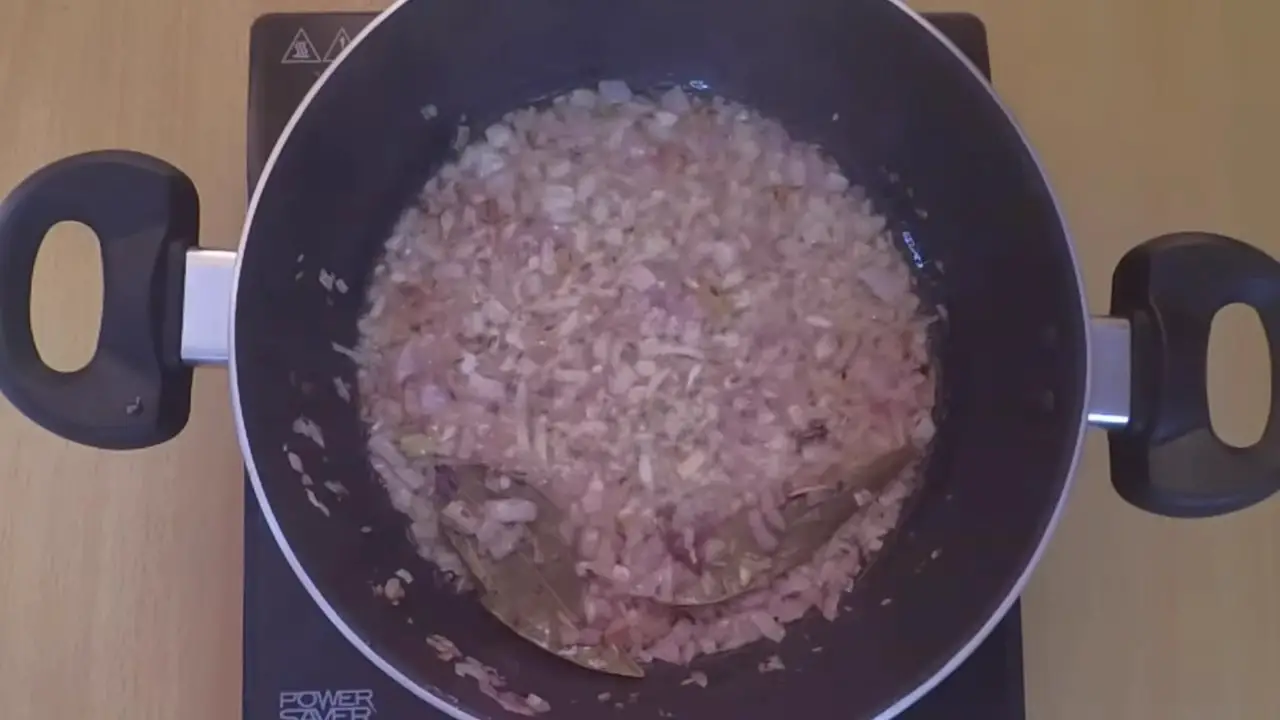
In a wok, heat oil and saute with onion, bay leaf, and cinnamon stick. Fry it on a medium flame till the onion is light golden in the color.
In a grinder, add all the ingredients mentioned above in the table for grinding paste. Grind it to make a fine paste.
Add the ground paste in the wok.
Add turmeric powder, red chili powder, and salt.
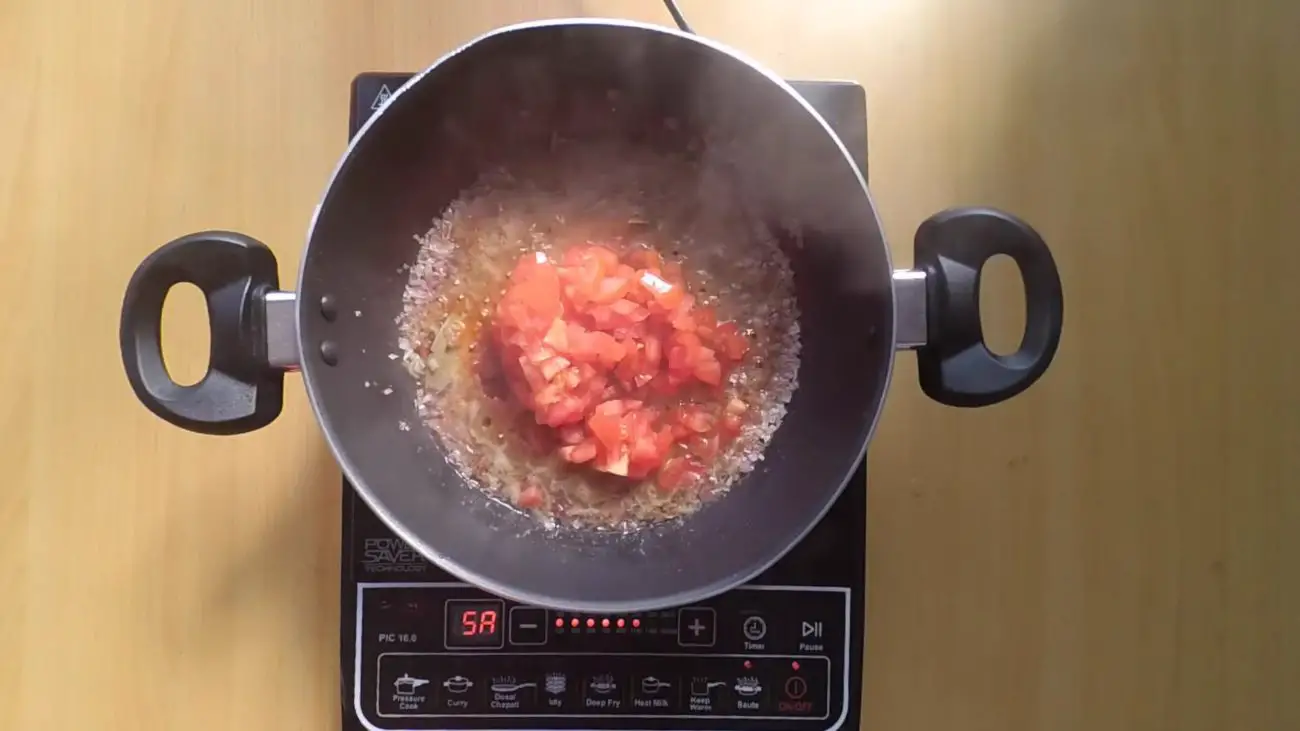
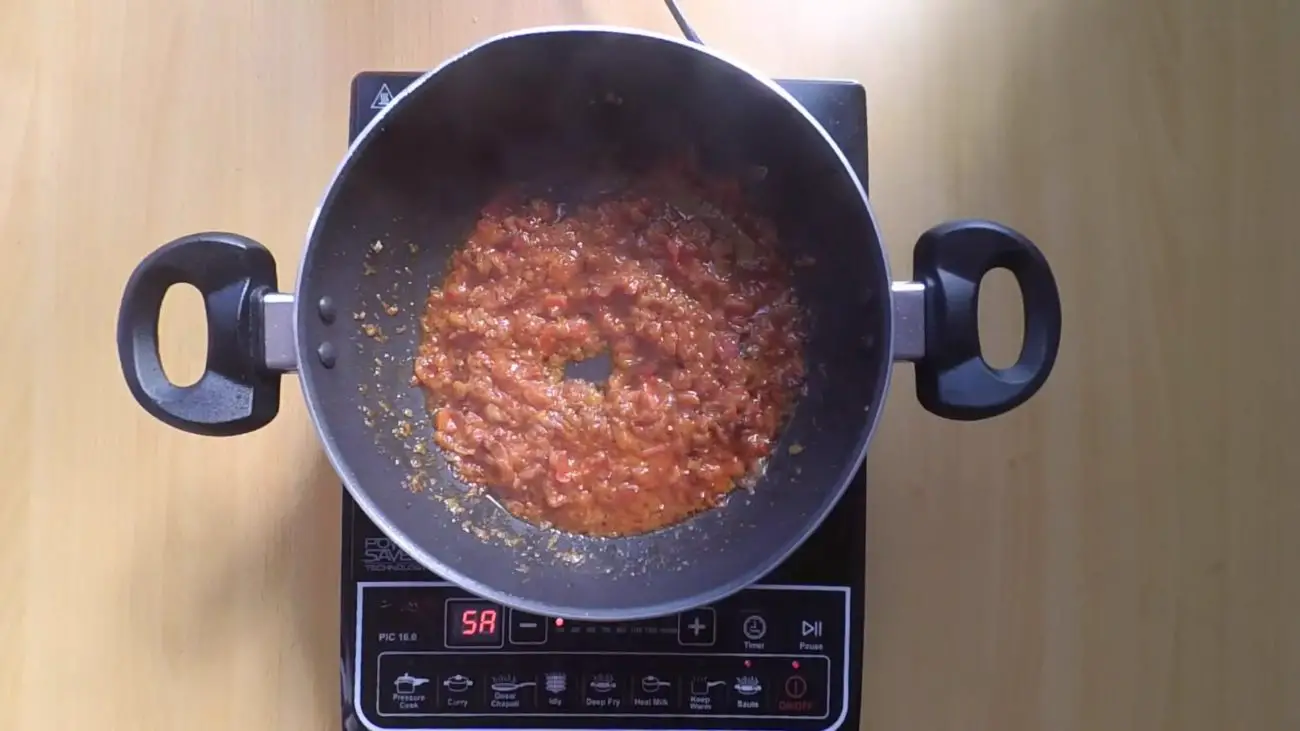
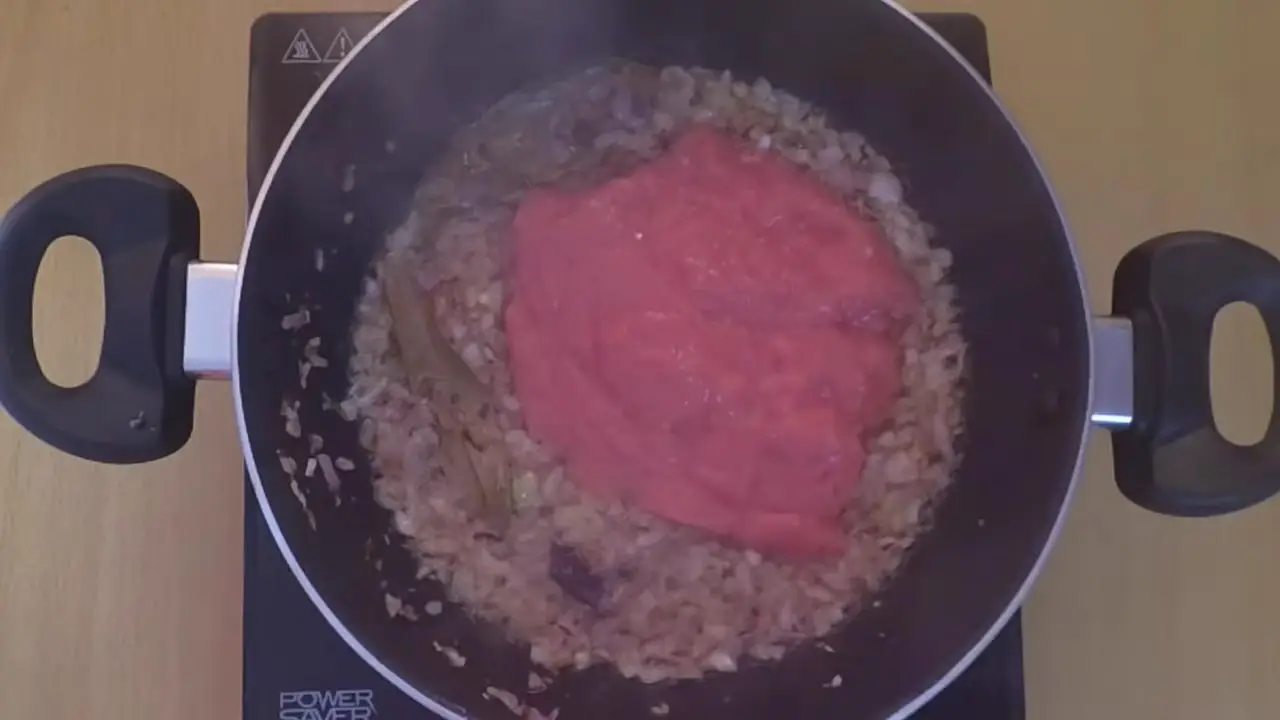
Add chopped tomatoes, mix it well. Cook, it covered on a medium to low flame till the tomato is mushy and shows oil separately.
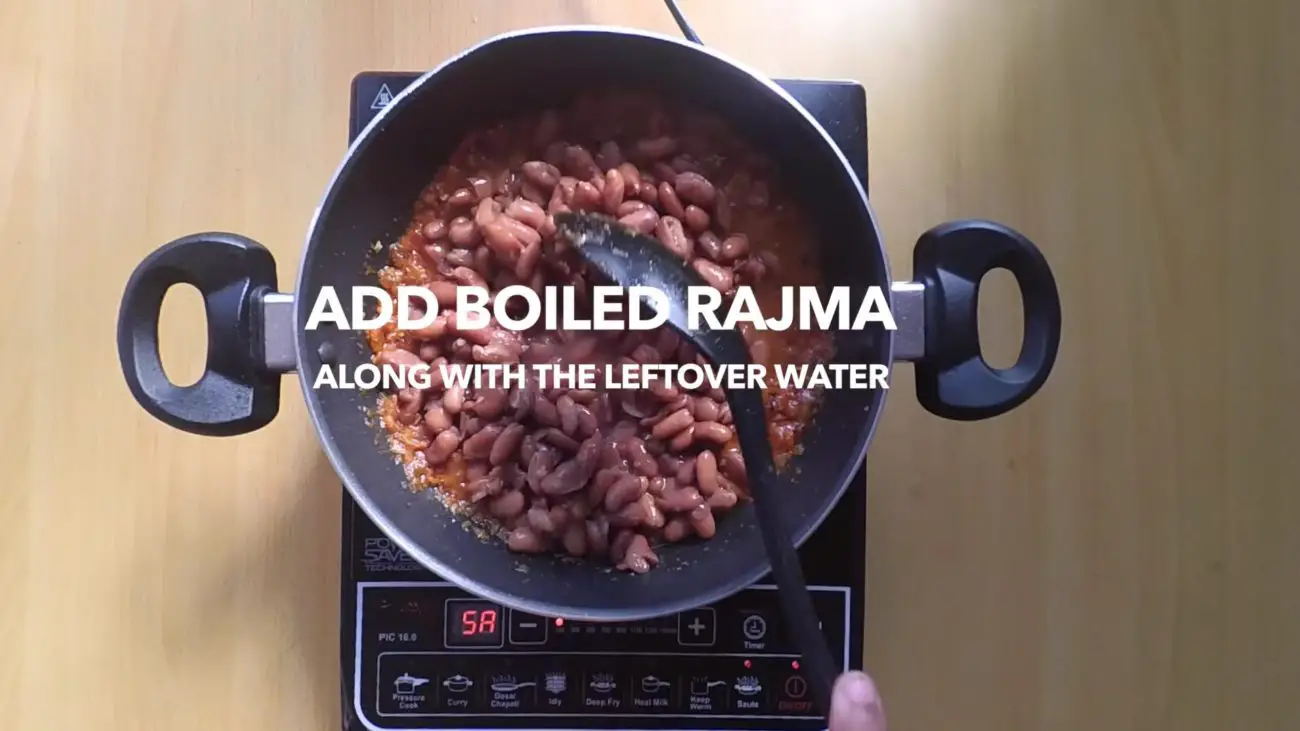
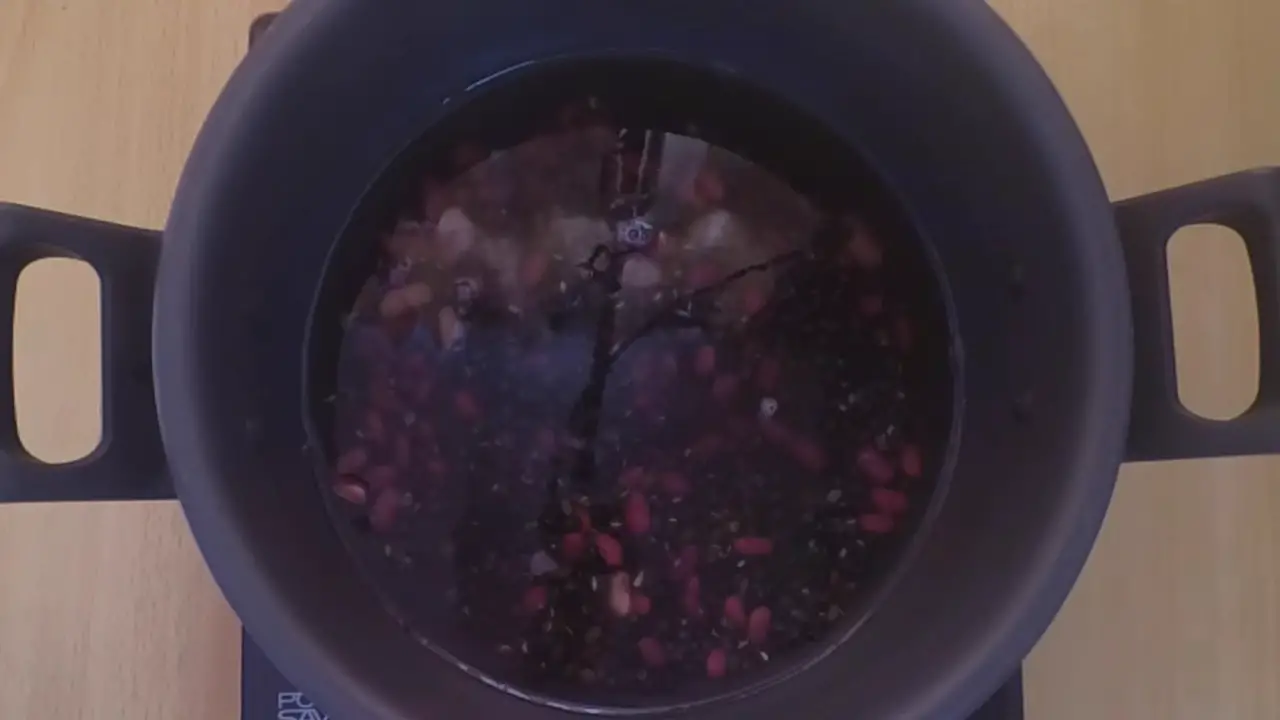
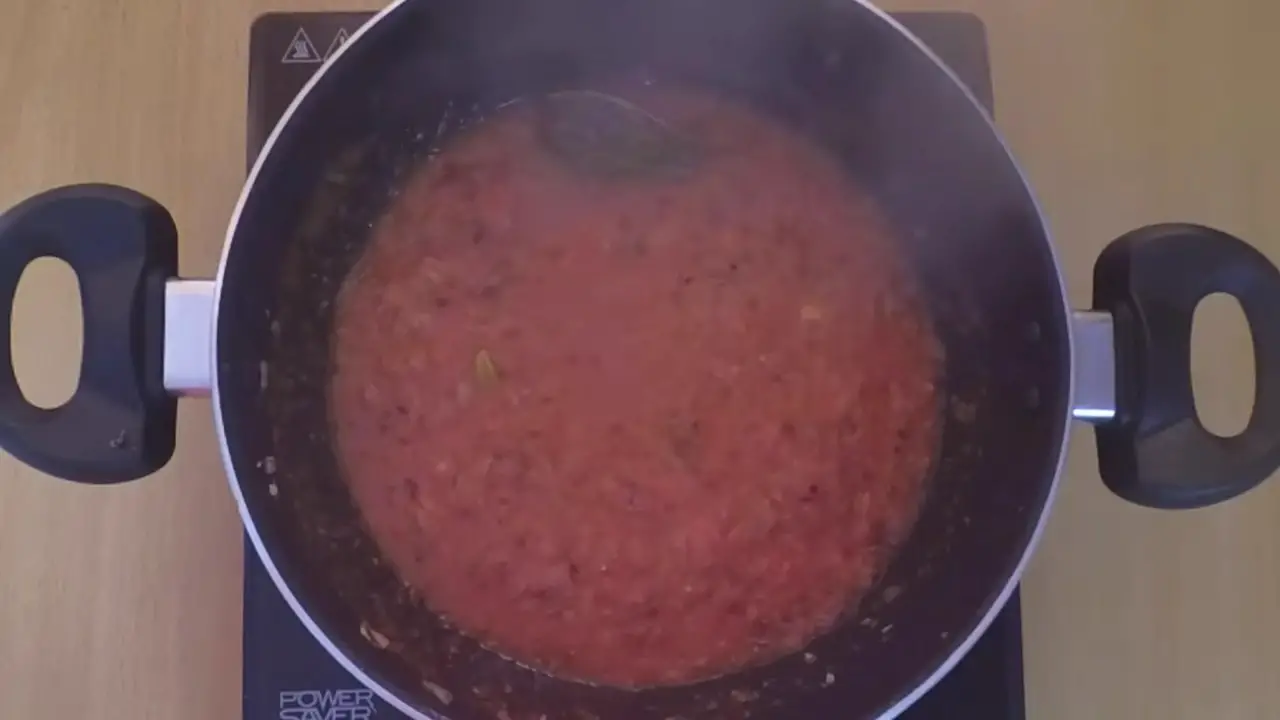
Now the tomato is mushy, we will add boiled rajma in the wok.
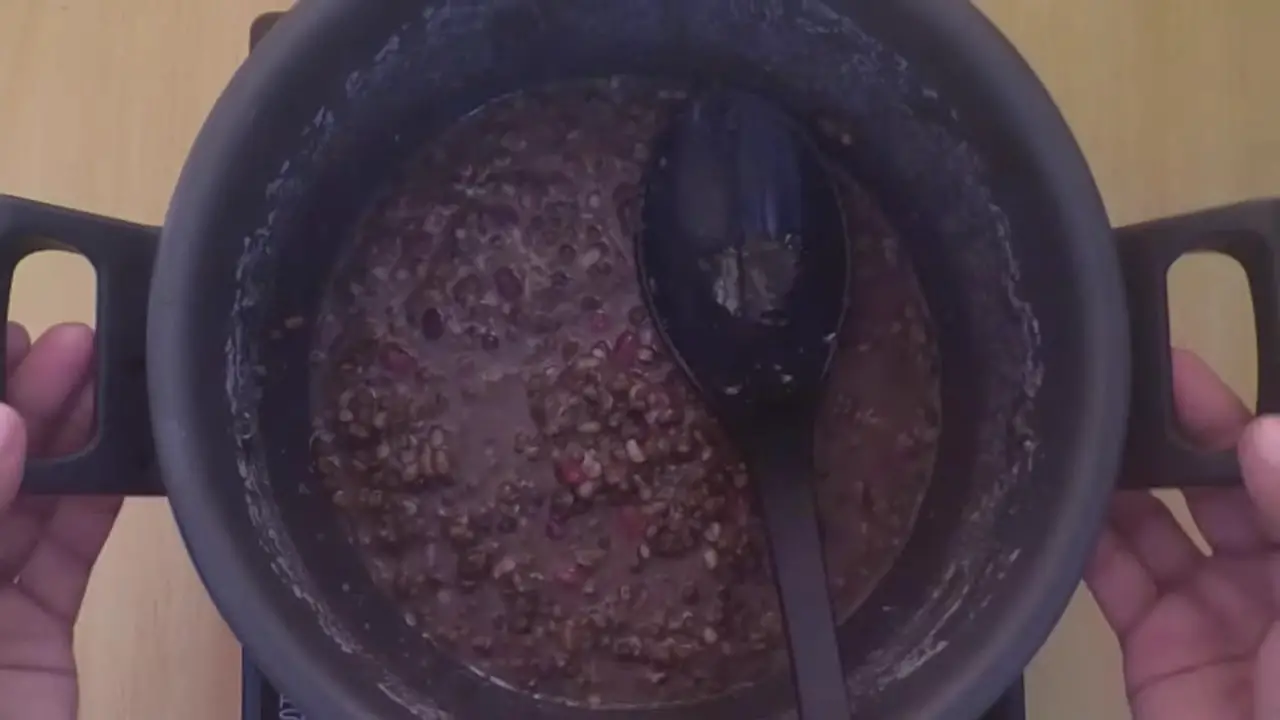
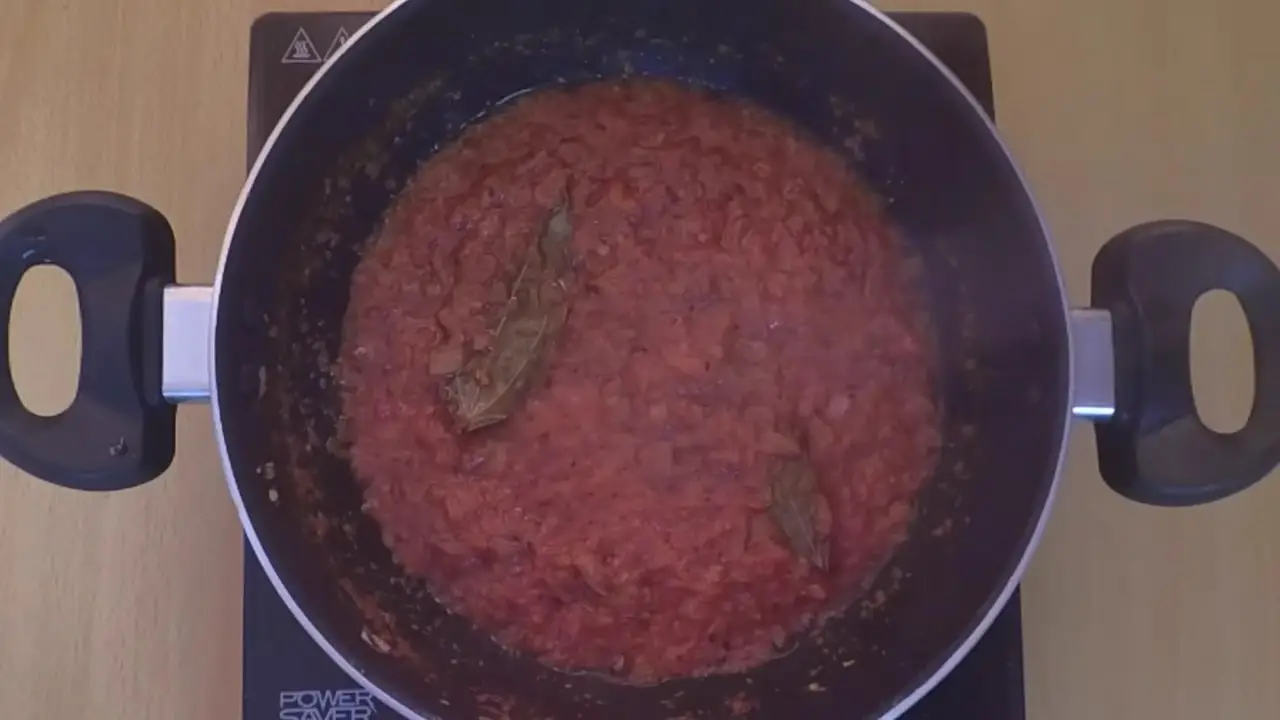
Add boiled rajma along with the leftover water in the wok, mix it well, check salt. You can add water if need. Cook, it covered on a medium flame for 3-4 minutes.
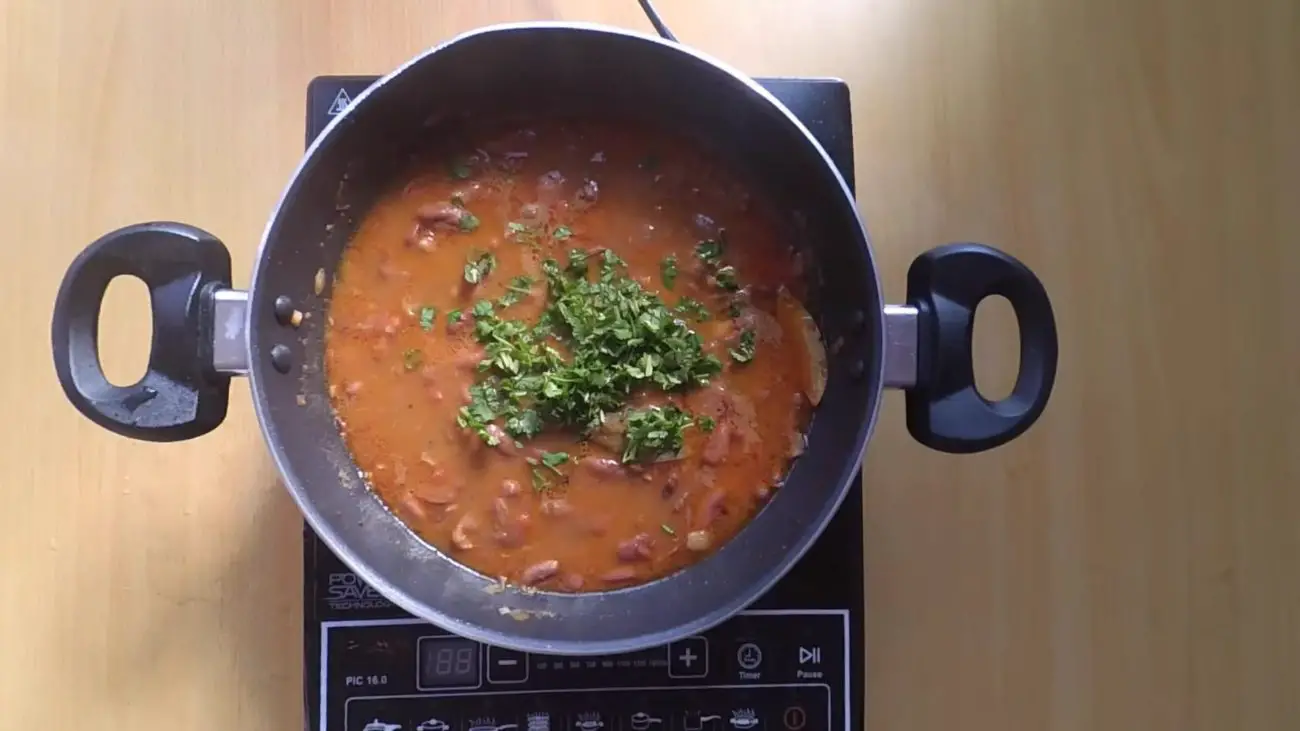
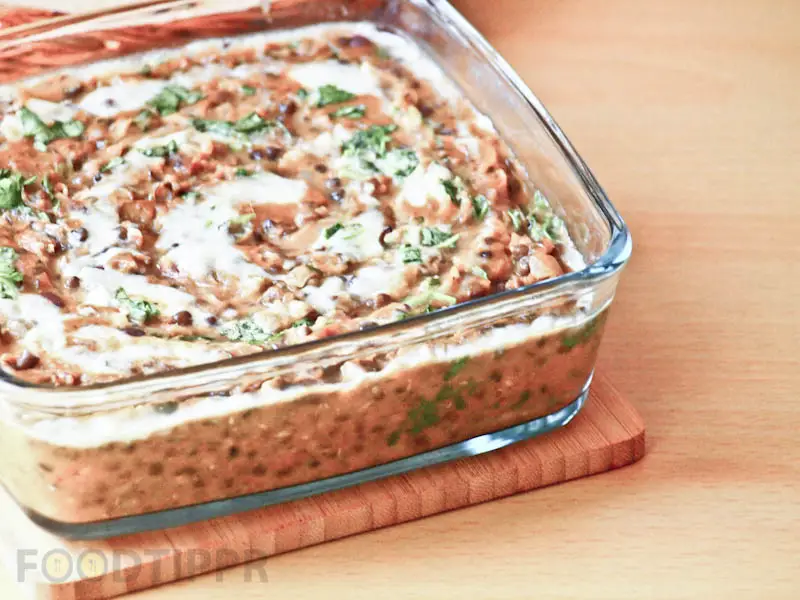
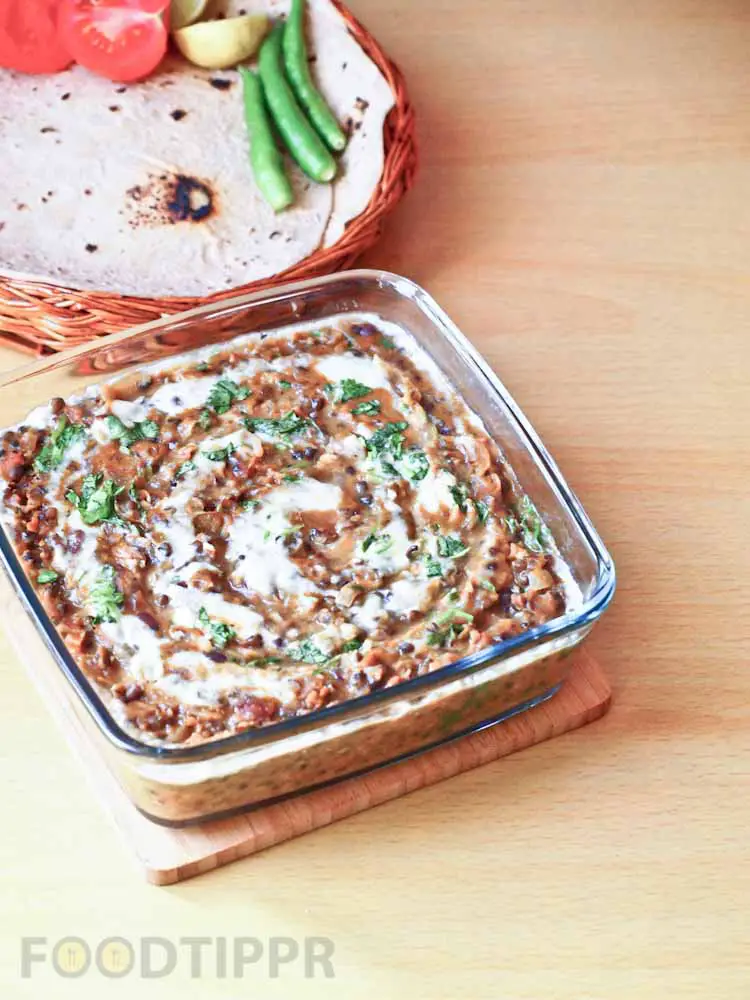
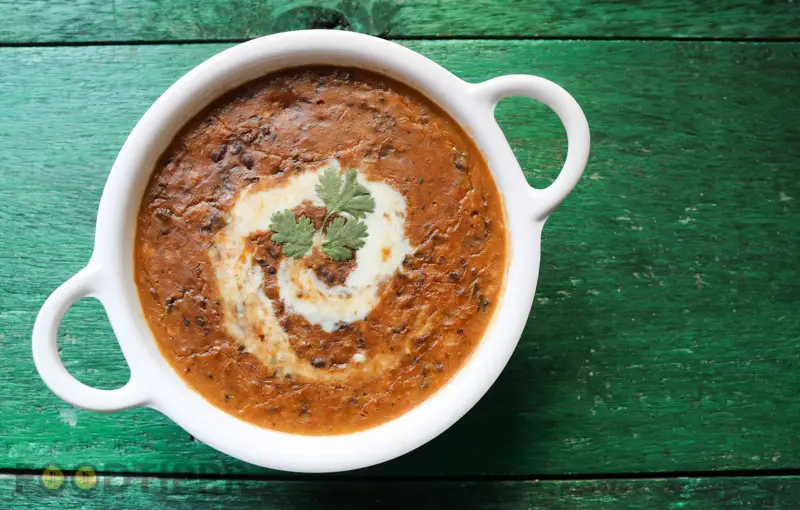
Switch off the flame, garnish with chopped coriander leaves. Serve hot with chapatti and rice.
Steps
Clean, wash, and soak rajma overnight. In a pressure cooker, add soaked rajma.
Add salt and 1-1.5 cup water and pressure cook it on a high flame for one whistle, then keep the flame low and cook for 6-7 minutes.
Open cooker, now the rajma has cooked properly.
In a wok, heat oil and saute with onion, bay leaf, and cinnamon stick. Fry it on a medium flame till the onion is light golden in the color.
In a grinder, add all the ingredients mentioned above in the table for grinding paste. Grind it to make a fine paste.
Add the ground paste in the wok.
Add turmeric powder, red chili powder, and salt.
Add chopped tomatoes, mix it well. Cook, it covered on a medium to low flame till the tomato is mushy and shows oil separately.
Now the tomato is mushy, we will add boiled rajma in the wok.
Add boiled rajma along with the leftover water in the wok, mix it well, check salt. You can add water if need. Cook, it covered on a medium flame for 3-4 minutes.
Switch off the flame, garnish with chopped coriander leaves. Serve hot with chapatti and rice.
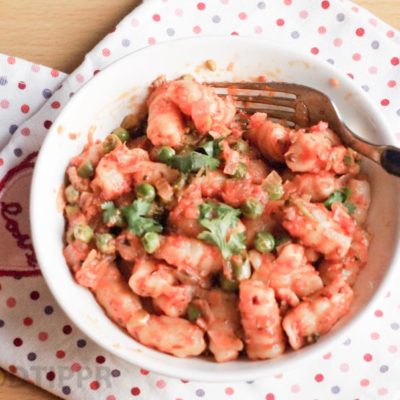
Check out the recipe for Homemade Pasta. In this post, we have prepared the pasta from all-purpose flour, and not just cooked the raw pasta.You will be amazed how easy it is to make pasta, and it will be free from any type of adulteration. You get what you make.Check out the step by step process of the making of Homemade Pasta. Also, you can watch the full video of the preparation of the Homemade Pasta.
Prep Time10 minutesmins
Cook Time20 minutesmins
Total Time30 minutesmins
Course: Appetizer, Breakfast, Side Dish, Snack
Cuisine: Indian
Keyword: homemadepasta, italian, pasta
Servings: 2
Ingredients
1/2cupall-purpose flour
1/2cupTomato puree
1tbspGarlic
1tbspGinger
1/2tspRed chili flakes
1/4tspPepper powder
2tbspVegetable oil
1chopped Onion
1/4Green peas
2Green chili
1/4cupBroccolli
to knead the flour Water
to taste Salt
1/4tspOregano herbs
1/4tspAll purpose seasoning
Instructions
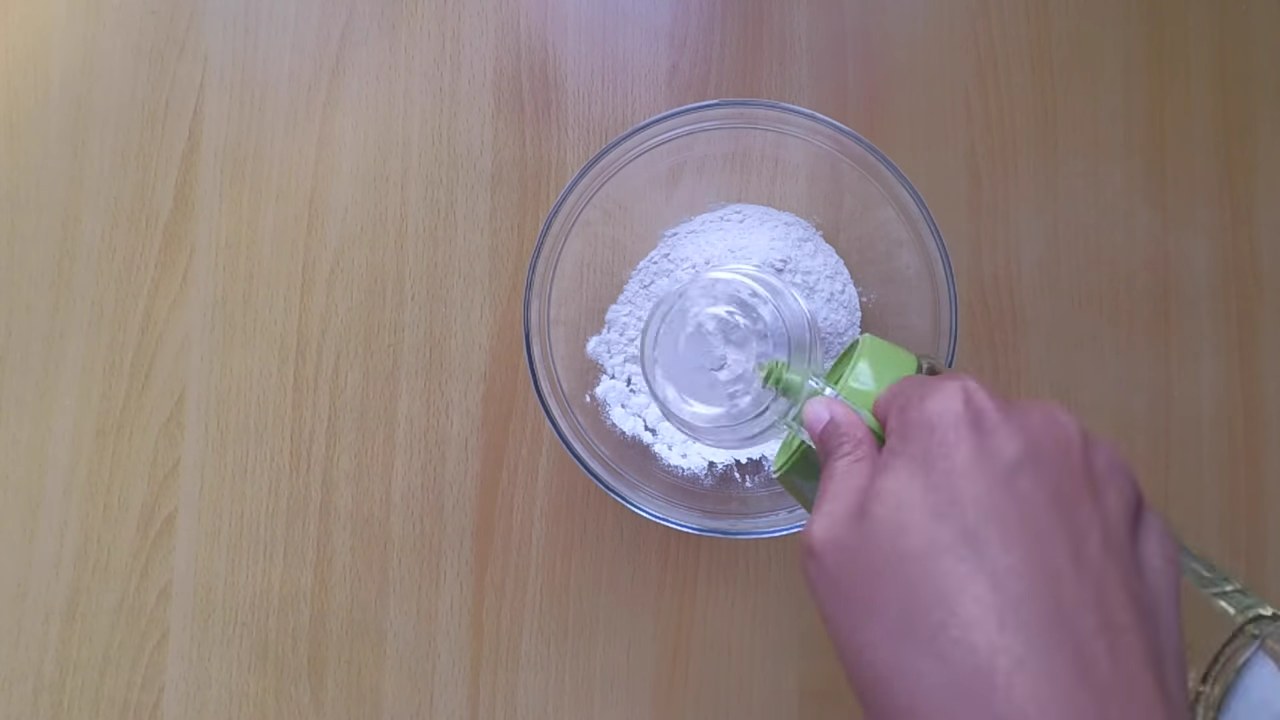
In a mixing bowl, add all-purpose flour, salt, vegetable oil, and salt. Mix it well. Add water and knead the flour well to make a soft dough.
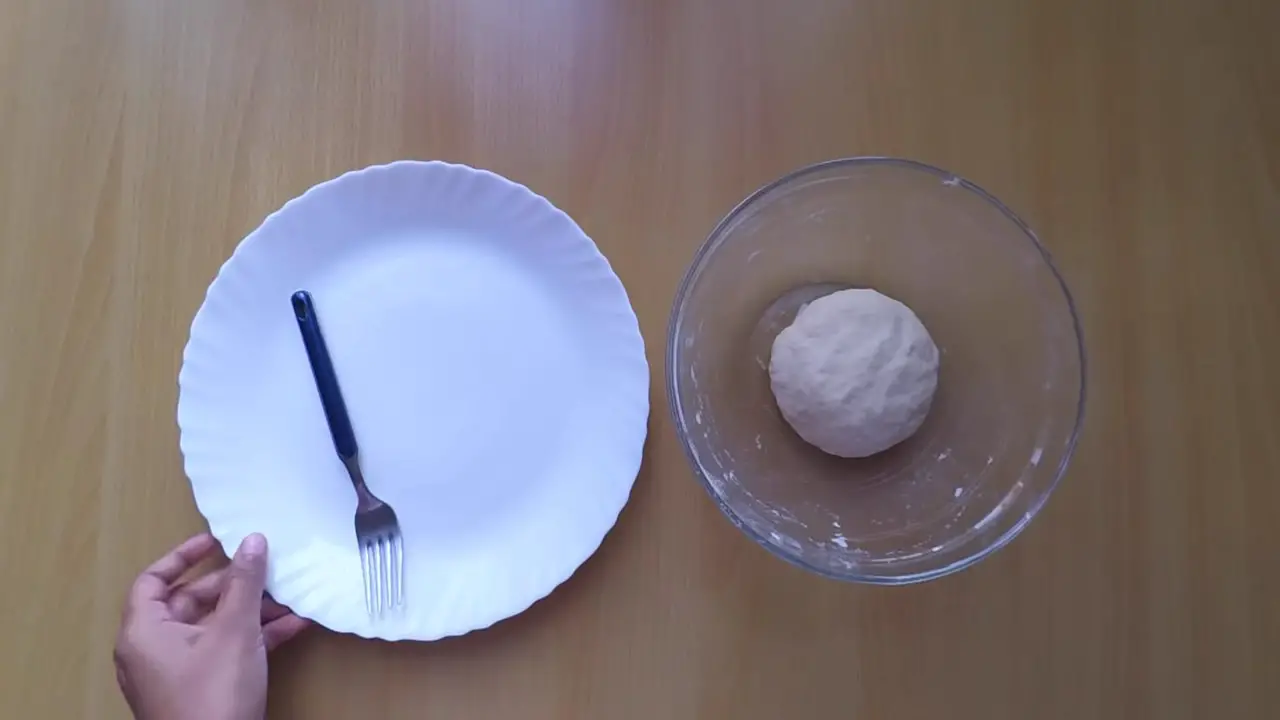
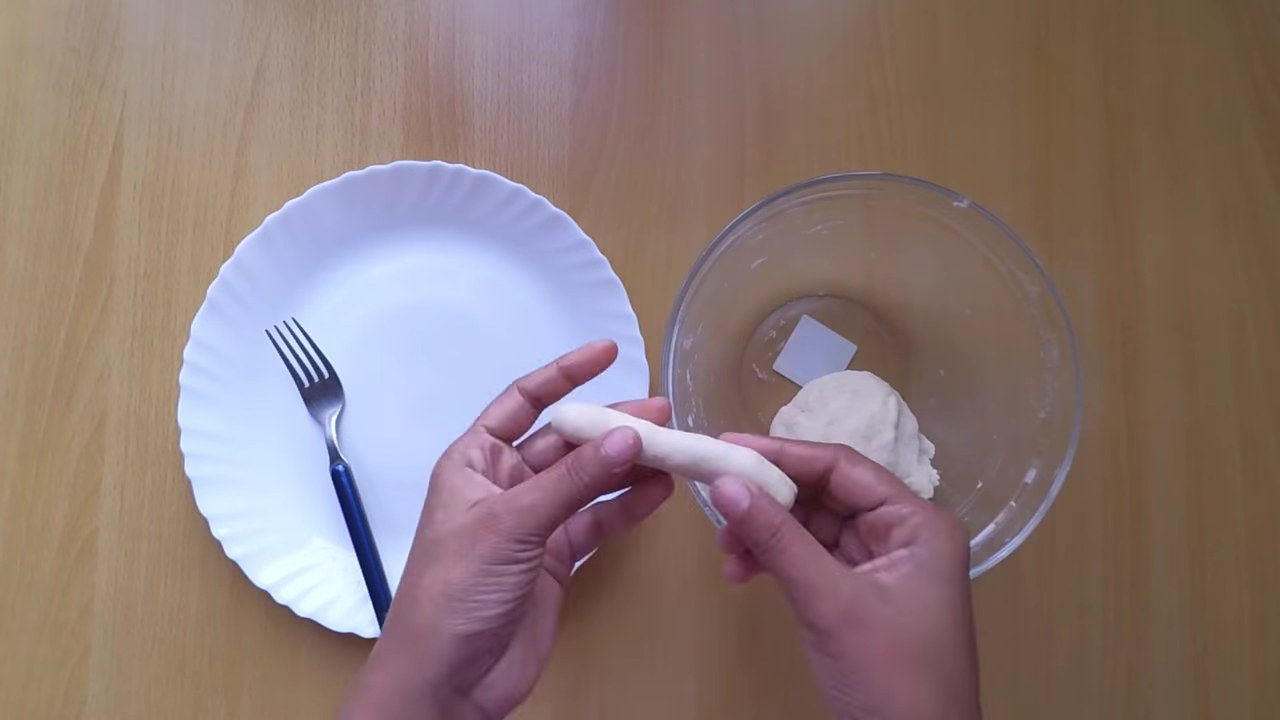
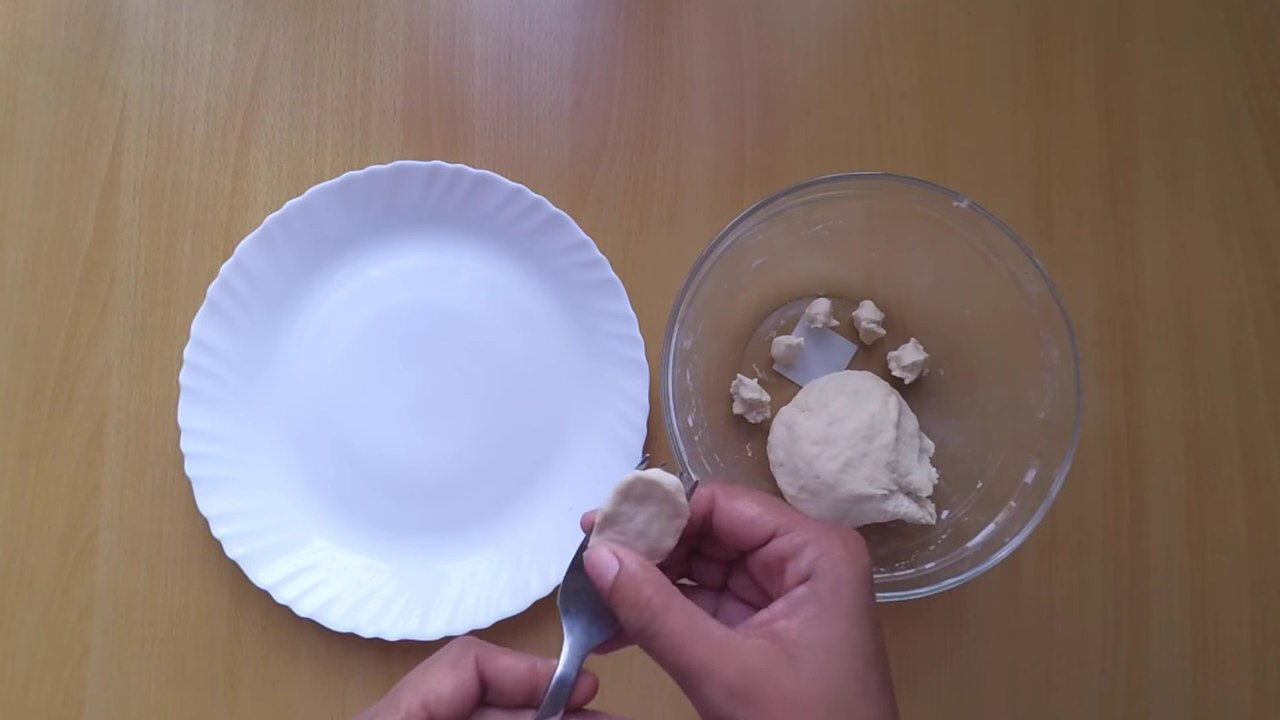
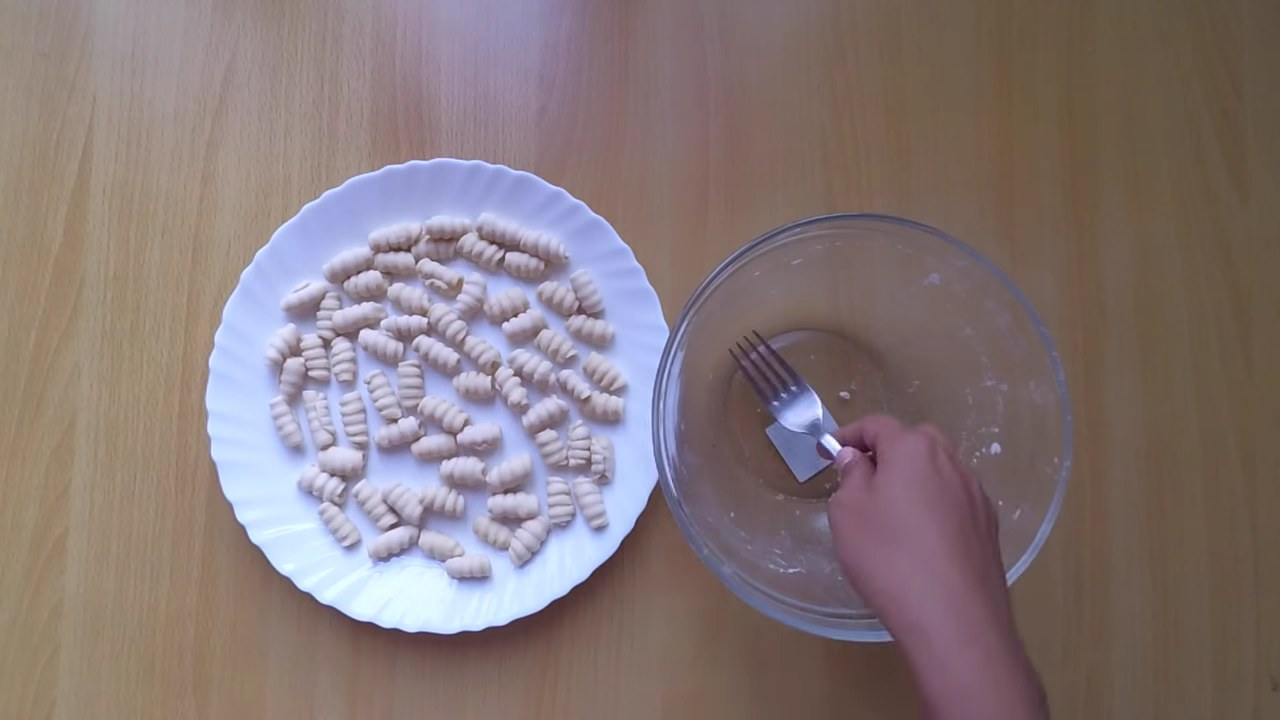
Divide the dough into 30-35 equal portions. Take one portion of the dough and make pasta like a shape using a fork. (Prefer video for better understanding)
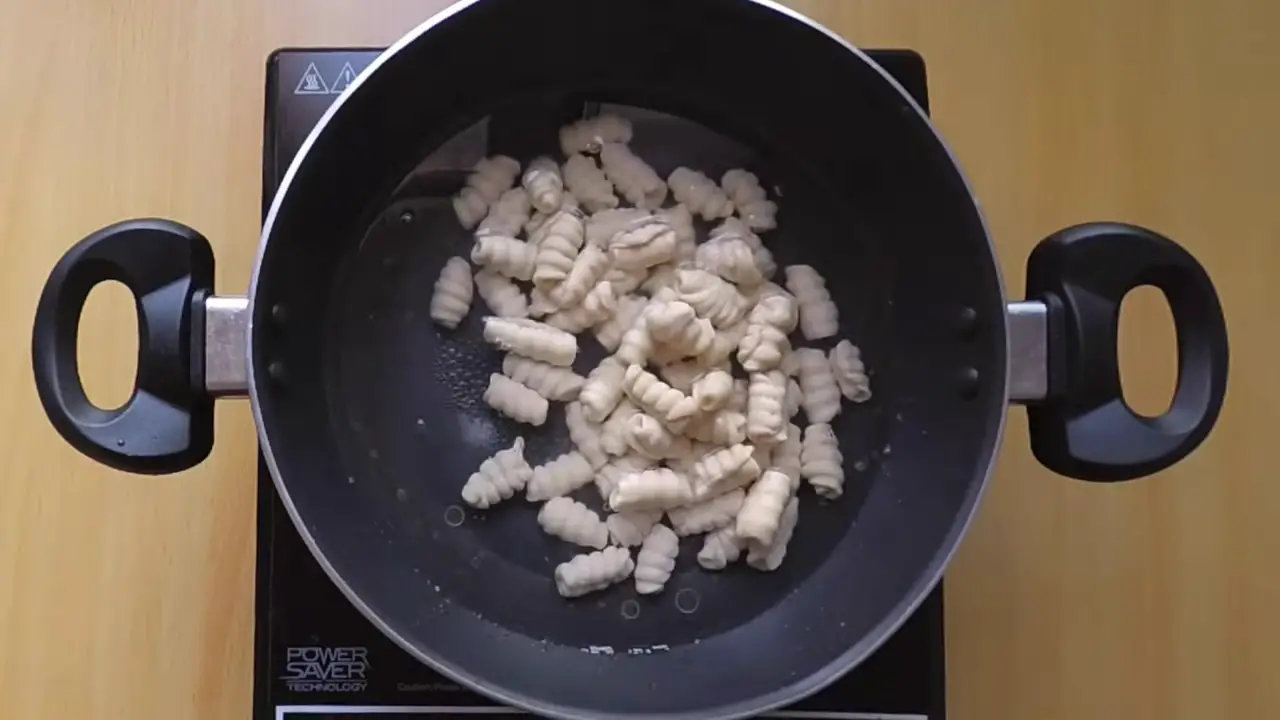
Giving pasta shape.
Fold it using a fork.
The pasta shape is ready.
Do the same with the rest of the dough.
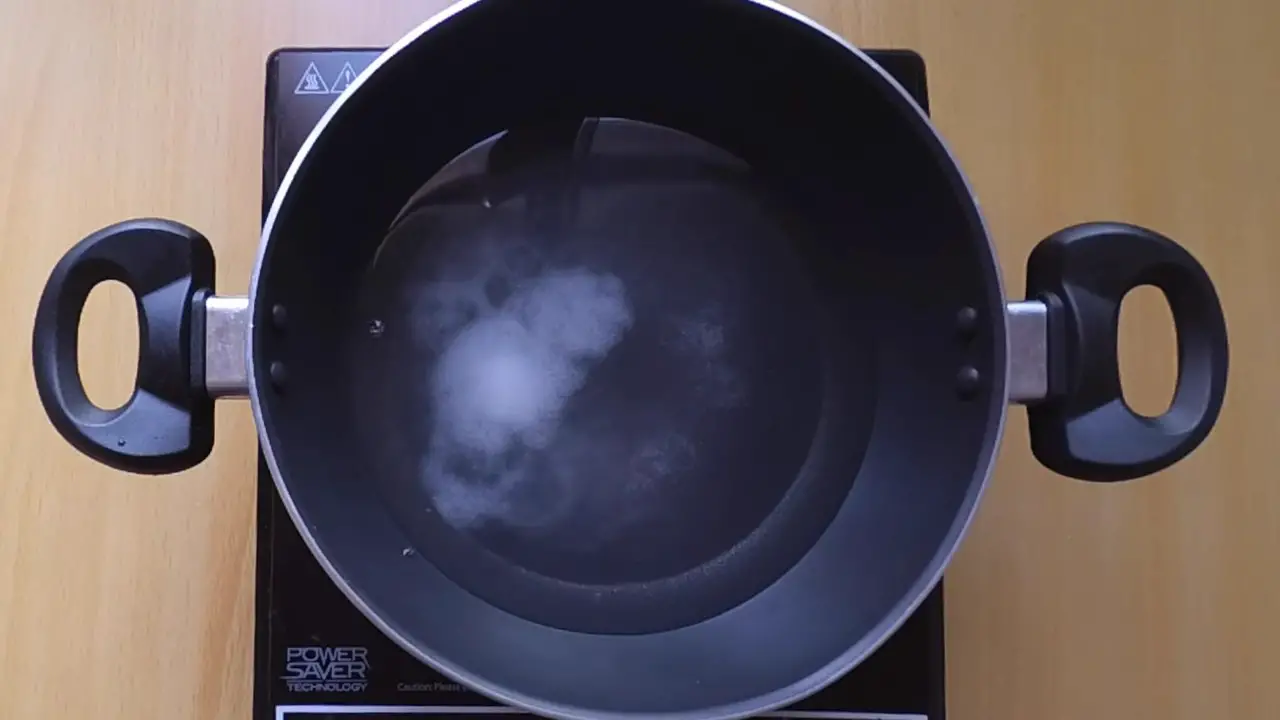
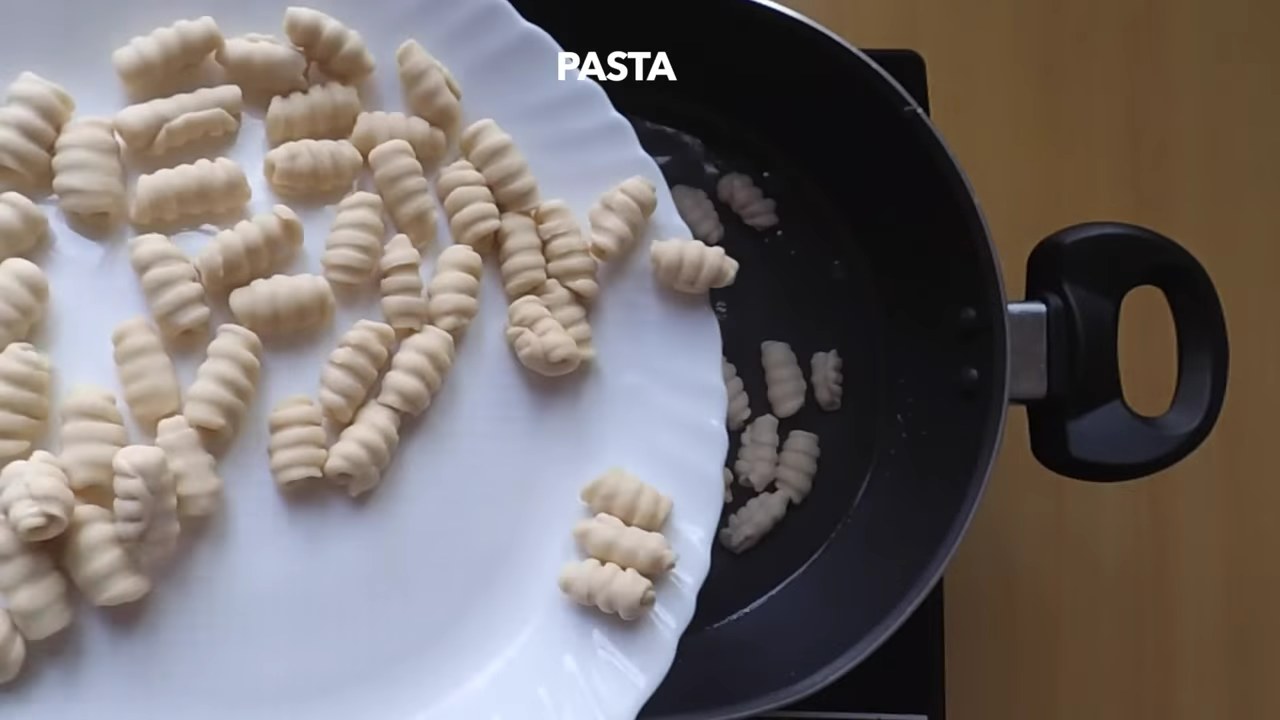
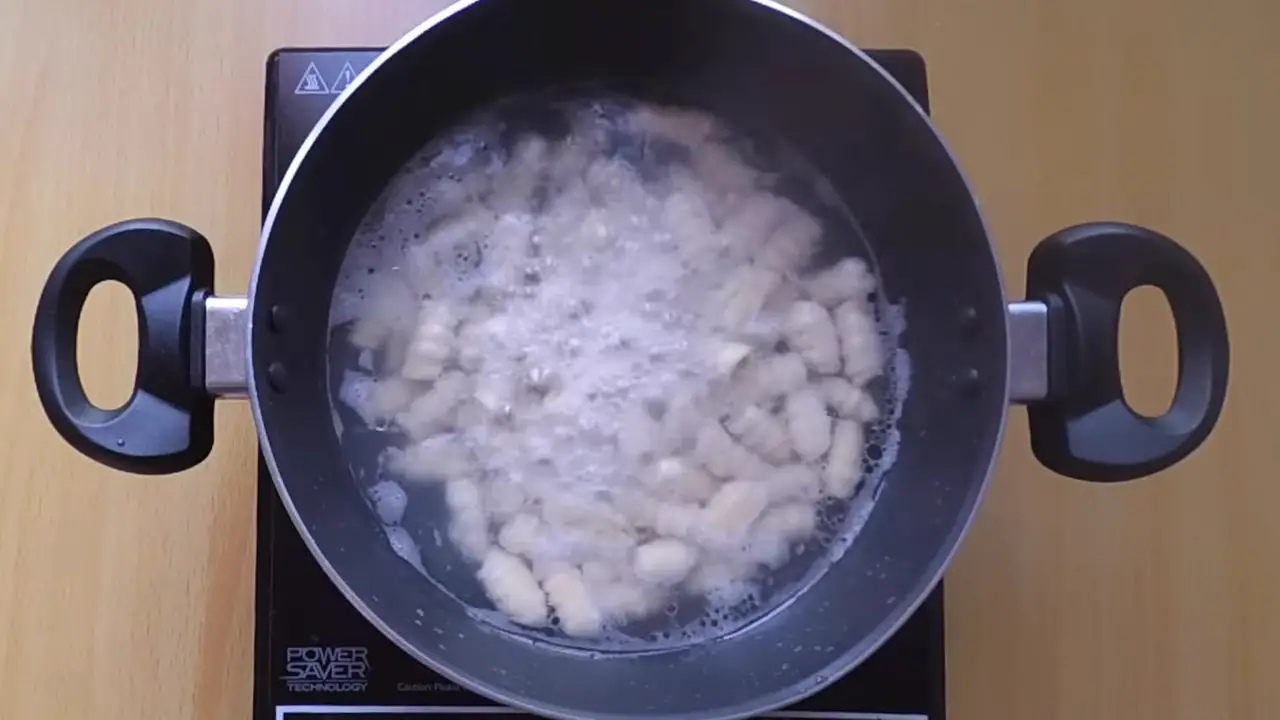
Heat wok with water and add salt. Let it boil for 1-2 minutes.
Add pasta in the wok and cook it on a medium to high flame for 8-10 minutes.
Keep stirring in between the process.
Strain it using a strainer.
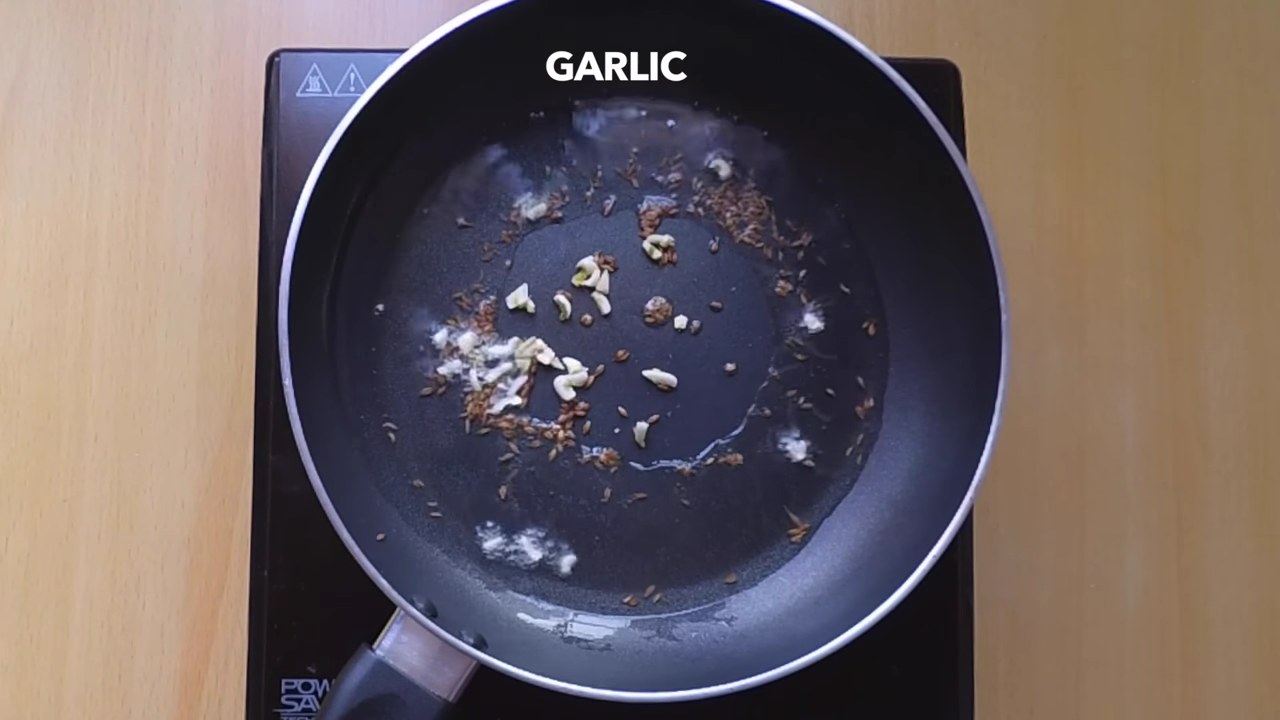
Heat oil in a pan and saute with cumin seeds, ginger, and garlic. Saute for a minute.
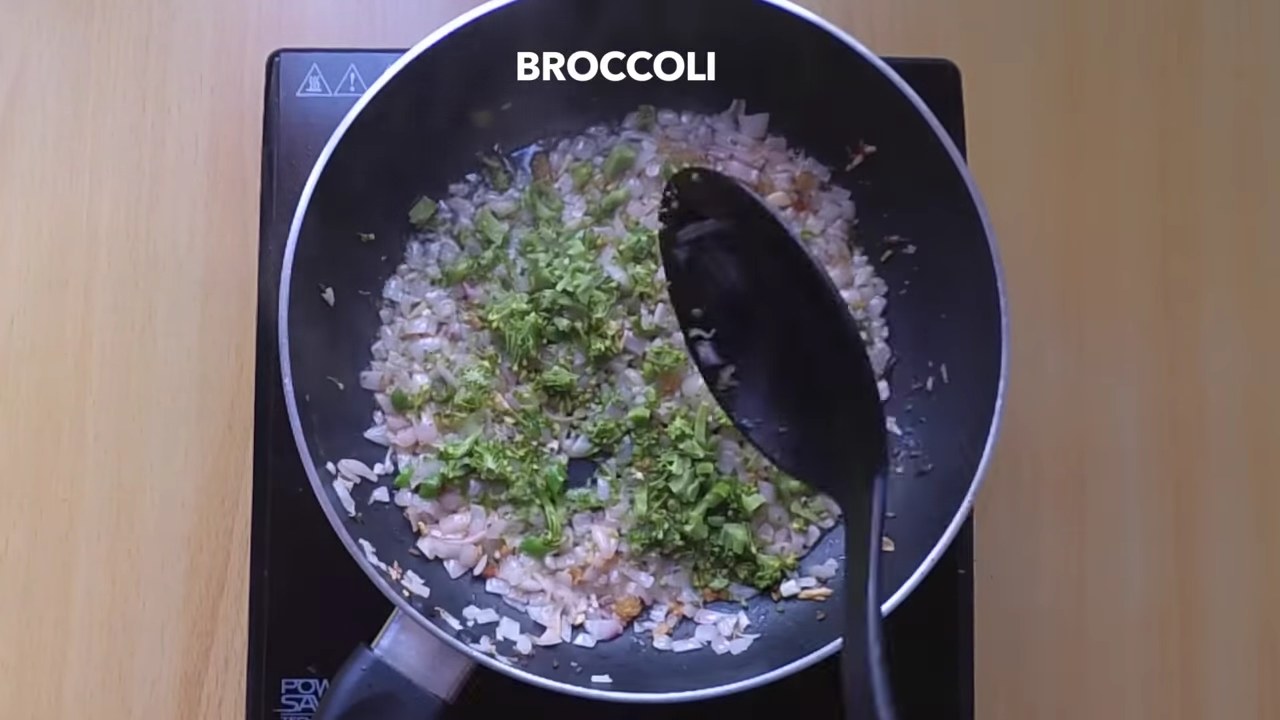
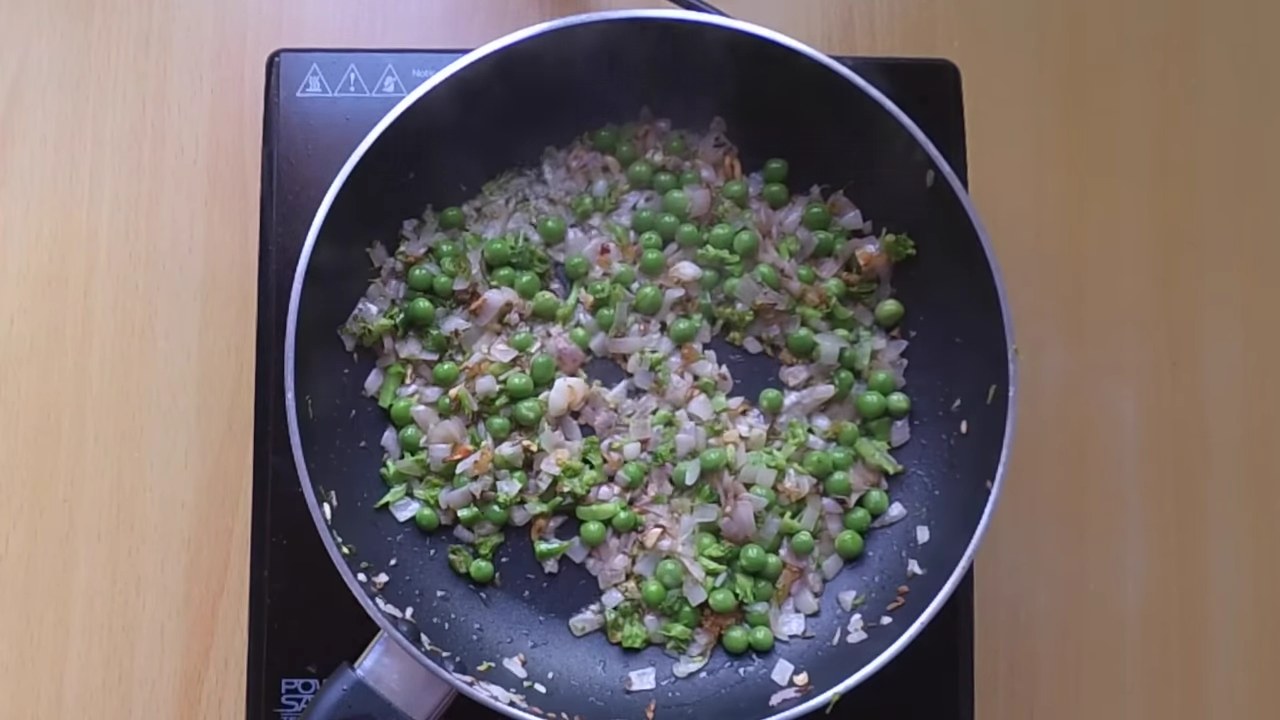
Add onion, fry till it is translucent in color. add red chili flakes, green chili.
Add broccoli and green peas. Cook for 2-3 minutes.
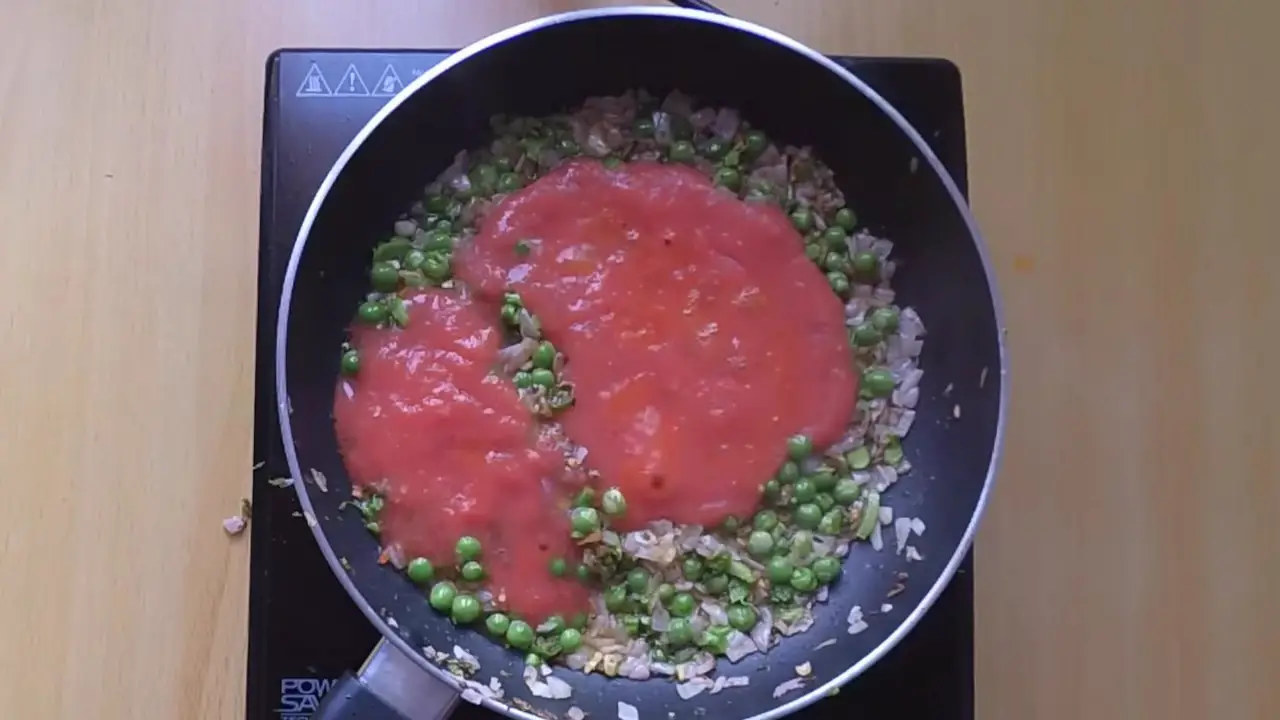
Add tomato puree and 20 ml water. Cook for 2-3 minutes.
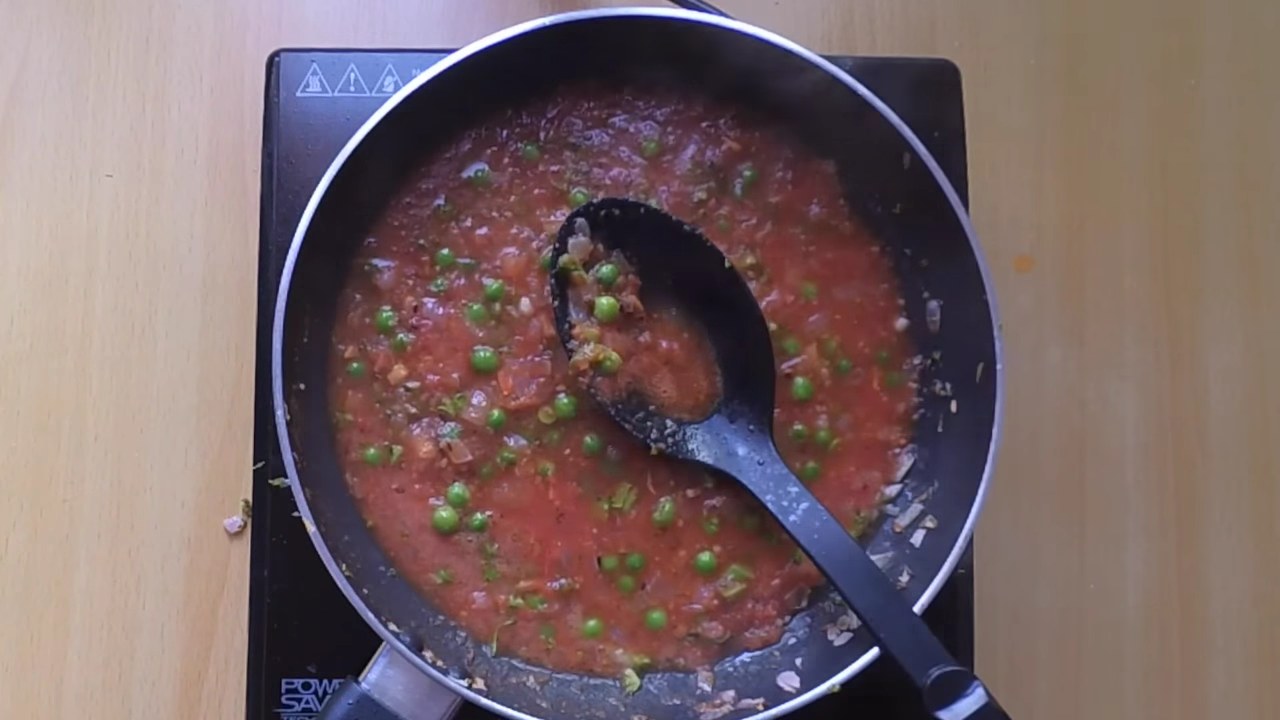
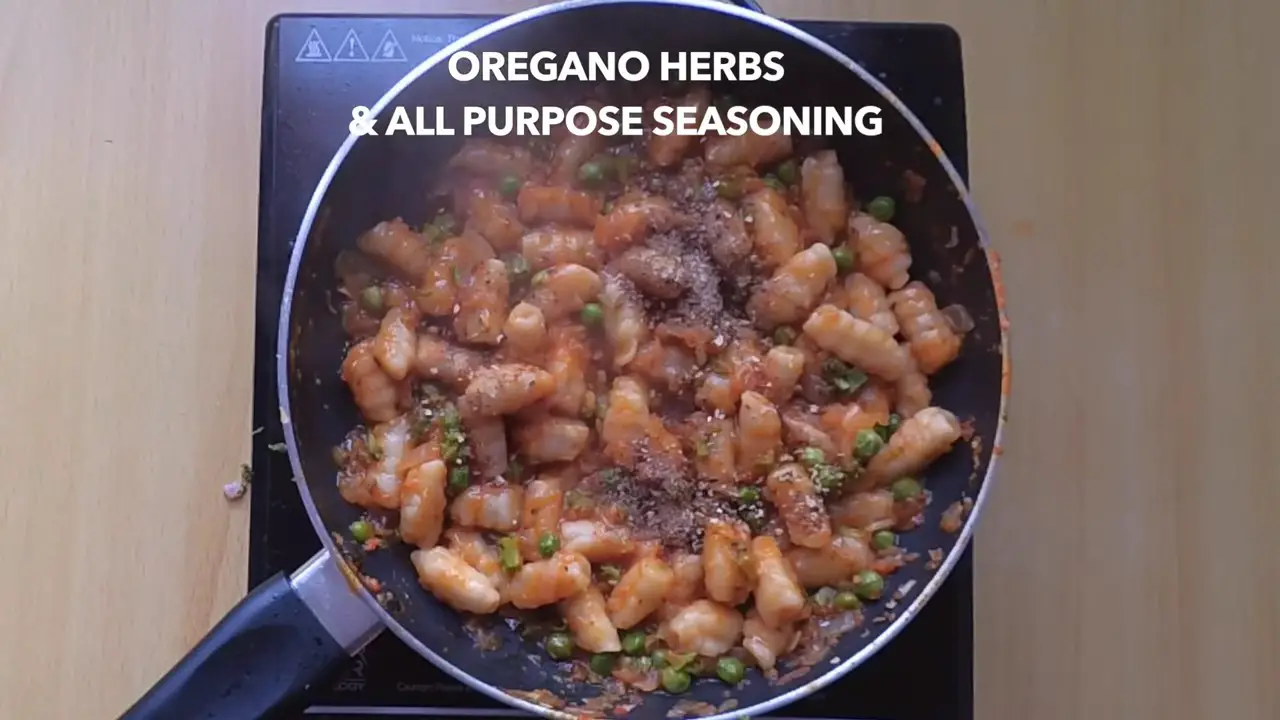
Add oregano herbs and all-purpose seasoning. Cook for another 1 more minutes.
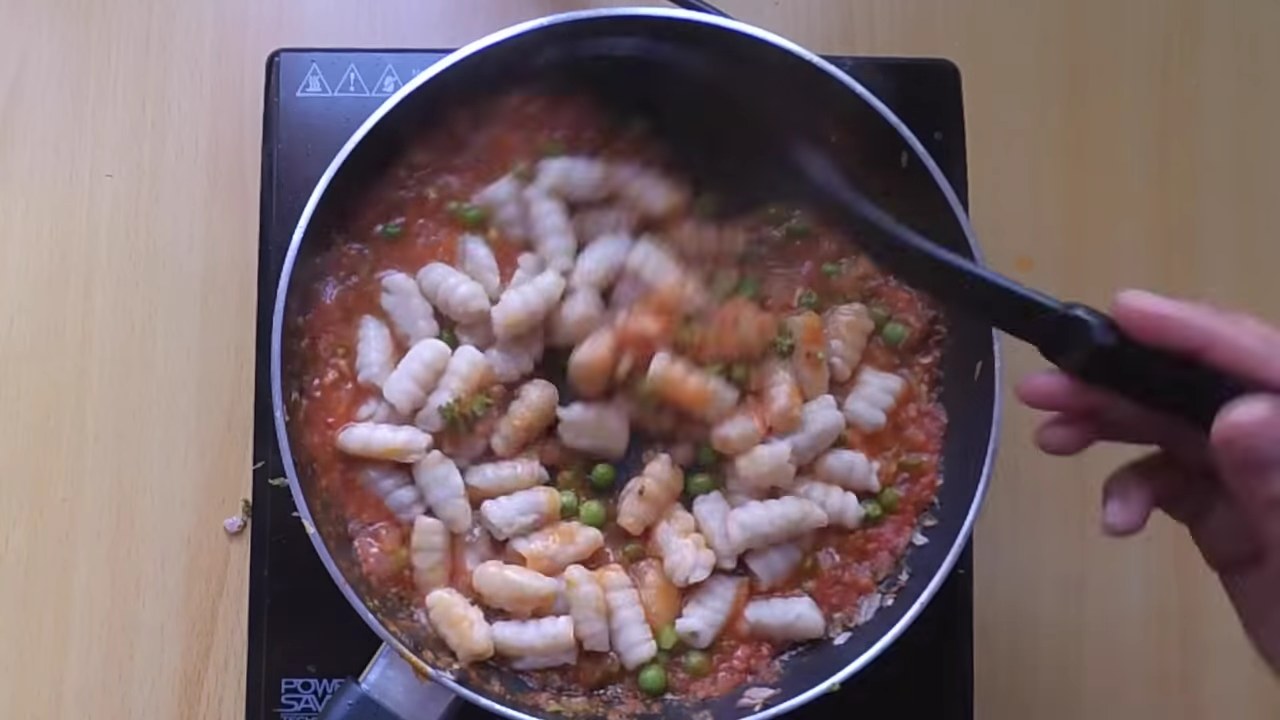
Add boiled pasta and check salt. Mix it well with the spices.
Cook for 1-2 minutes before serving. Delicious homemade pasta is ready to serve. Serve hot.
Steps
In a mixing bowl, add all-purpose flour, salt, vegetable oil, and salt. Mix it well. Add water and knead the flour well to make a soft dough.
Divide the dough into 30-35 equal portions. Take one portion of the dough and make pasta like a shape using a fork. (Prefer video for better understanding)
Giving pasta shape.
Fold it using a fork.
The pasta shape is ready.
Do the same with the rest of the dough.
Heat wok with water and add salt. Let it boil for 1-2 minutes.
Add pasta in the wok and cook it on a medium to high flame for 8-10 minutes.
Keep stirring in between the process.
Strain it using a strainer.
Heat oil in a pan and saute with cumin seeds, ginger, and garlic. Saute for a minute.
Add onion, fry till it is translucent in color. add red chili flakes, green chili.
Add broccoli and green peas. Cook for 2-3 minutes.
Add tomato puree and 20 ml water. Cook for 2-3 minutes.
Add oregano herbs and all-purpose seasoning. Cook for another 1 more minutes.
Add boiled pasta and check salt. Mix it well with the spices.
Cook for 1-2 minutes before serving. Delicious homemade pasta is ready to serve. Serve hot.
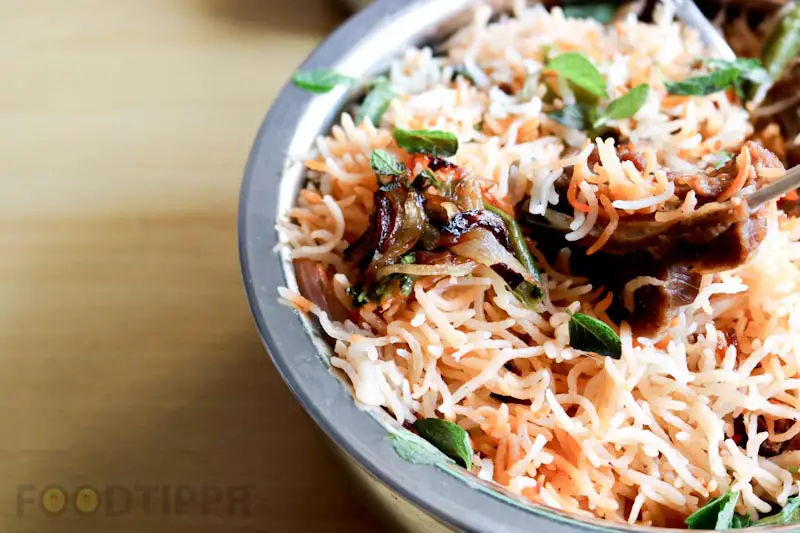
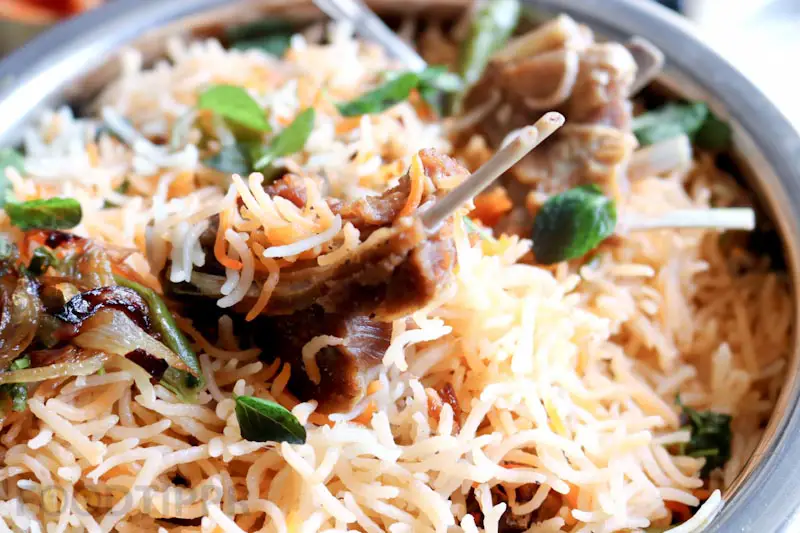
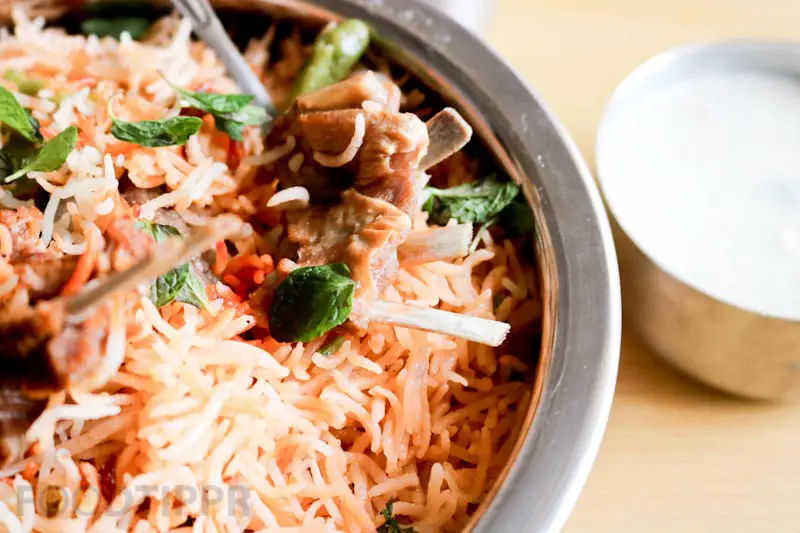
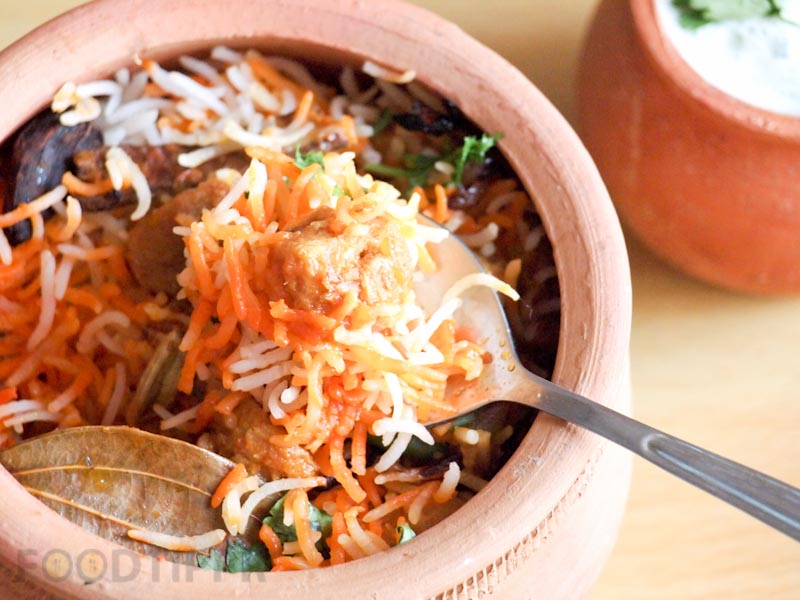
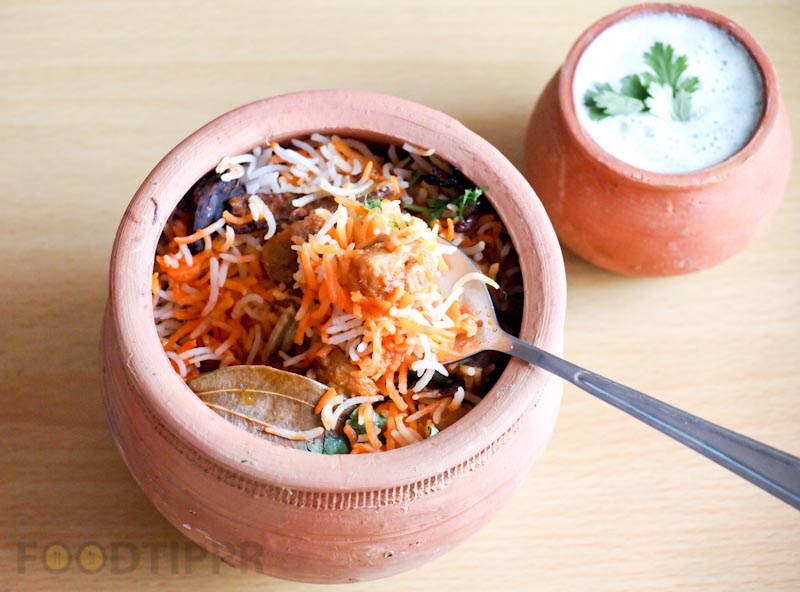
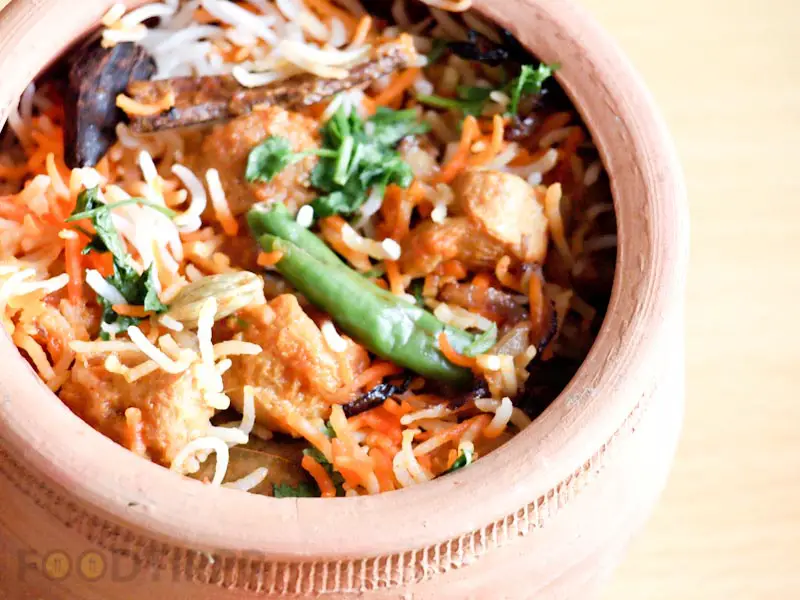
I am glad you landed on the best Mutton Potli Biryani Recipe Ever.
Keeping a Biryani lover is always a challenge because the bar is always so high. In fact, I am surrounded by such people and they are quite a critic of my work. This is why the Mutton Potli Biryani has attained perfection.
I have been making this type of Biryani from over a decade, and it has gone through several iterations to earn the batch of the Best Mutton Potli Biryani.
I am certain that if you make this recipe, everyone is going to love it, even if they are not a Biryani lover like yourself.
Prepare this amazing recipe by following carefully the process mentions, or simply watch the video preparation of this recipe which is to the point.
Always remember, it’s a practice which makes a man (or a woman for that matter) Perfect.
Now go and enjoy your biryani. and Come back for more. :-)
Best Mutton Potli Biryani Recipe Ever | Nonveg Recipes
Dear Biryani Lover,I am glad you landed on the best Mutton Potli Biryani Recipe Ever.Keeping a Biryani lover is always a challenge because the bar is always so high. In fact, I am surrounded by such people and they are quite a critic of my work. This is why the Mutton Potli Biryani has attained perfection.Also See: Mutton Masala BiryaniI have been making this type of Biryani from over a decade, and it has gone through several iterations to earn the batch of the Best Mutton Potli Biryani.I am certain that if you make this recipe, everyone is going to love it, even if they are not a Biryani lover like yourself.Prepare this amazing recipe by following carefully the process mentions, or simply watch the video preparation of this recipe which is to the point.Always remember, it’s practice which makes a Man (or a Women for that matter) Perfect.
Prep Time10 minutesmins
Cook Time40 minutesmins
Total Time50 minutesmins
Course: dinner, lunch, Main Course
Cuisine: Indian
Keyword: Biryani, Mutton, Muttonbiryani, rice
Servings: 4
Ingredients
1/2kgMutton
750mlWater
to taste Salt
3tbspCoriander seeds
2tbspFennel seeds
1tspCumin seeds
1sliced Onion
10clovesGarlic
1inchpiece Ginger
1/2inchpiece Cinnamon stick
5Cloves
3Cardamom green
2Cardamom brown
1teaspoonBlack pepper
1teaspoonCumin seeds (to grind)
6clovesGarlic ( to grind)
1/2inchpiece Ginger ( to grind)
2Cloves( to grind)
2Cardamom green( to grind)
1Cardamom brown( to grind)
8Blackpepper( to grind)
1Onion( to grind)
1/4of a flower Mace( to grind)
1/2cupVegetable oil
2sliced Onion
8-10slit Green chili
3cupsoaked Basmati rice
1/2cupFried onion
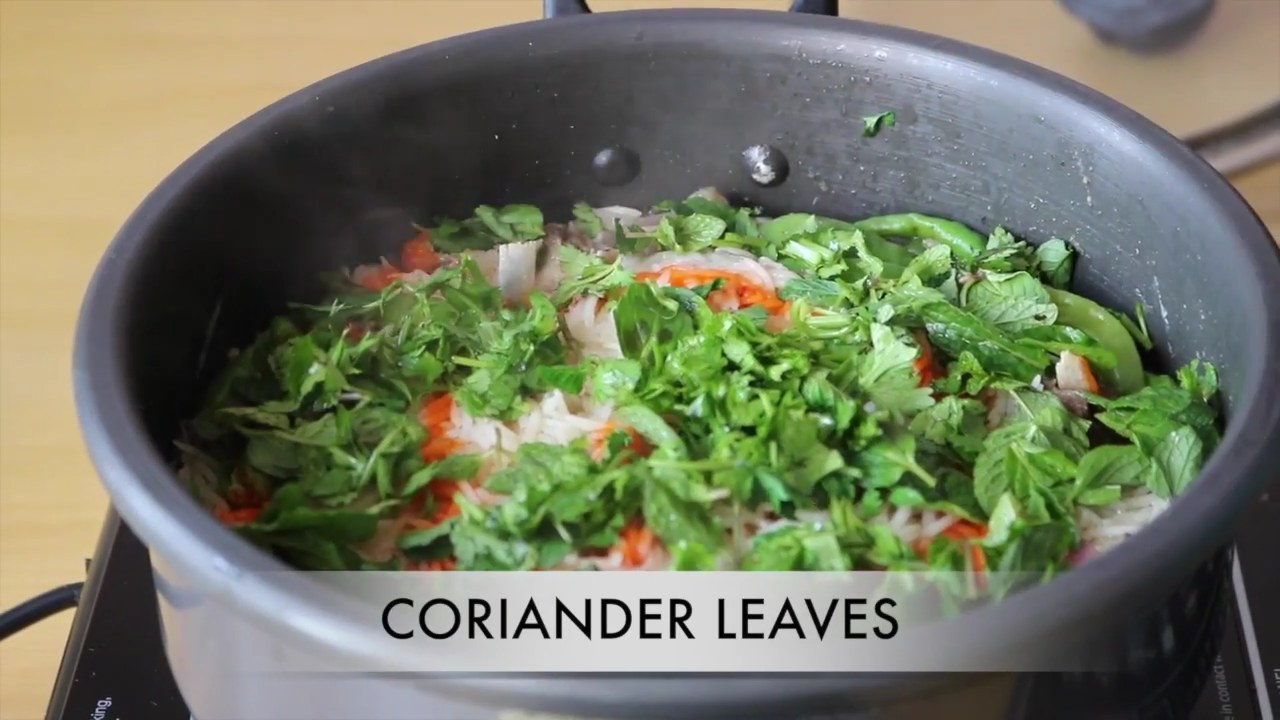
2tbspMint leaves
2tbspCoriander leaves
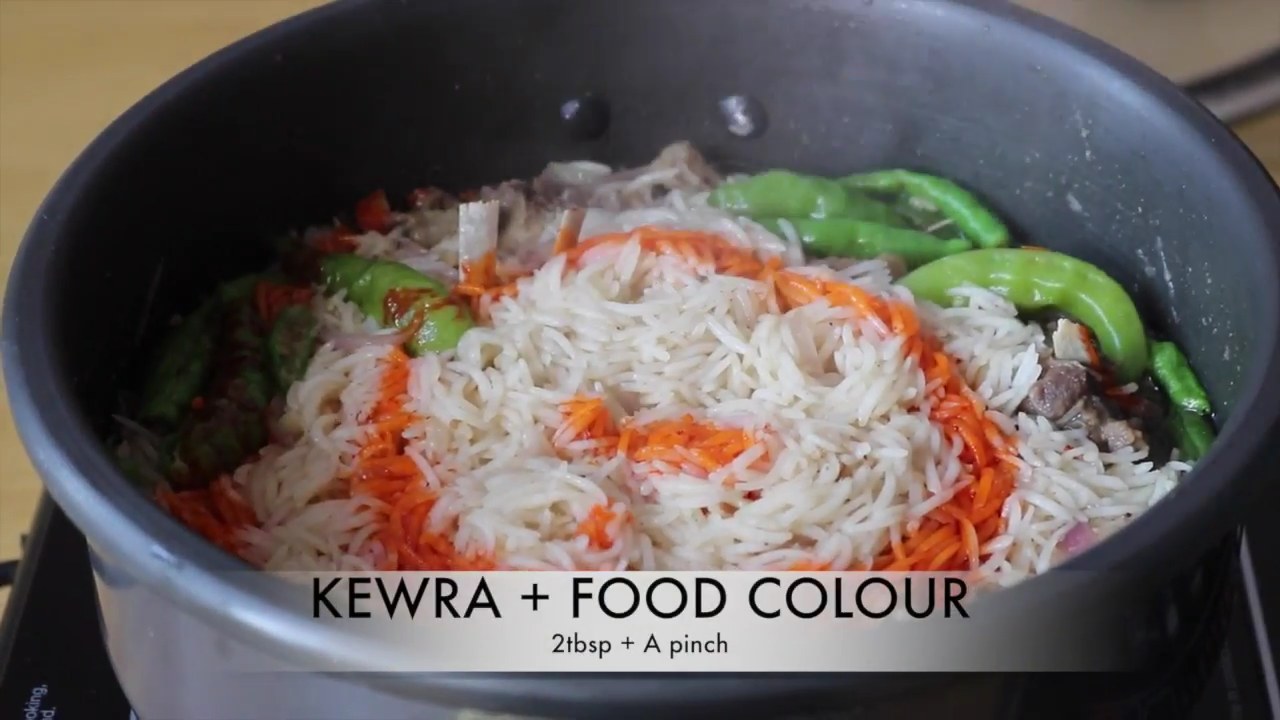
1tbspKewra water
small pinch food colorred
Instructions
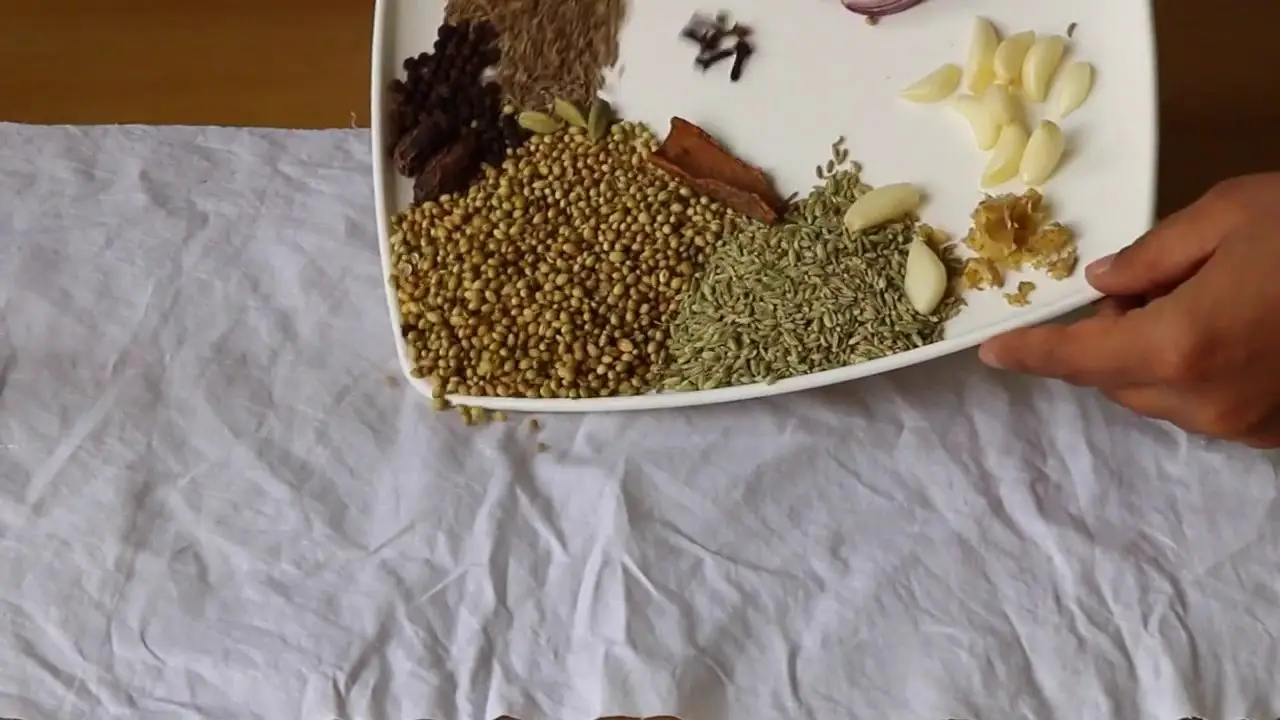
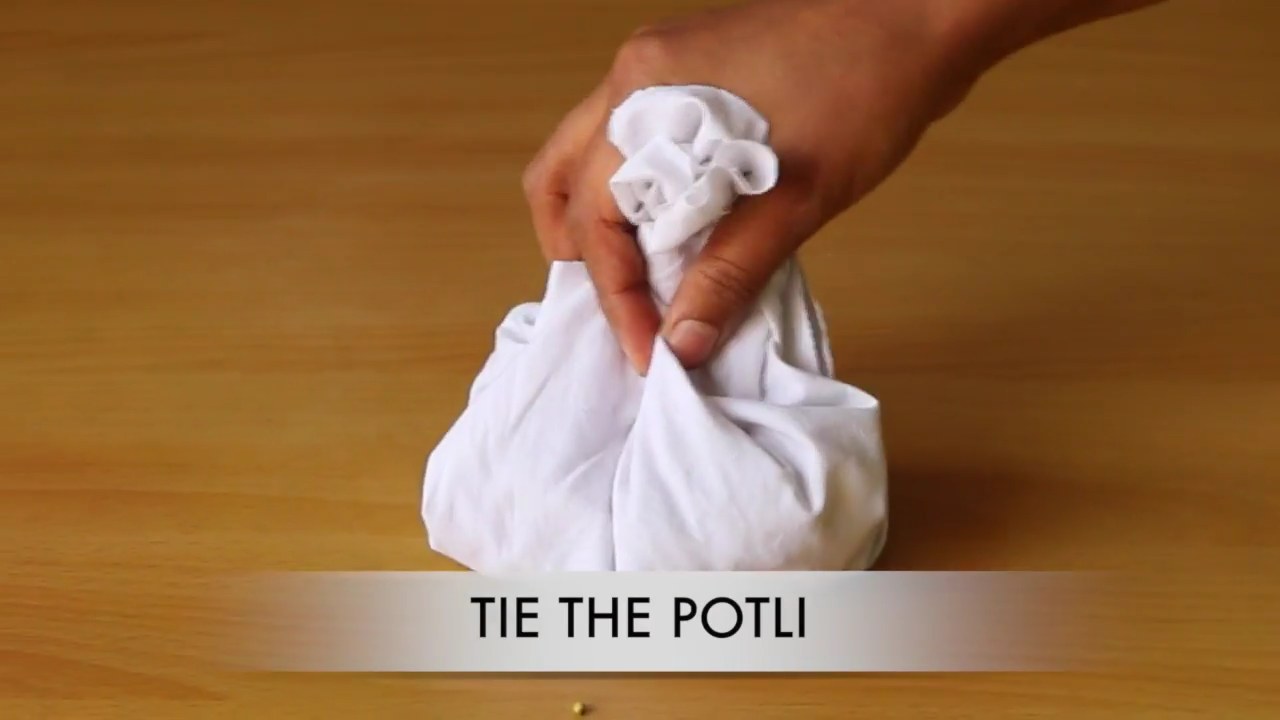
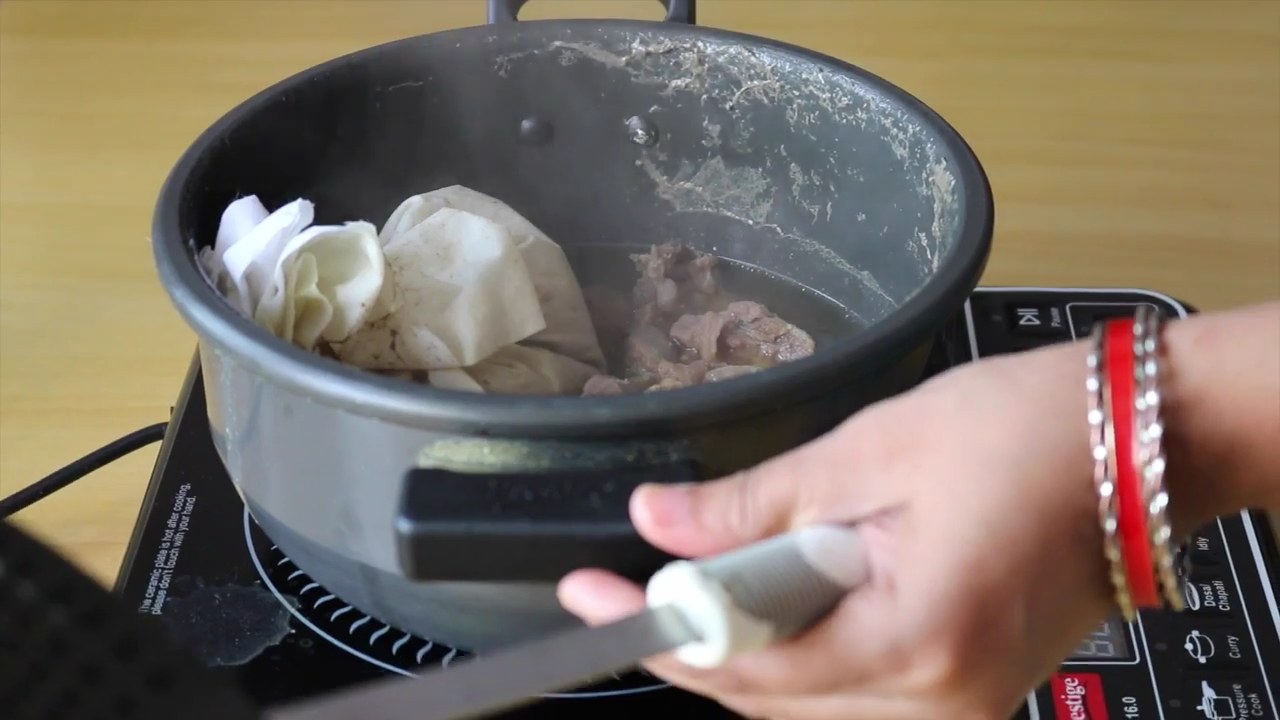
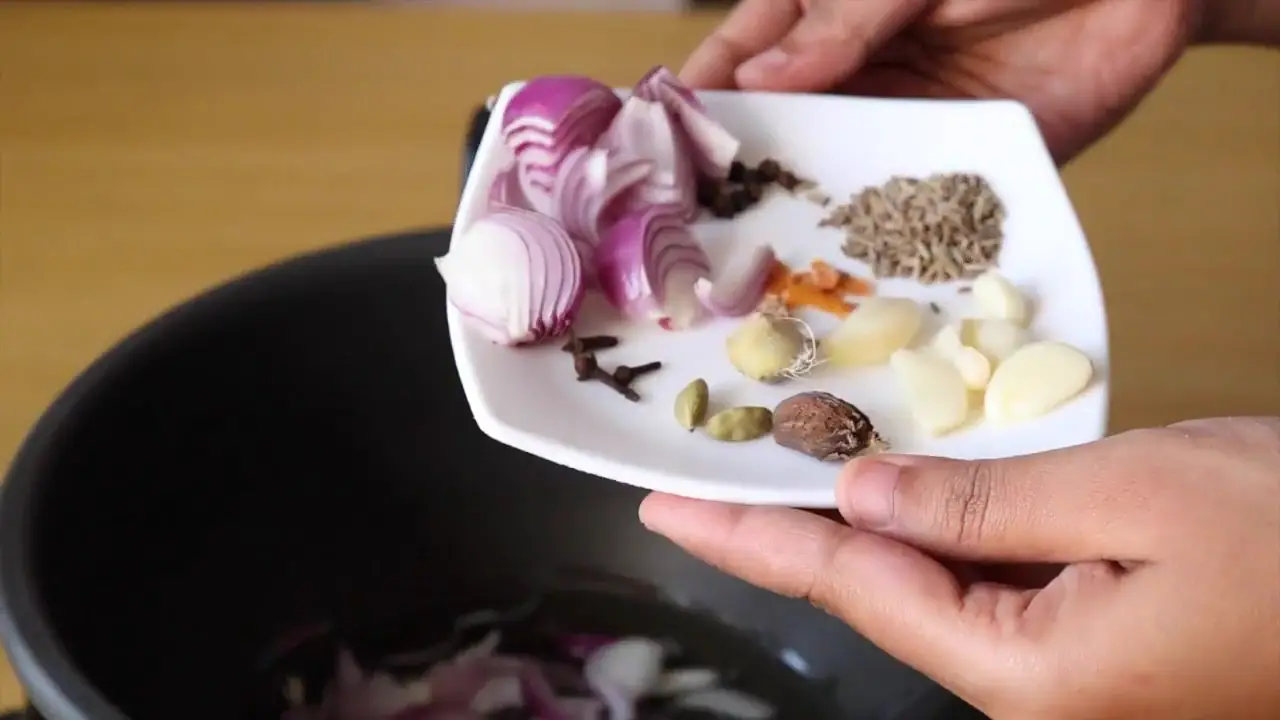
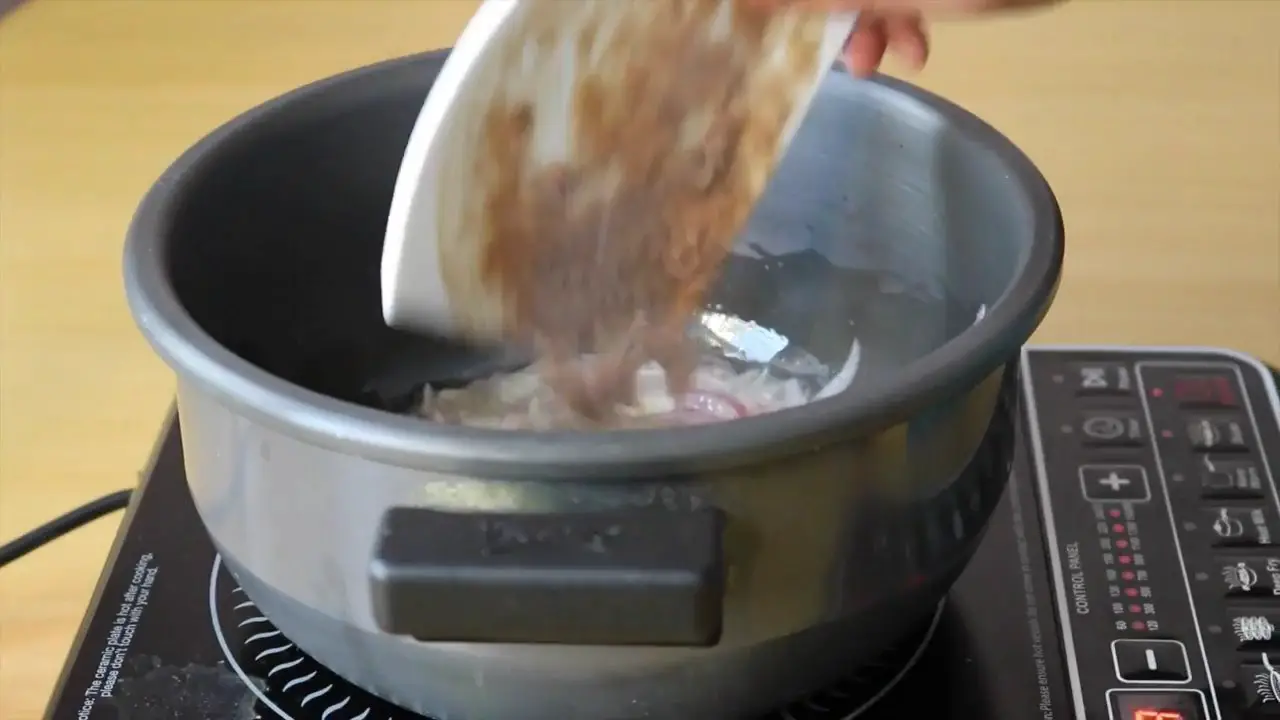
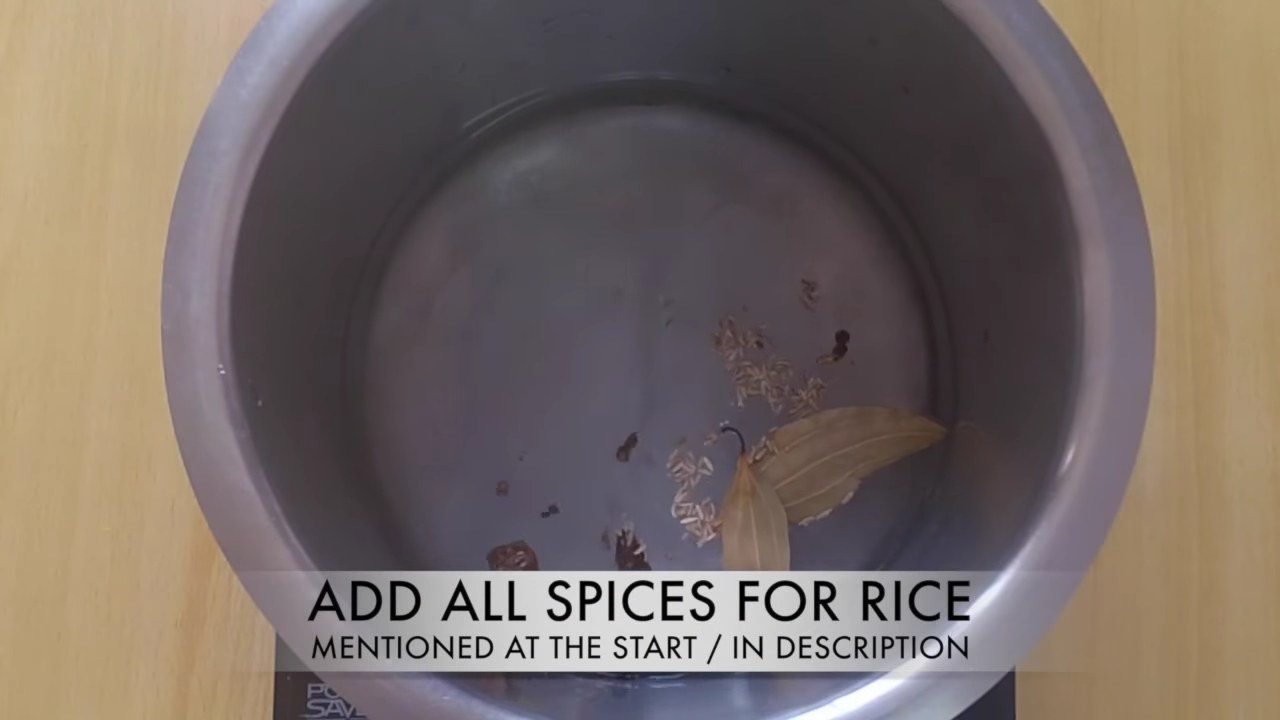
1.Take a muslin cloth and add fennel seeds, coriander seeds, garlic, ginger, cloves, cinnamon stick, black pepper, cardamom green and brown and tie the knot.
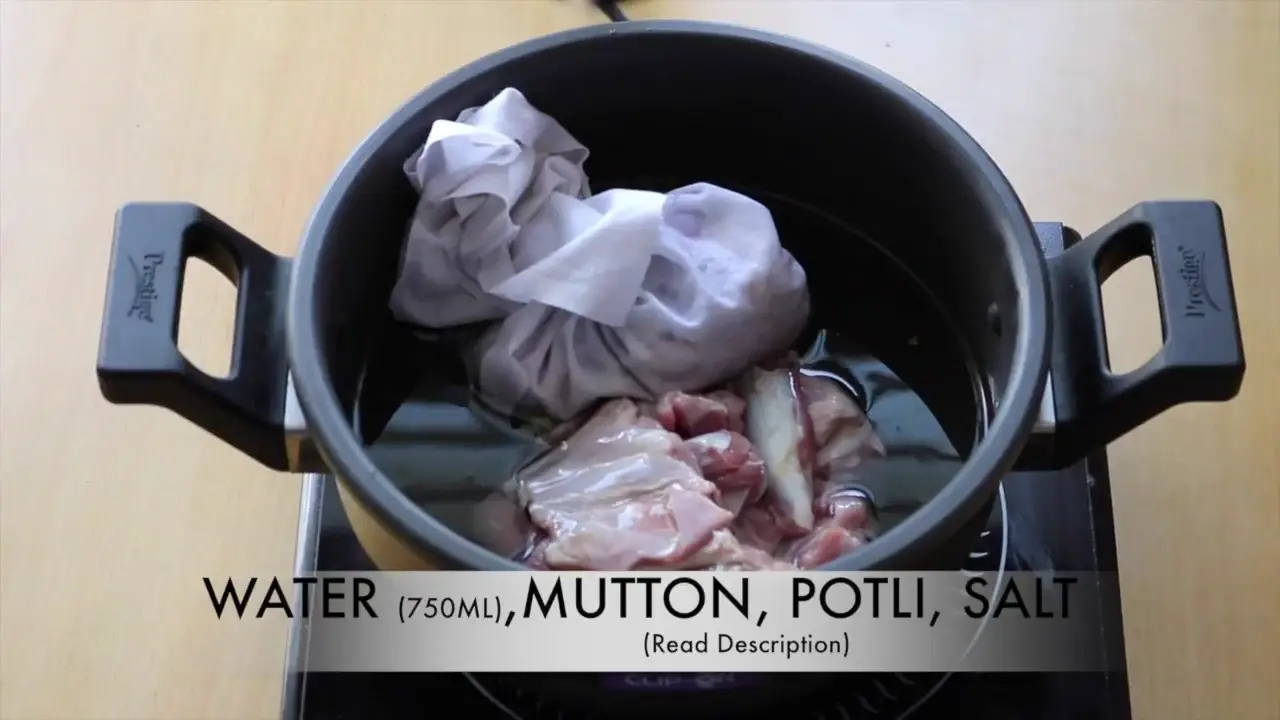
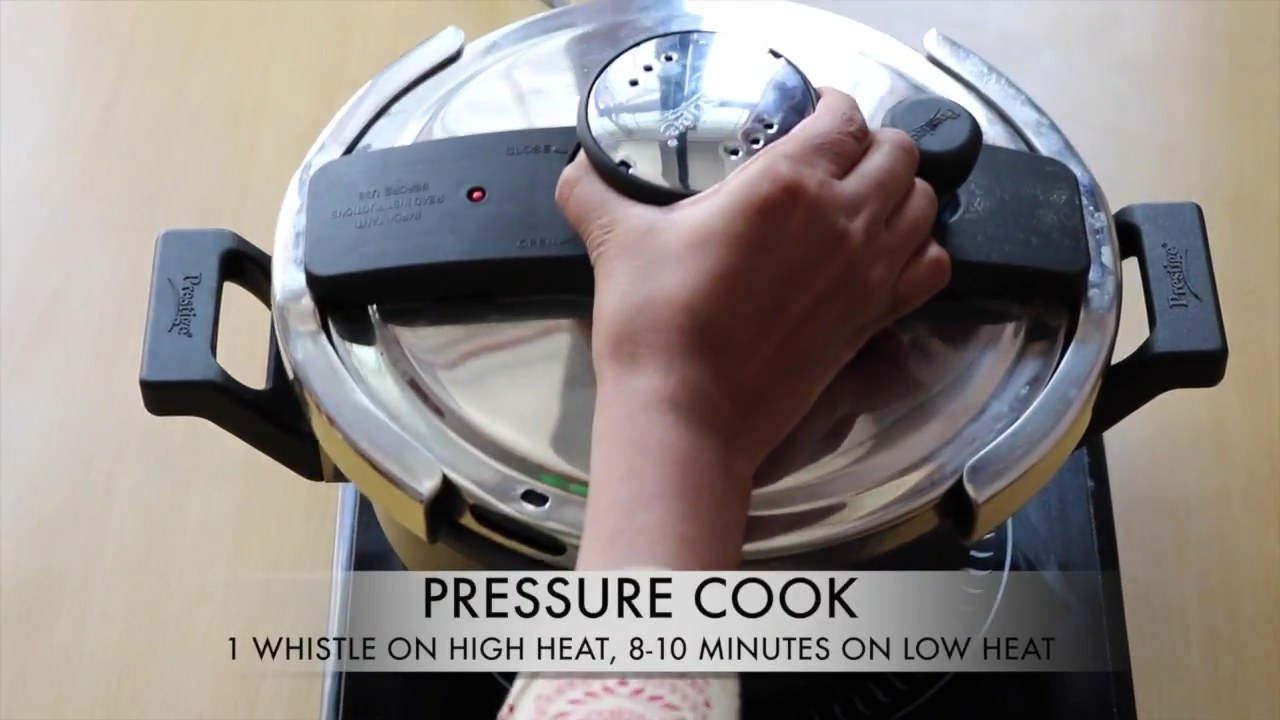
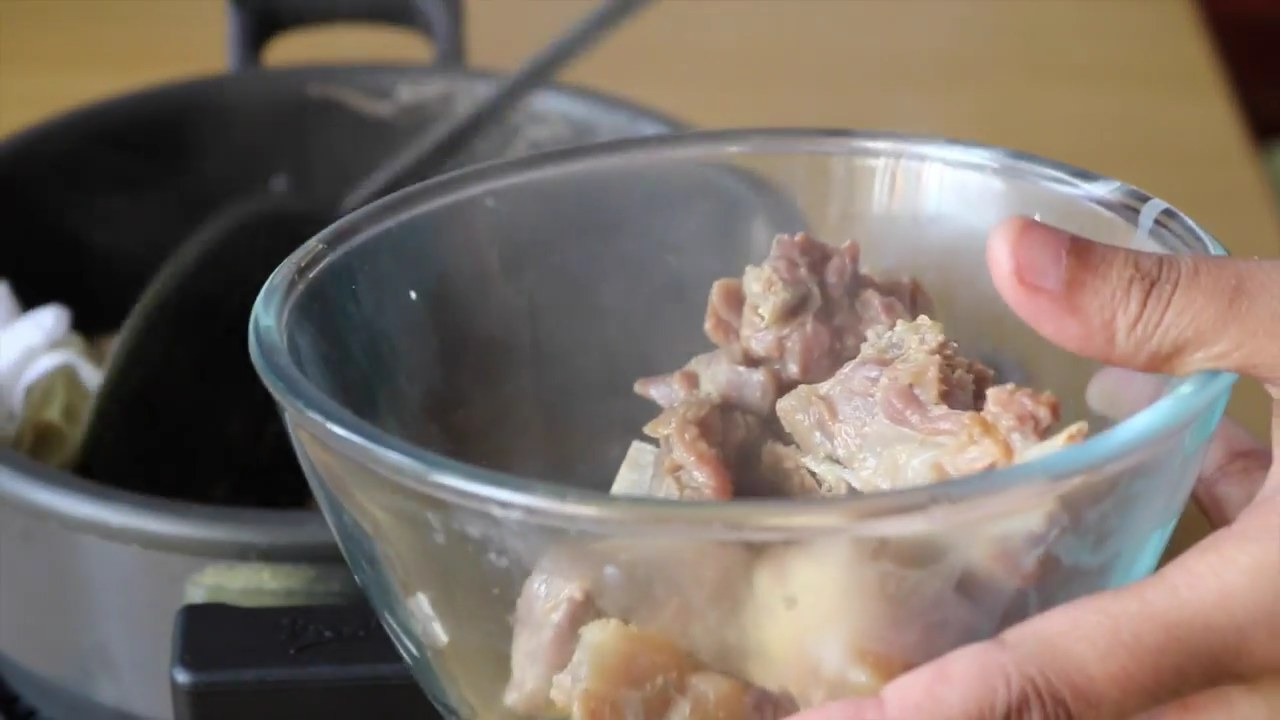
put potli, mutton water, and salt. close the lid of a pressure cooker and pressure cook it on a high flame for one whistle then low the flame and cook for the other 15 minutes.
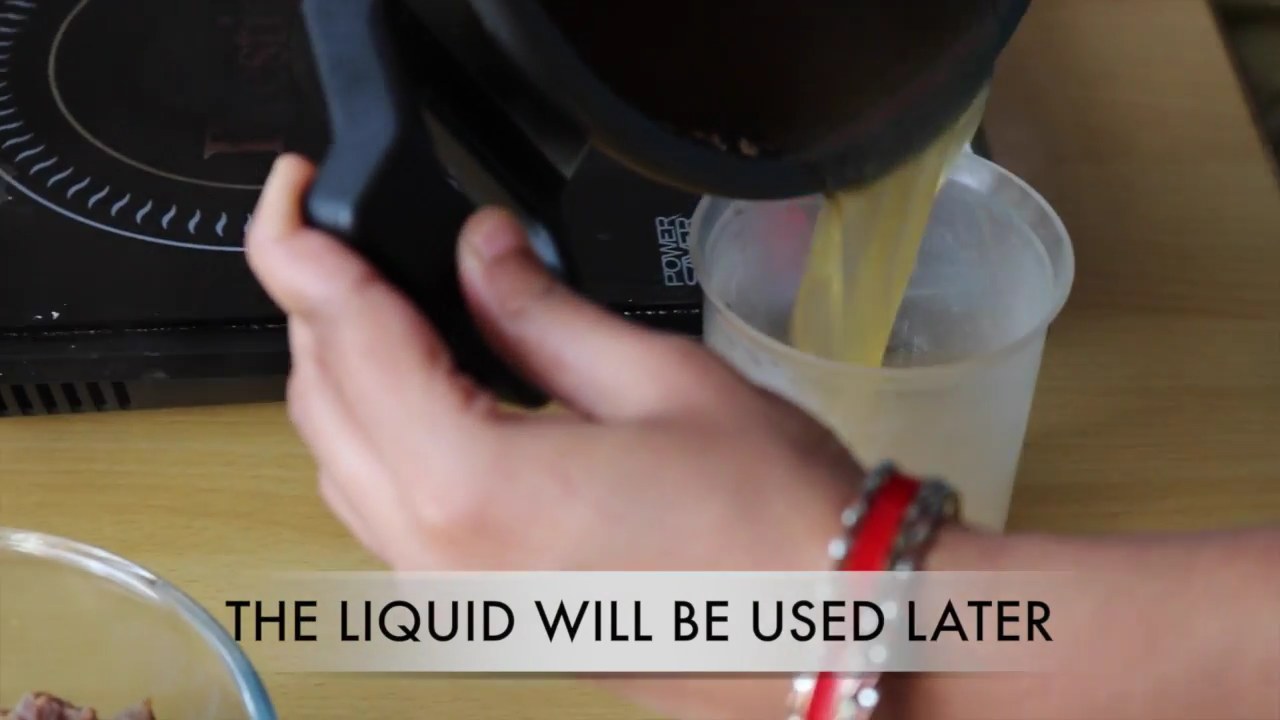
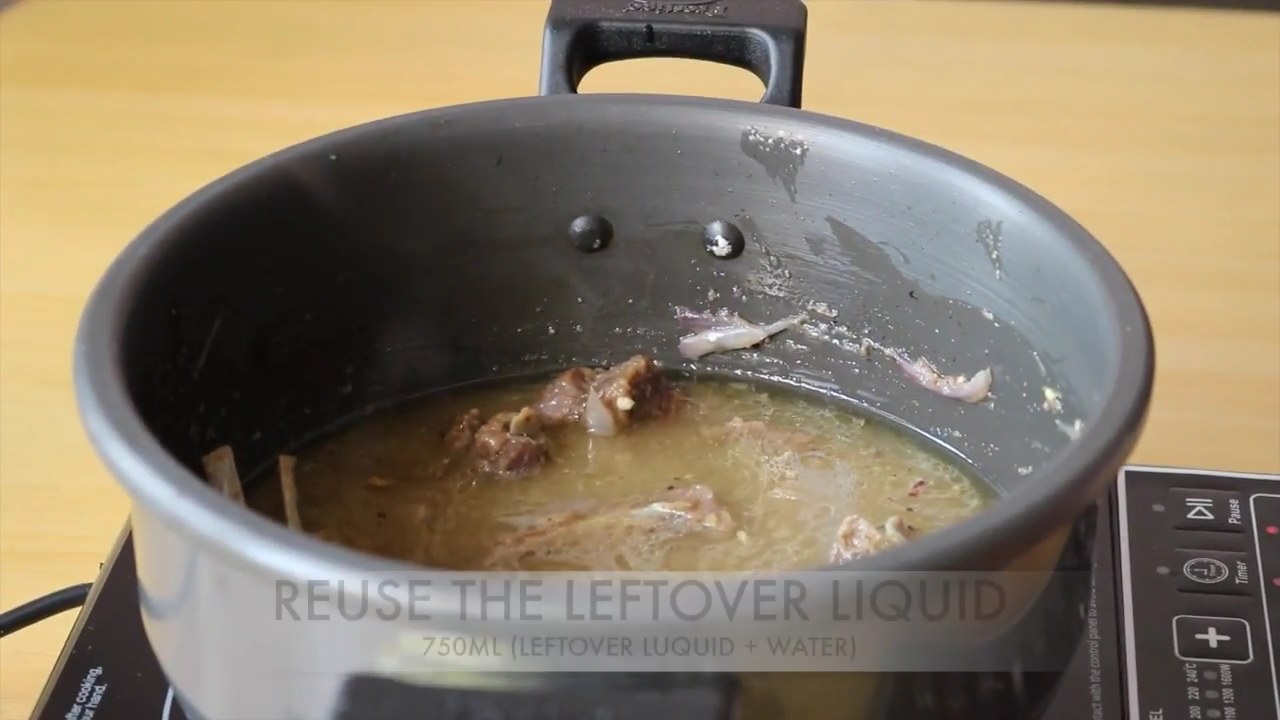
open and take out the mutton pieces in a separate bowl and keep the liquid for later use.
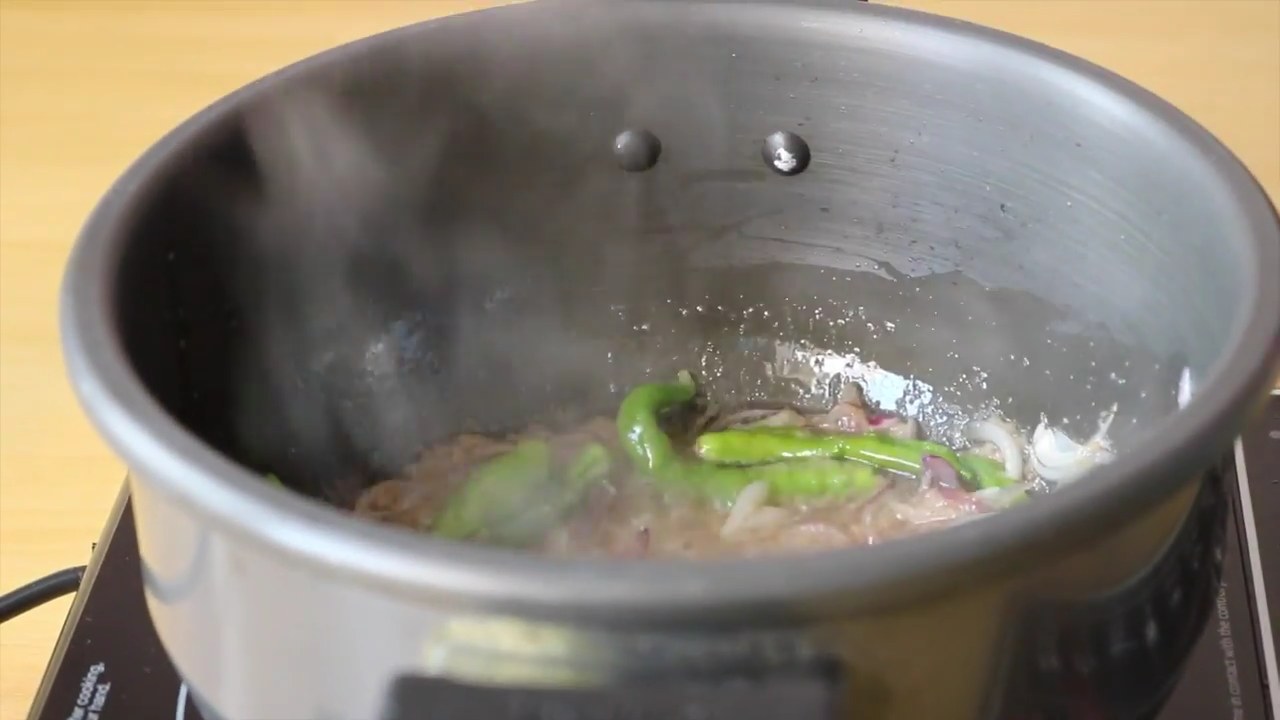
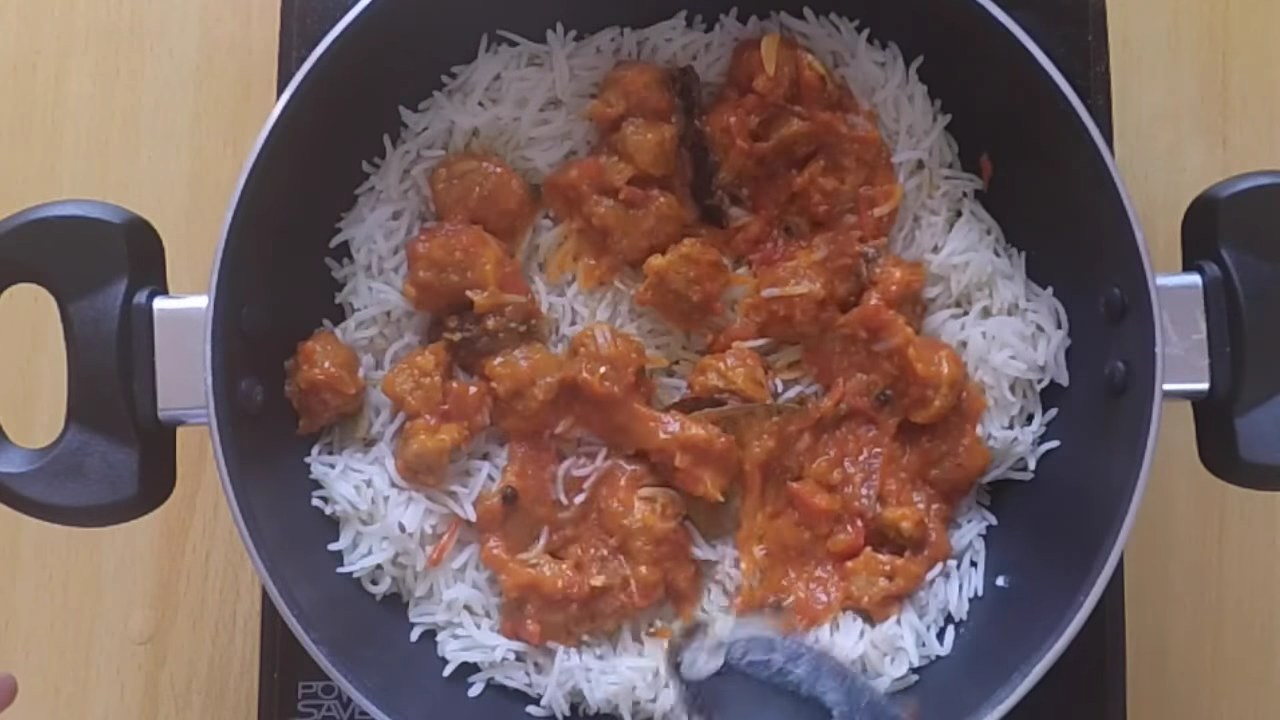
Heat oil in a wok and add onion and fry it till it is translucent in color. Add the ground paste (ginger, garlic, cumin seeds, cloves, cardamom green and brown, black pepper, and mace). Cook it on a high to medium flame till it shows oil separately.
Add slit green chili.
Add cooked mutton pieces and cook for 2-3 minutes.
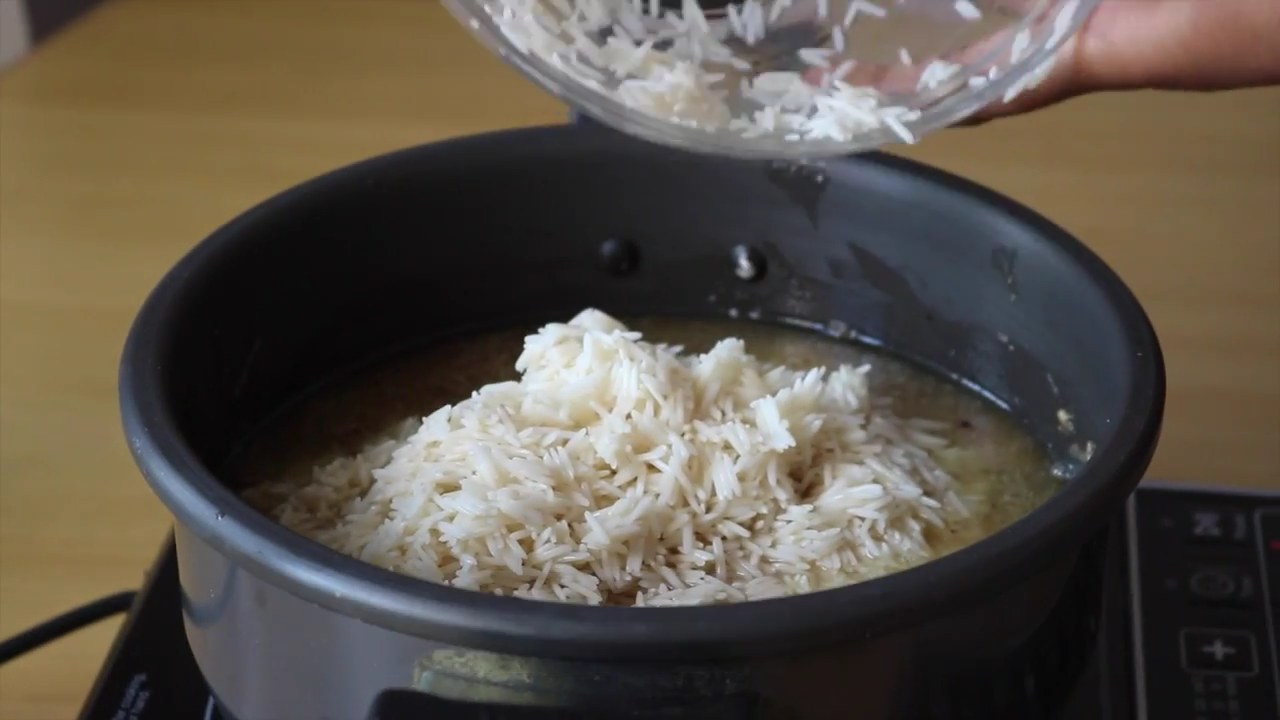
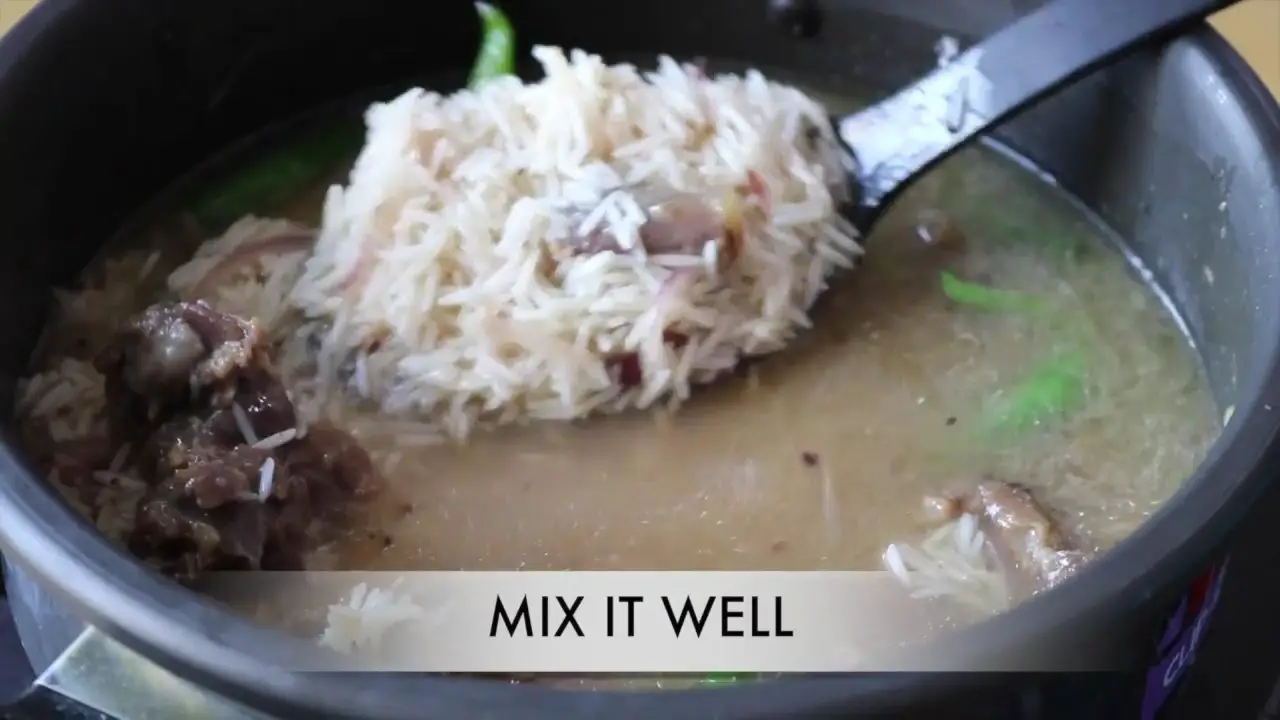
Add reserved water and rice. check salt, add more if necessary.
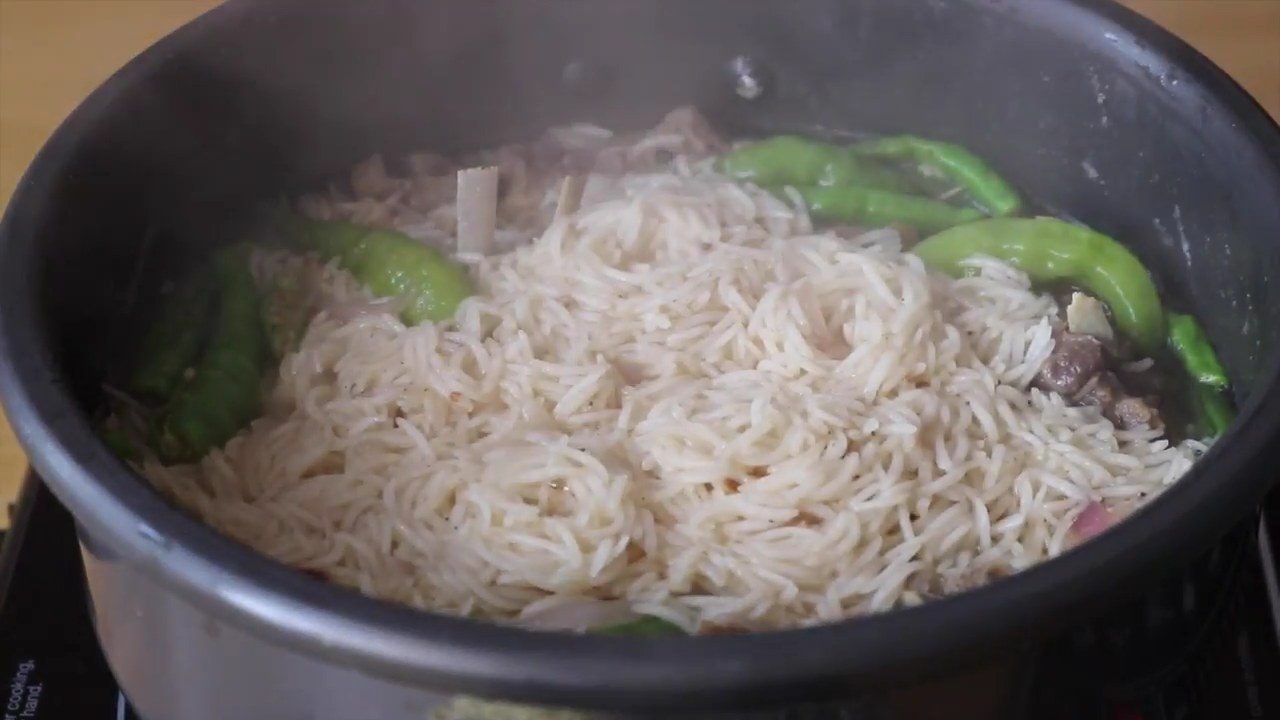
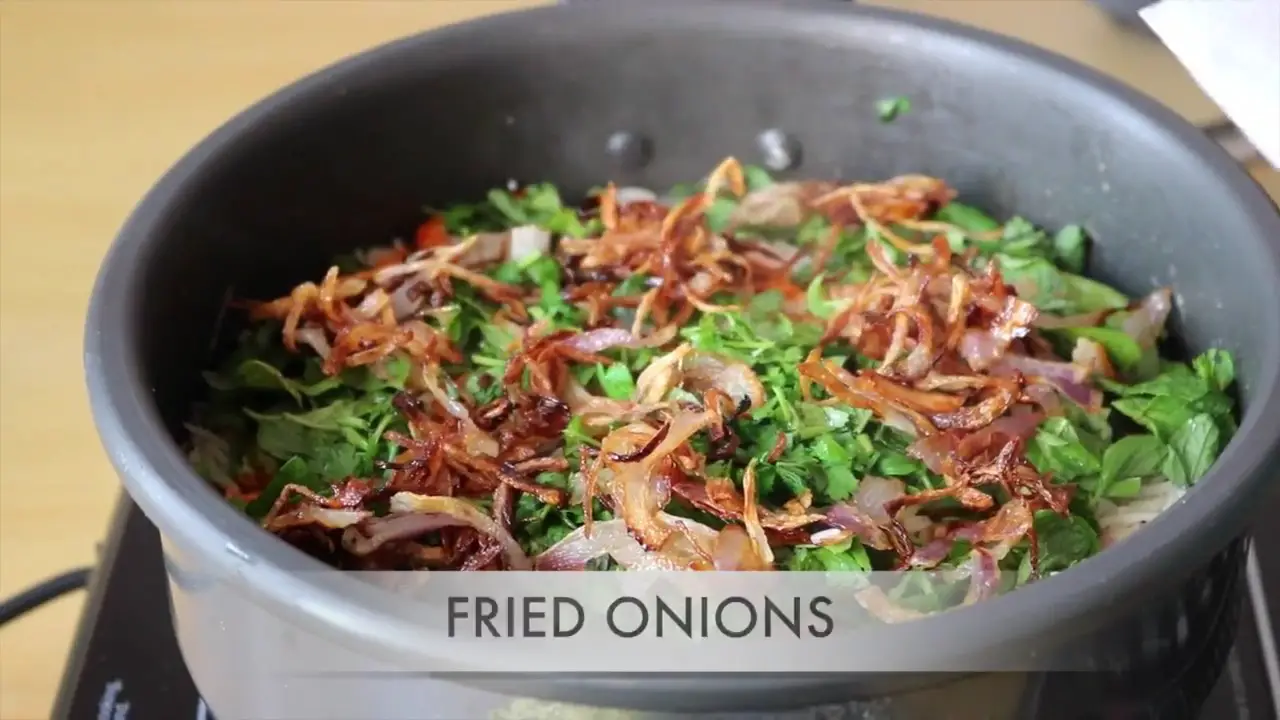
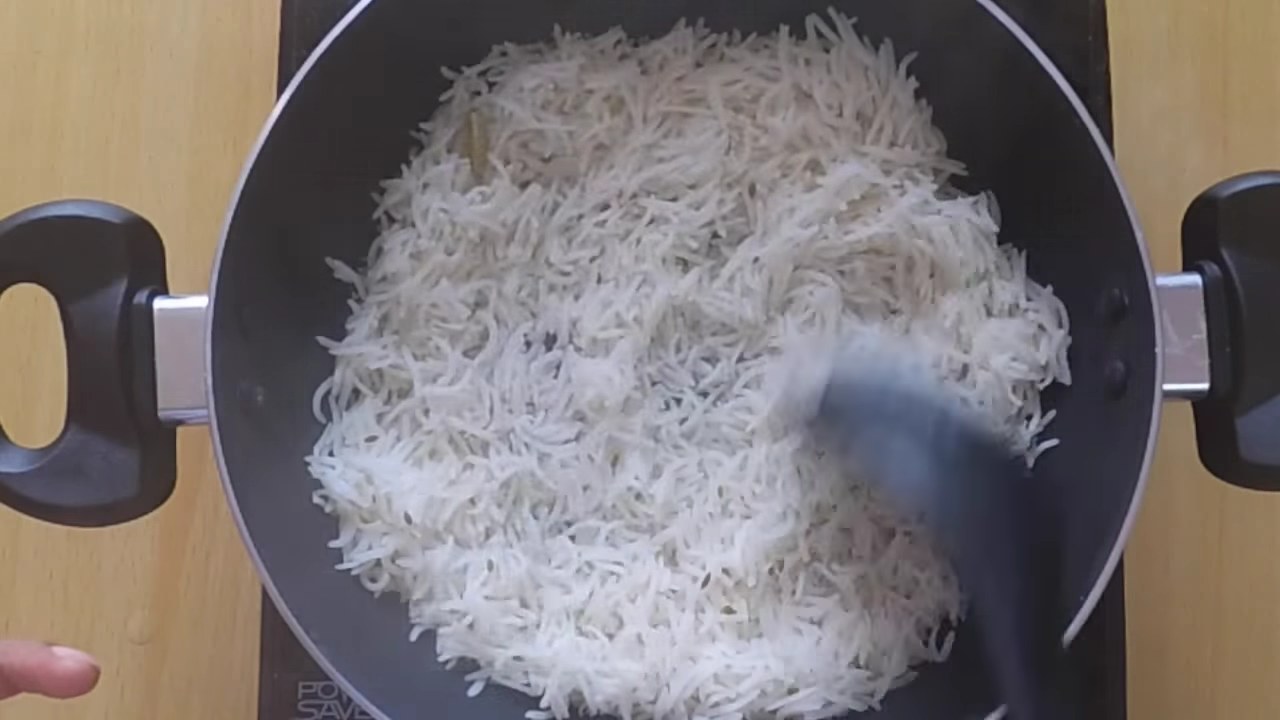
Cook it on a high flame till it boils. Add( kewra plus food color), mint leaves, and fried onion. Keep the flame low and cook it till the rice cooked properly.
Presenting a real treat for Vegetarians, The Delicious Nutrela Biryani. Being a Vegetarian myself, in a family of Nonvegetarians, I know how lonely it feels when people around you talk about Biryani all the time but you can’t have it. I know the feeling sucks.
This is why we have recipes like Nutrela Biryani, which is as good as any nonveg biryani.
And the fact that Nutrela Biryani is a veg biryani, doesn’t mean a non-vegetarians won’t love it. I bet they won’t say no to it.
The Nutella tastes almost like Chicken because of its rubbery texture, kids can;t even differentiate between the Chicken and Nutrela.
Do try this Nutrela Biryani recipe, I am sure you are going to love it.
Follow the step by step process mentioned below or watch the preparation video embedded below.
The Best Nutrela Biryani Recipe Ever | Veg Biryani
Presenting a real treat for Vegetarians, The Delicious Nutrela Biryani. Being a Vegetarian myself, in a family of Nonvegetarians, I know how lonely it feels when people around you talk about Biryani all the time but you can’t have it. I know the feeling sucks.This is why we have recipes like Nutrela Biryani, which is as good as any nonveg biryani.And the fact that Nutrela Biryani is a veg biryani, doesn’t mean a non-vegetarians won’t love it. I bet they won’t say no to it.The Nutella tastes almost like Chicken because of its rubbery texture, kids can;t even differentiate between the Chicken and Nutrela.Do try this Nutrela Biryani recipe, I am sure you are going to love it.
Ingredients
1cupsoaked Nutrella
3sliced Onion
2chopped Tomato
2tbspCoriander leaves
3tbspVegetable oil
1/2teaspoonTurmeric powder
1teaspoonRed chili powder
to taste Salt
1tbspGinger-garlic paste
1/2teaspoonGaram masala powder
1teaspoonCumin seeds
6-7Black pepper
3Cloves
2Cardamom green
1Cardamom brown
2Bay leaf
1/2inchpiece Cinnamon stick
2cupsoaked Basmati rice
1teaspoonCumin seeds
6-7Black pepper
3Cloves
2Cardamom green
1literapprox Water
to taste salt
1Cardamom brown
1Bay leaf
1/2inchpiece Cinnamon stick
small pinch Food color
2tbspKewra water
1/2cupFried onion
3-4green chili
1tbspYogurt
Instructions
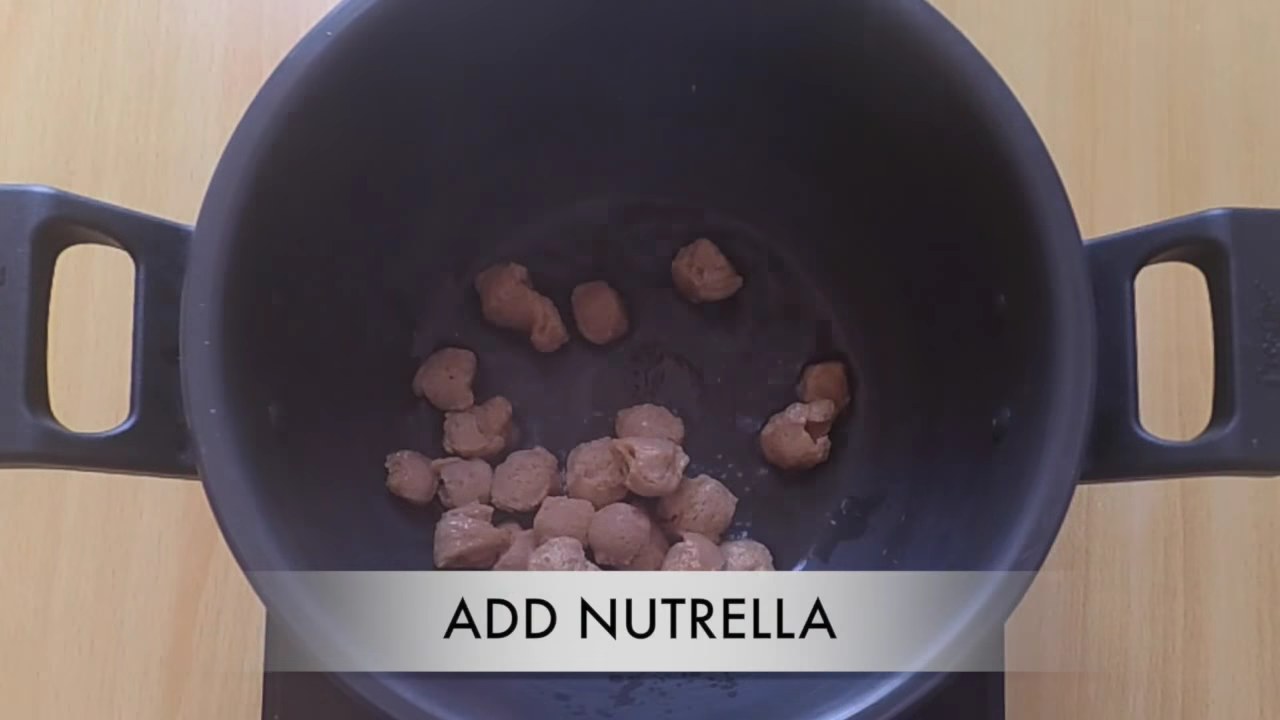
Heat oil in a pressure cooker.
Add Nutrela and fry it for 2-3 minutes on a medium flame.
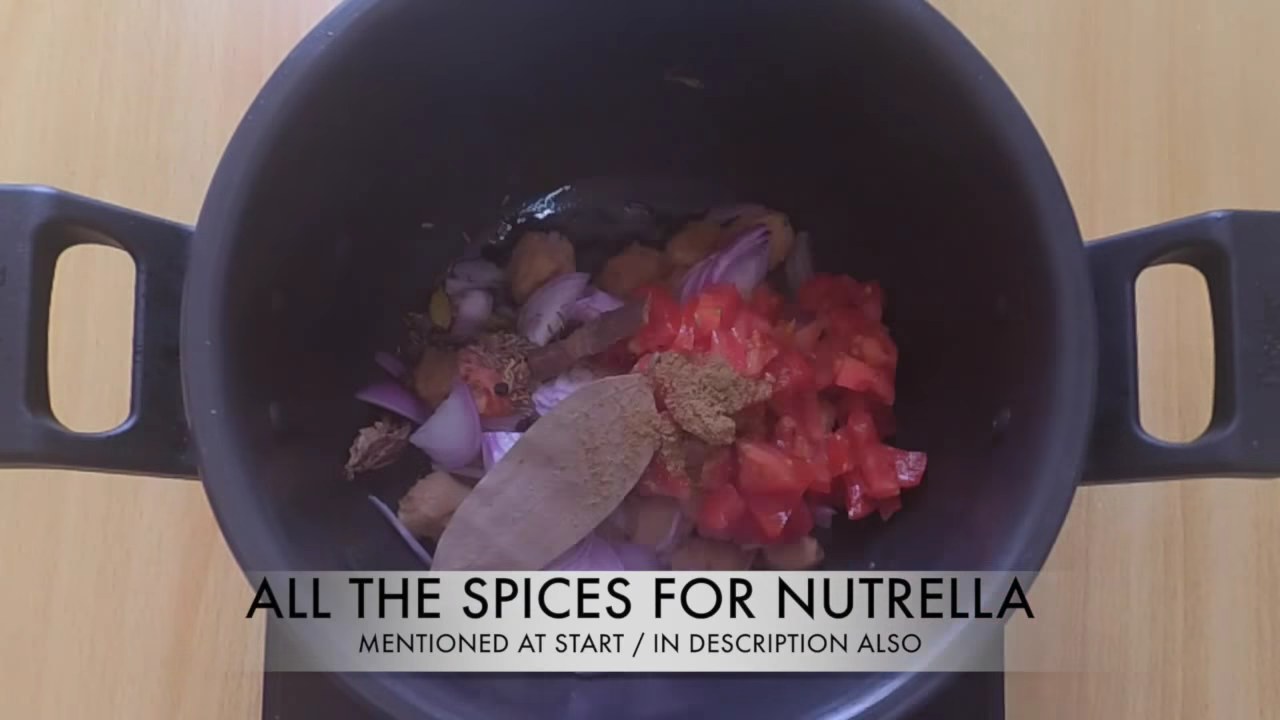
Add sliced onion.
Add all the ingredients mentioned above in the table “ingredients for Nutrela”
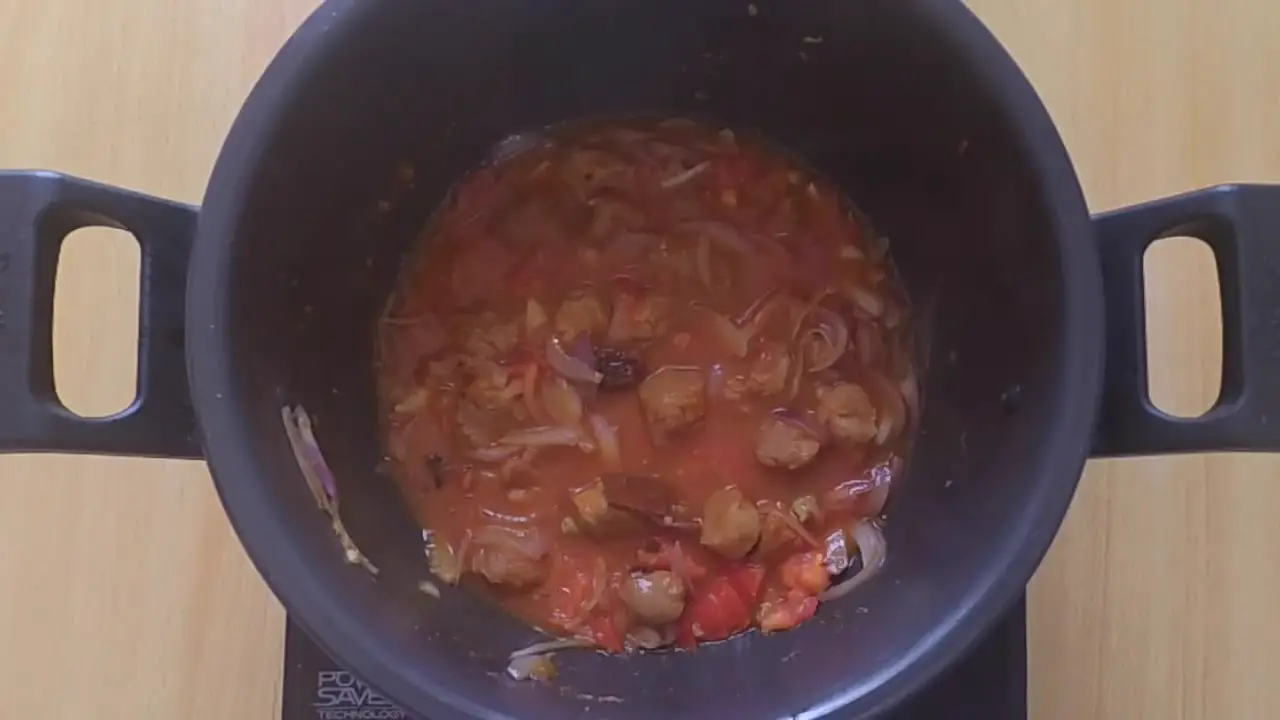
Add 50 ml of water, mix it well. Close the lid of a pressure cooker. Pressure cook it on a high flame for one whistle then keep the flame low and cook for 5-6 minutes.
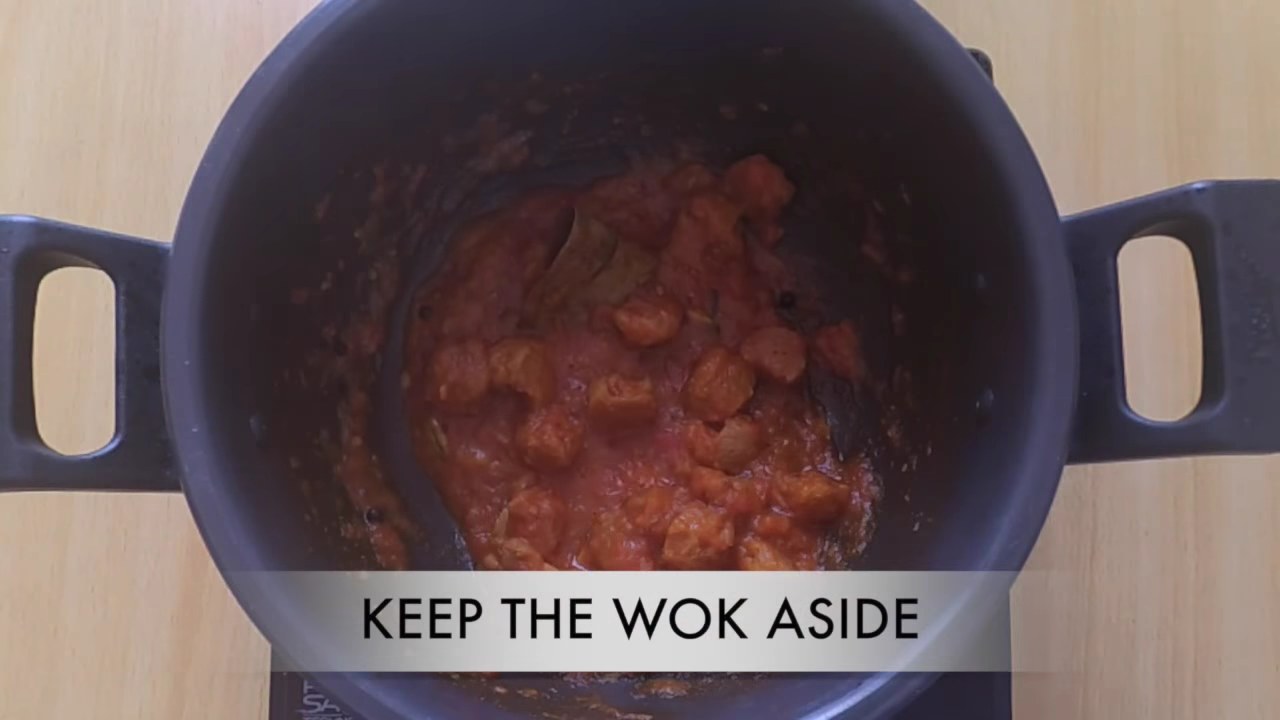
Open cooker, cook it till the water dries up. Keep the cooker aside.
In a separate wok, add water, salt, and all the ingredients mentioned above in the table ” ingredients for rice”. Bring it to boil.
Add soaked rice and cook it till the rice is properly cooked. Strain it using a strainer.
In a separate wok, add yogurt and spread it.
Add half quantity of the cooked rice.
Add cooked Nutrela.
Steps
Heat oil in a pressure cooker.
Add Nutrela and fry it for 2-3 minutes on a medium flame.
Add sliced onion.
Add all the ingredients mentioned above in the table “ingredients for Nutrela”
Add 50 ml water, mix it well. Close the lid of a pressure cooker. Pressure cook it on a high flame for one whistle then keep the flame low and cook for 5-6 minutes.
Open cooker, cook it till the water dries up. Keep the cooker aside.
In a separate wok, add water, salt and all the ingredients mentioned above in the table ” ingredients for rice”. Bring it to boil.
Add soaked rice and cook it till the rice is properly cooked. Starin it using a strainer.
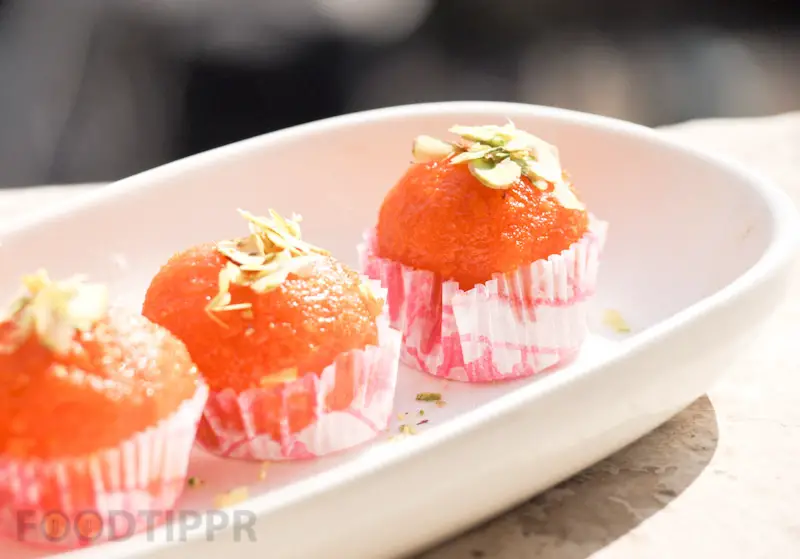
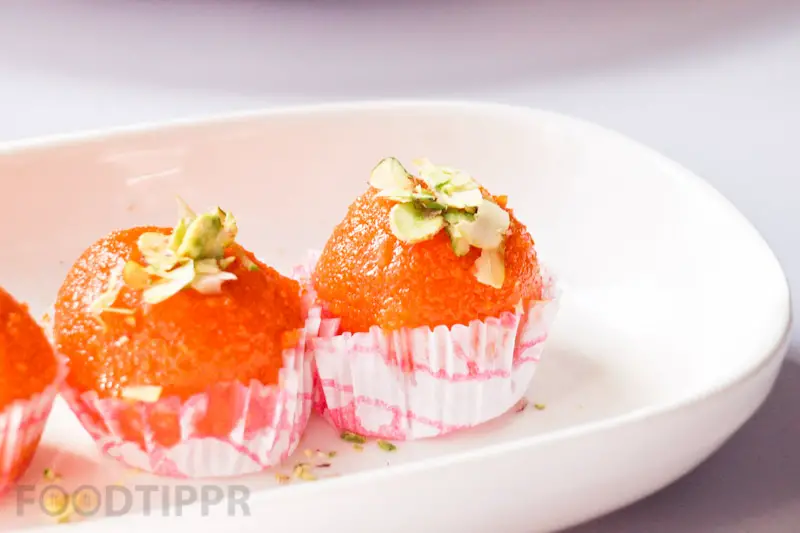
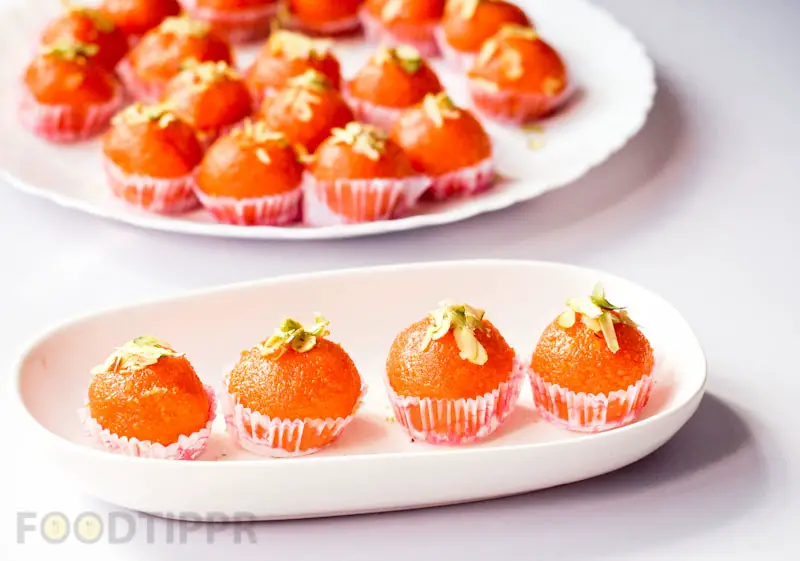
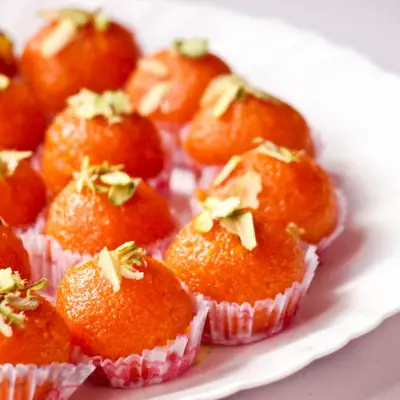
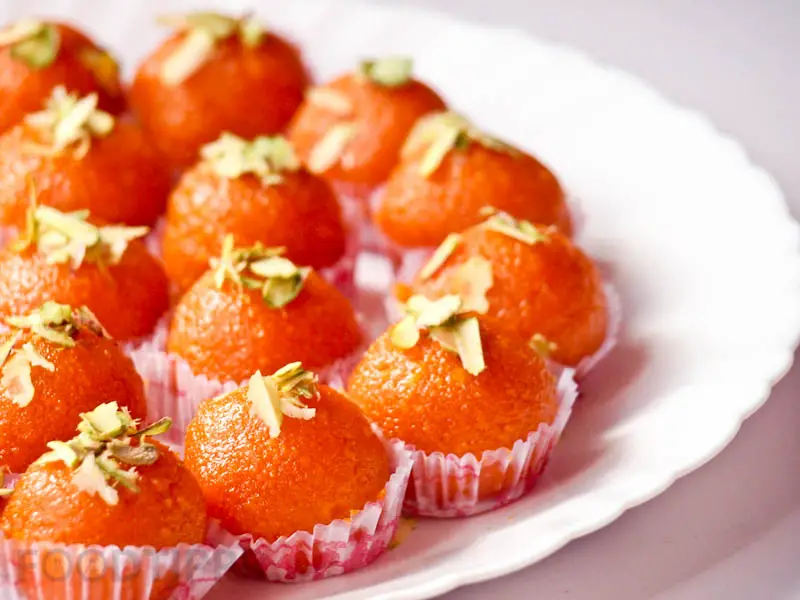
Presenting the recipe of the Delicious Mootichoor Laddoos. If you love Indian Sweets, I am sure the Motichoor Laddoo will be on the top of your lists for favorite Indian sweets, because it is my favorite also.
The Motichoor Laddoos are available in almost every part of India. From Bikanerwala to Haldirams, to your local Halwai shop, everyone offers their versions of this delicious Motichoor Laddoos.
Now you can prepare them at home, and trust me, it’s one of the most delicious Motichoor Laddoos you will have in a long time. Because it’s homemade, it’s hygienic, and you put your efforts to make it, making it more special.
I bet you will never have to visit shops to get these delicious balls of awesomeness.
Find the step by step process of this recipe below or simply watch the video preparation, we have got multiple options for you.
Presenting the recipe of the Delicious Mootichoor Laddoos. If you love Indian Sweets, I am sure the Motichoor Laddoo will be on the top of your lists for favorite Indian sweets, because it is my favorite also.The Motichoor Laddoos are available in almost every part of India. From Bikanerwala to Haldirams, to your local Halwai shop, everyone offers their versions of this delicious Motichoor Laddoos.Now you can prepare them at home, and trust me, it’s one of the most delicious Motichoor Laddoos you will have in a long time. Because it’s homemade, it’s hygienic, and you put your efforts to make it, making it more special.I bet you will never have to visit shops to get these delicious balls of awesomeness.
Prep Time5 minutesmins
Cook Time10 minutesmins
Total Time15 minutesmins
Course: Dessert, sweets
Cuisine: Indian
Keyword: ladoo, mithai, sweets
Ingredients
2cupChickpea flour
for lumps free batter Water
1/4cupGhee
1tbspKewra
1/8tspFood color
1cup+ 1 cup Sugar + waterfor sugar syrup
for deep frying Ghee/refined oil
1/4tspCardamom green powder
for garnish Pistachio
Instructions
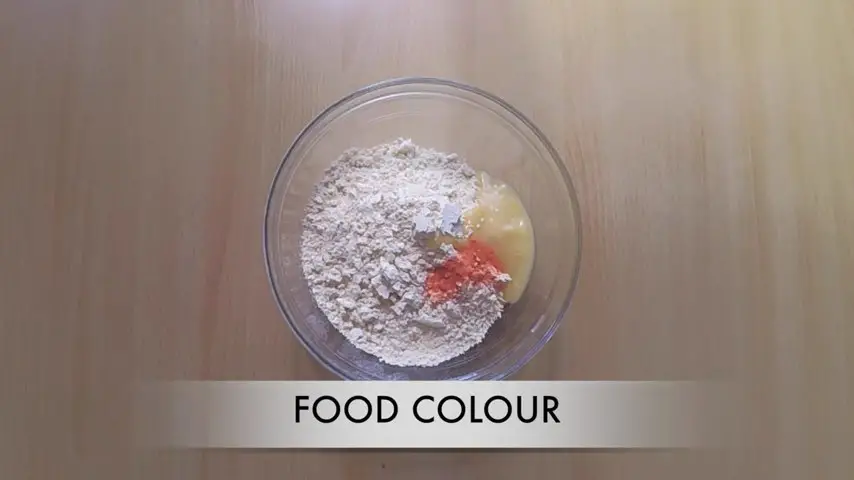
Add chickpea flour in a bowl.
Add ghee and food color.
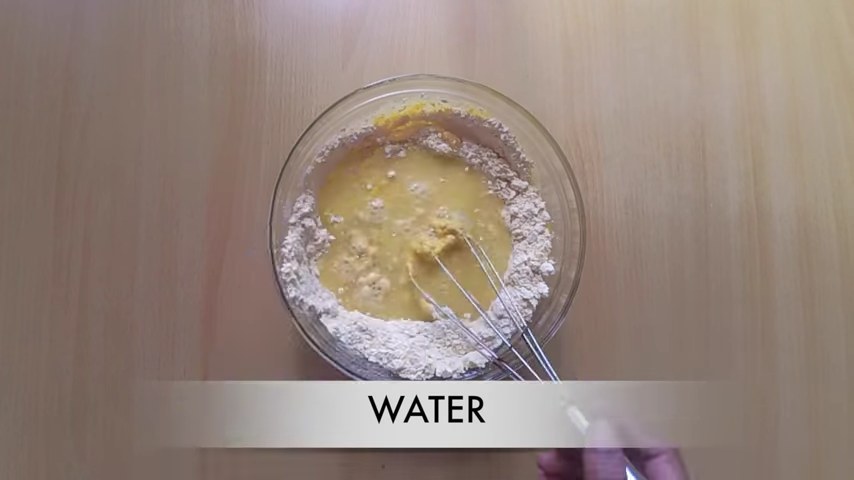
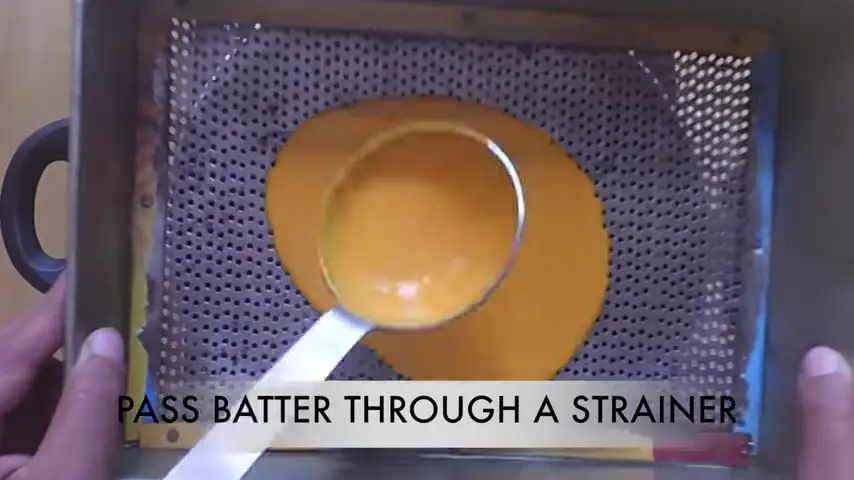
Add water, mix it well and make lumps free batter that can pass through a perforated strainer.
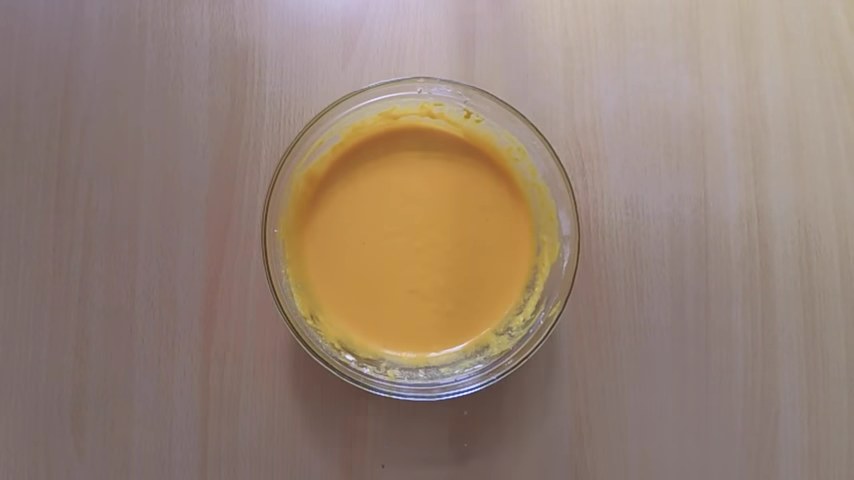
The batter is ready.
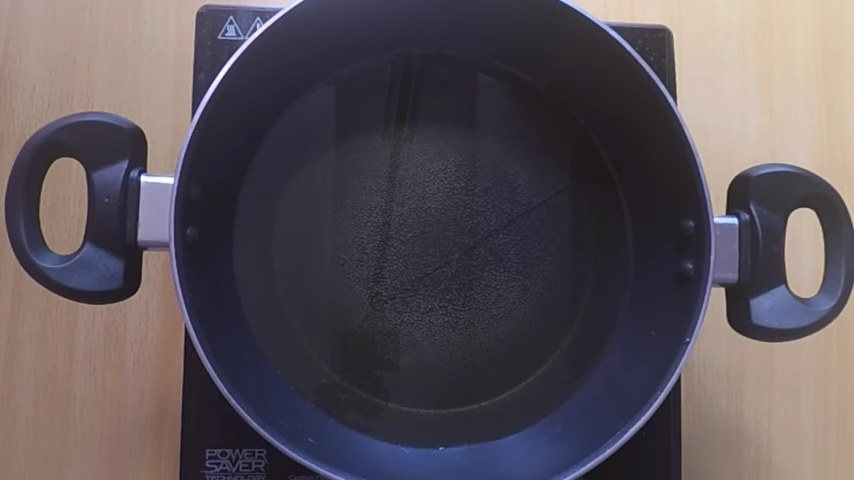
Heat oil in a wok.
Pass batter through a strainer.
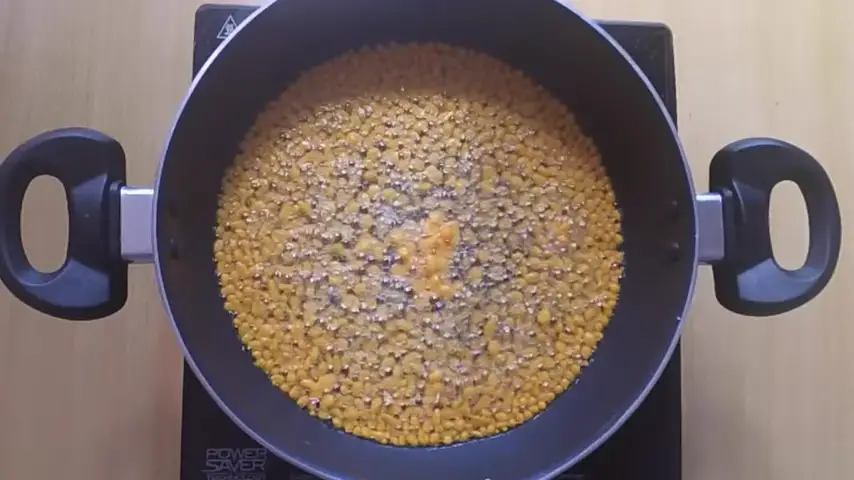
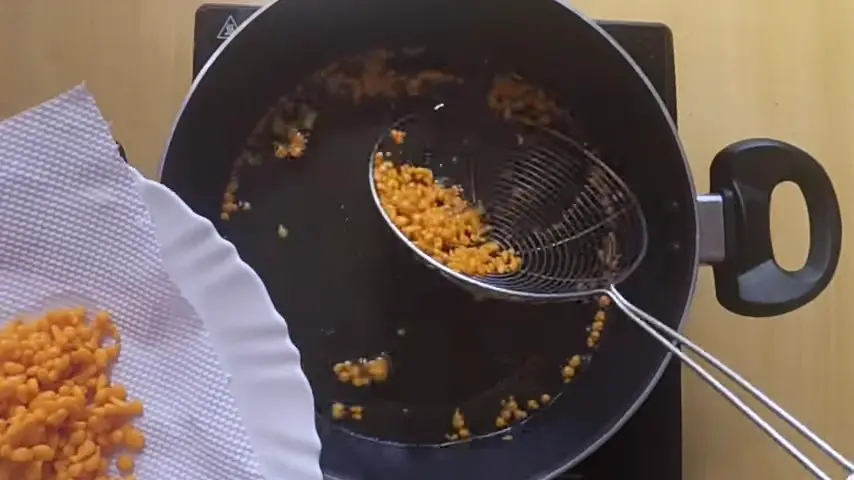
Fry it till it is light golden in color.
Strain it on a tissue paper to get rid of extra oil. Do the same with the rest of the batter and prepare boondis.
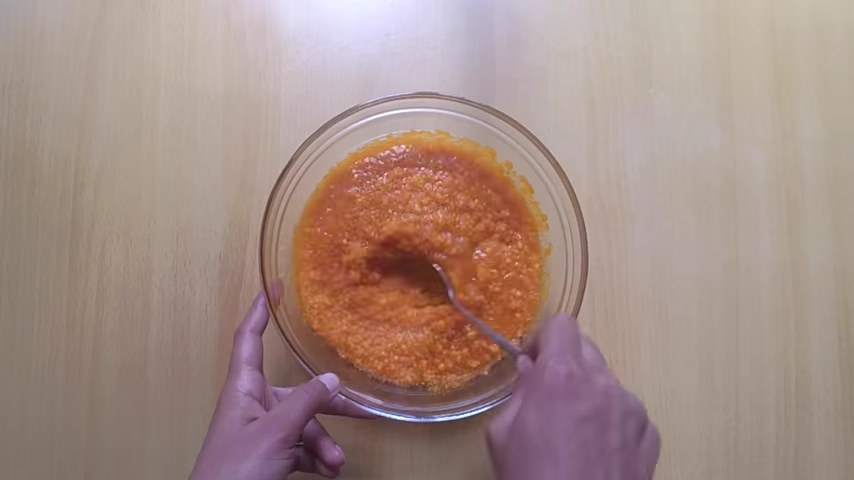
In a wok, prepare the sugar syrup. add water and sugar and bring it to boil.
Add cardamom green powder, food color, and kewra. boil it for 4-5 minutes. switch off the flame.
Grind boondis coarsely.
The boondi is ready.
Transfer the ground boondis in a bowl.
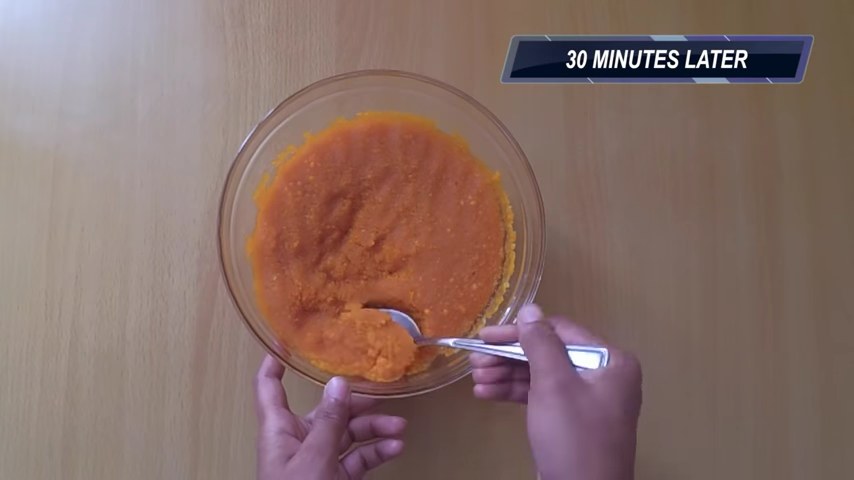
Add sugar syrup.
Mix it well. Cover and keep the bowl in a fridge for half an hour.
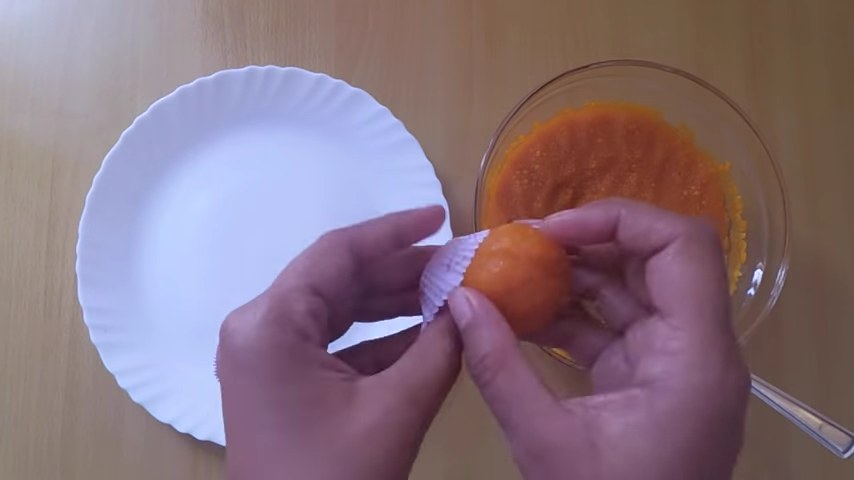
Take out the boondi from the fridge and make laddoo.
Prepare all the laddoo like this.
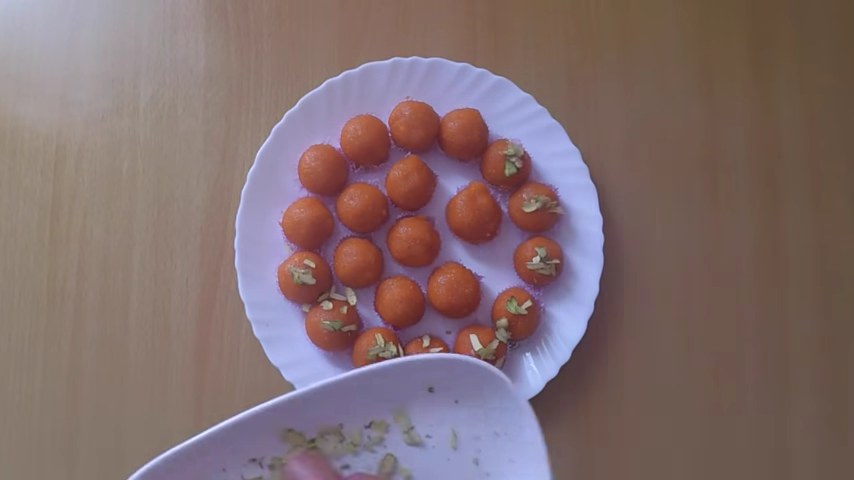
Garnish with sliced pistachio. Delicious homemade laddoos are ready to serve.
Steps
Add chickpea flour in a bowl.
Add ghee and food color.
Add water, mix it well and make lumps free batter that can pass through a perforated strainer.
The batter is ready.
Heat oil in a wok.
Pass batter through a strainer.
Fry it till it is light golden in color.
Strain it on a tissue paper to get rid of a extra oil. Do the same with the rest of the batter and prepare boondis.
In a wok, prepare sugar syrup. add water and sugar and bring it to boil.
Add cardamom green powder, food color and kewra. boil it for 4-5 minutes. switch off the flame.
Grind boondis coarsely.
The boondi is ready.
Transfer the ground boondis in a bowl.
Add sugar syrup.
Mix it well. Cover and keep the bowl in a fridge for half an hour.
Take out the boondi from the fridge and make laddoo.
Prepare all the laddoo like this.
Garnish with sliced pistchio. Delicious homemade laddoos are ready to serve.
Presenting the recipe of Dal Makhani. It is a fancy Dal Makhani Recipe that is available in mostly all the Indian Restaurants.
Fancy doesn’t mean it is not delicious, it is, but it also looks good on the plate.
Which makes it the best recipe for special guests or special days. When you just want to enjoy the home cooked food but still want to have something special.
Follow the step by step process mentioned below to prepare delicious restaurant-style Dal Makhani at home. Wath the full video of the preparation of the recipe.
Presenting the recipe of Dal Makhani. It is a fancy Dal Makhani Recipe that is available in mostly all the Indian Restaurants.Fancy doesn’t mean it is not delicious, it is, but it also looks good on the plate.Which makes it the best recipe for special guests or special days. When you just want to enjoy the home-cooked food but still want to have something special.Follow the step by step process mentioned below to prepare delicious restaurant-style Dal Makhani at home. Wath the full video of the preparation of the recipe.
Prep Time10 minutesmins
Cook Time30 minutesmins
Total Time40 minutesmins
Course: lunch, Main Course
Cuisine: Indian
Keyword: Dal, Dalmakhani, Kidneybean
Servings: 4
Ingredients
1cupwhole urad dalsoaked overnight
2tbspKidney beansoaked overnight2
2,chopped Onion
1cupTomato puree
1tbspCream
3tbspVegetable oil
1tbspButter
2Bay leaf
1/2inchpiece Cinnamon stick
1teaspoonCumin seeds
3Cloves
2Cardamom green
1tbspGinger-garlic paste
1/2teaspoonTurmeric powder
1teaspoonRed chili powder
to taste Salt
1/2teaspoonFenugreek leaves
1teaspoonGaram masala powder
2tbspchopped Coriander leaves
Instructions
In a pressure cooker, add soaked dal, kidney bean, water, and salt.
Close the lid of a pressure cooker and pressure cook it on a high flame for one whistle, then keep the flame low and cook for 8-10 minutes.
Open the cooker, and mash the dal with a spatula to get the velvety texture.
Heat pan with oil and butter. Saute with cumin seeds, bay leaf, cinnamon stick, cardamom green, and cloves.
Add onion, fry till it is translucent in color.
Add ginger-garlic paste and cook for 30 seconds to 1 minute or till the raw smells gone.
Add tomato puree, cook for 3-4 minutes on medium to low flame.
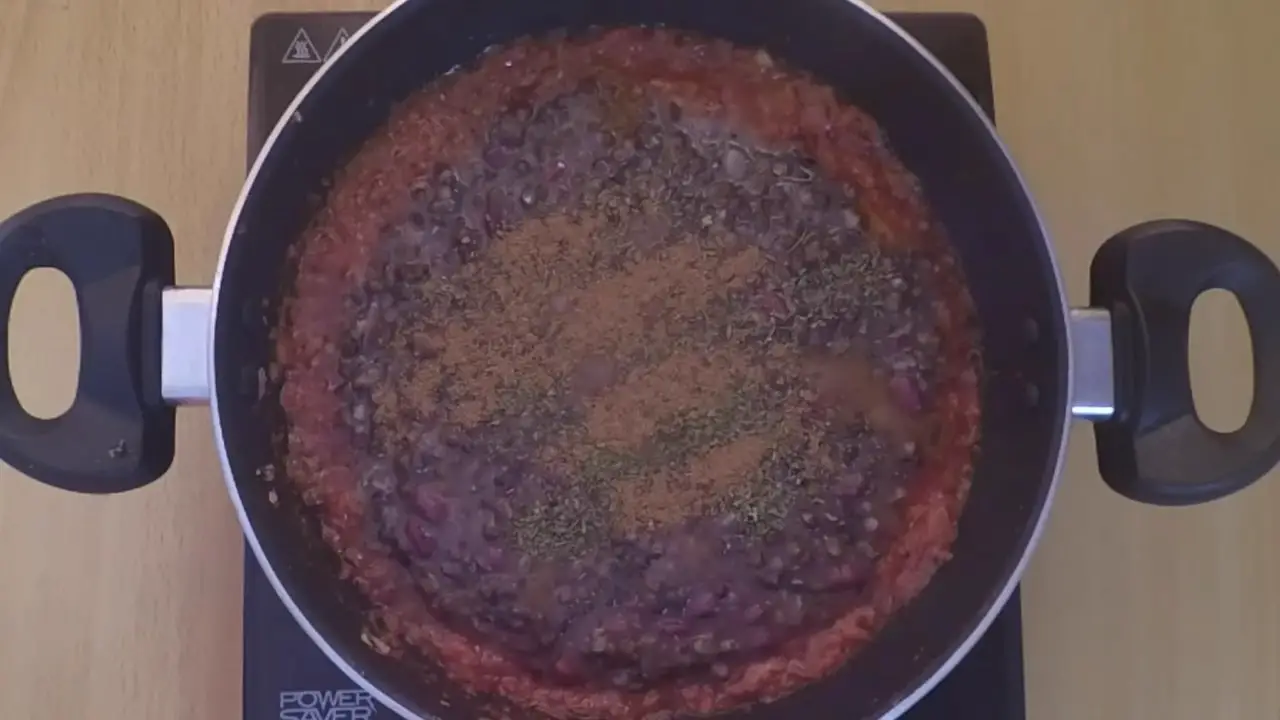
Add red chili powder, turmeric powder, salt, and Garma masala powder. Mix it well and cook for another 2-3 minutes.
The spices are ready to mix in the dal.
Add cooked dal in the wok, mix it well.
Add fenugreek leaves and 1/ 2 tsp garam masala powder. Mix it well. Cook covered on medium-low flame for 2-3 minutes. Switch off the stove.
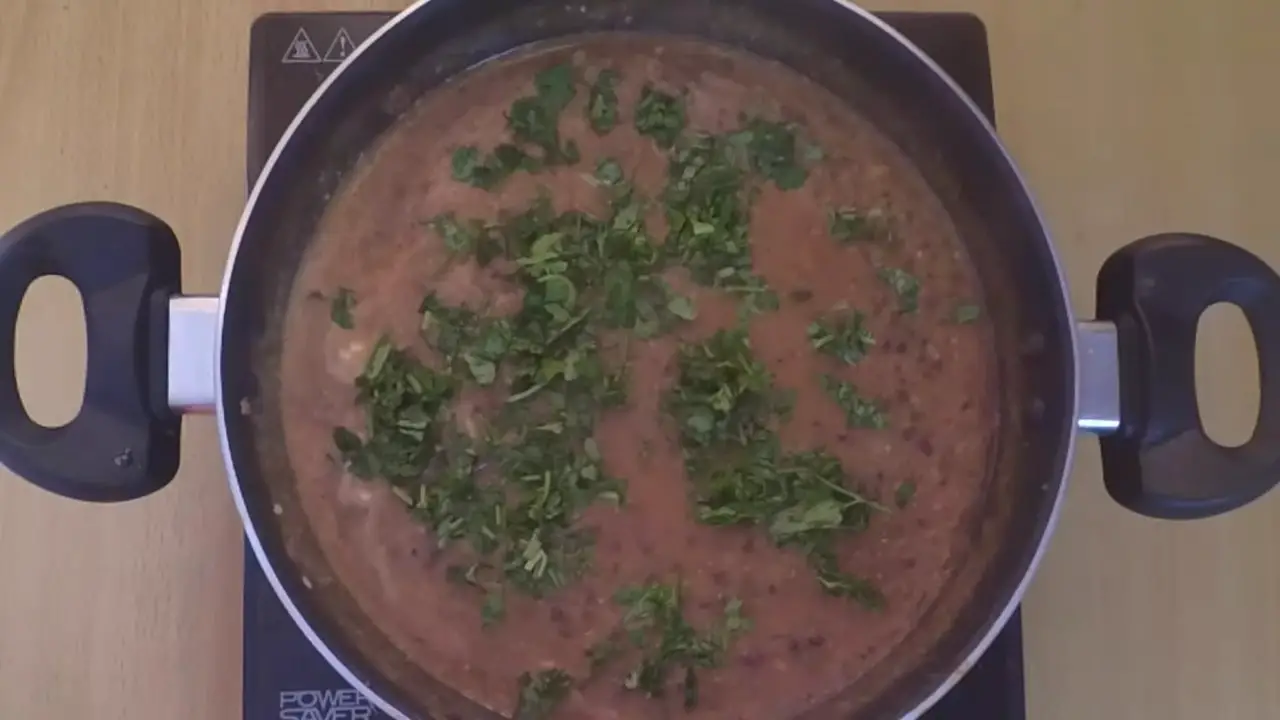
Add cream and mix it well.
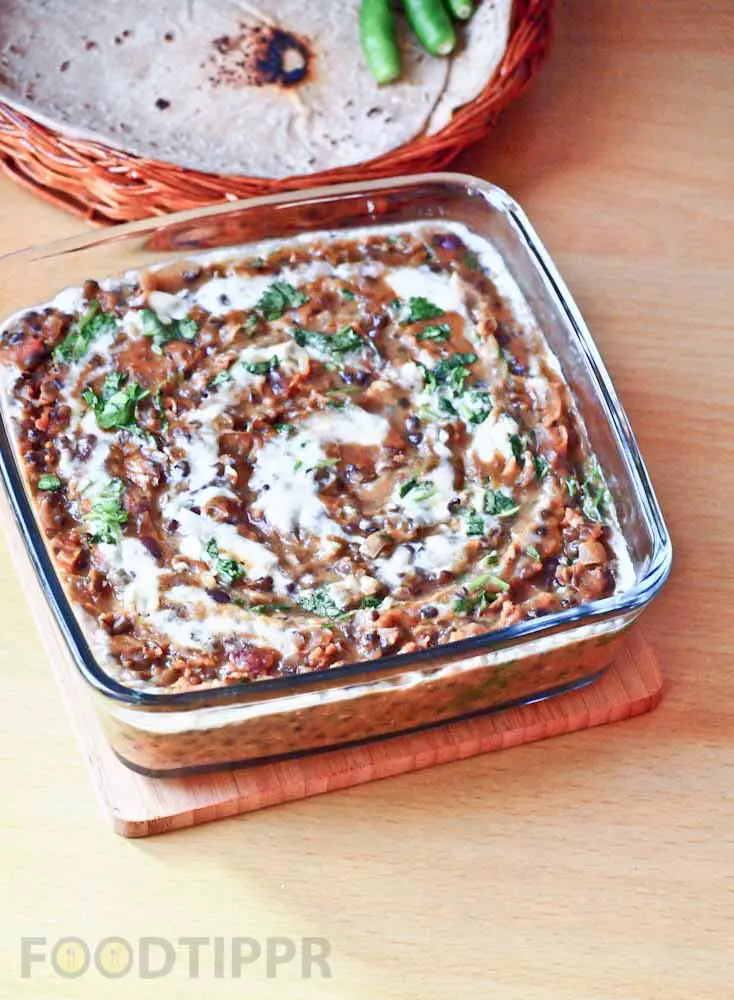
Add chopped coriander leaves. Delicious homemade dal makhani is ready to serve. Serve hot with Naan or chapatti.
Watch the Video Preparation
Steps
In a pressure cooker, add soaked dal, kidney bean, water, and salt.
Close the lid of a pressure cooker and pressure cook it on a high flame for one whistle, then keep the flame low and cook for 8-10 minutes.
Open cooker, and mash the dal with spatula to get the velvety texture.
Heat pan with oil and butter. Saute with cumin seeds, bay leaf, cinnamon stick, cardamom green and cloves.
Add onion, fry till it is translucent in color.
Add ginger-garlic paste and cook for 30 seonds to 1 minutes or till the raw smells gone.
Add tomato puree, cook for 3-4 minutes on medium to low flame.
Add red chili powder, turmeric powder, salt, and Garma masala powder. Mix it well and cook for another 2-3 minutes.
The spices are ready to mix in the dal.
Add cooked dal in the wok, mix it well.
Add fenugreek leaves and 1/ 2 tsp garam masala powder. Mix it well. Cook covered on medium-low flame for 2-3 minutes. Switch off the stove.
Add cream and mix it well.
Add chopped coriander leaves. Delicious homemade dal makhani is ready to sreve. Serve hot with Naan or chapatti.
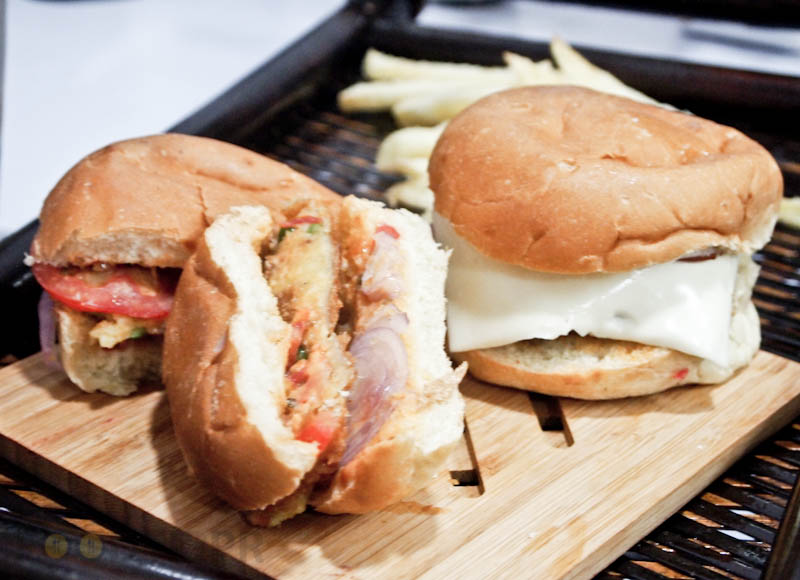
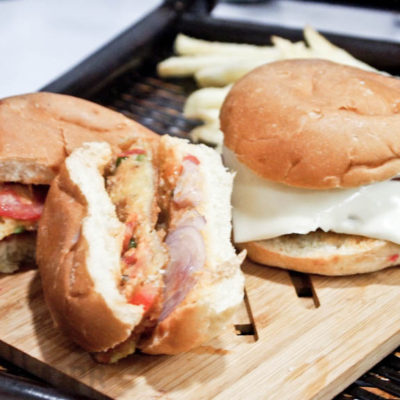
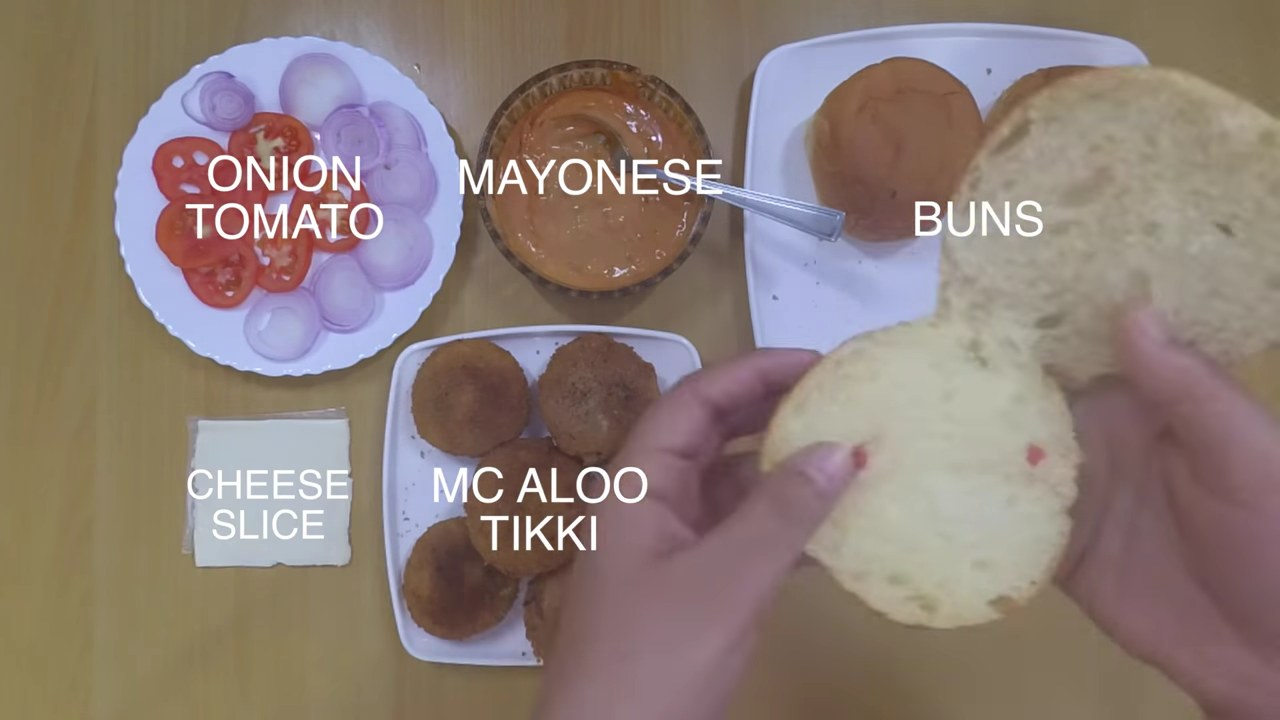
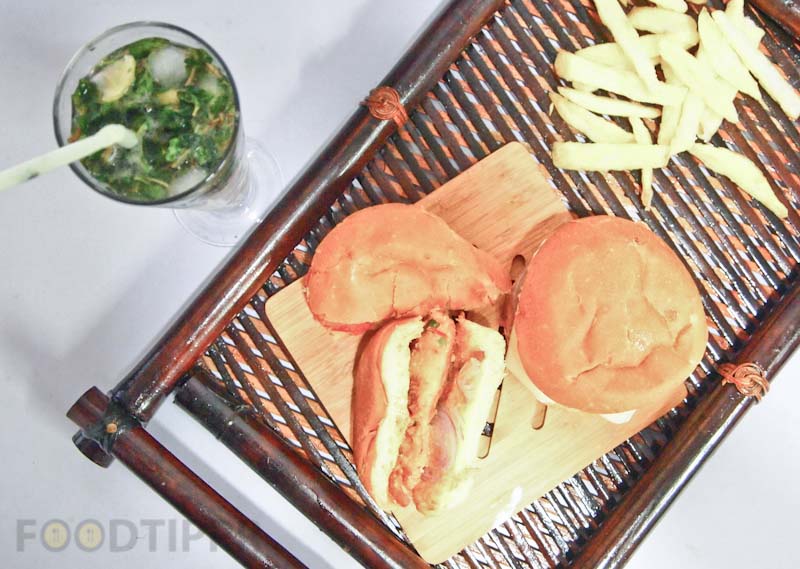
Check out the recipe of McAloo Tikki Burger. Now you can easily prepare it at home.
How many times has this happened that you are craving for something like a McD Burger but you can’t go out because it’s so Far from your place, or it’s so hot, or maybe you don’t have the company to go with.
The reason can be anything, but when the plan gets canceled, and you can’t have the thing you are craving for, everyone will feel bad.
And we don’t want you to feel bad, this is why you should know how to make a Burger at home which is as delicious as the Burger or McDonald’s
Because then no matter how many plans get canceled, you will have no regrets at all.
Check out the step by step process mentioned below to prepare McAloo Tikki Burger. Also, you can watch the full video embedded below. I am sure you are going to love it.
Check out the recipe of McAloo Tikki Burger. Now you can easily prepare it at home.How many times has this happened that you are craving for something like a McD Burger but you can’t go out because it’s so Far from your place, or it’s so hot, or maybe you don’t have the company to go with.The reason can be anything, but when the plan gets canceled, and you can’t have the thing you are craving for, everyone will feel bad.
And we don’t want you to feel bad, this is why you should know how to make a Burger at home which is as delicious as the Burger or McDonald’s
Prep Time10 minutesmins
Cook Time25 minutesmins
Total Time35 minutesmins
Course: Appetizer, Breakfast, Main Course, Side Dish, Snack
Cuisine: American
Keyword: aloo, burger, tikis
Servings: 4
Ingredients
1/2 cup PotatoBoiled, peeled and mashed
1/2cupGreen Peas
1/2cupPohaFlattened rice
4Buns
1tbspGarlicchopped
2tbspButter
to taste Salt
1teaspoonRed chili powder
1/2teaspoonTurmeric powder
1/4teaspoonPepper powder
1/4teaspoonCumin powder
1/4teaspoonDry Mango powder
1/2cupAll purpose flour
1/4cupCorn flour
1/4tspBaking powder
1/2cupChilled water
1tbspVegetable oil
6-7Tomato slices
6-7Onion rings
optional Amul Cheese slices
1/2cupMayonnaise
2cupBread crumbs
Instructions
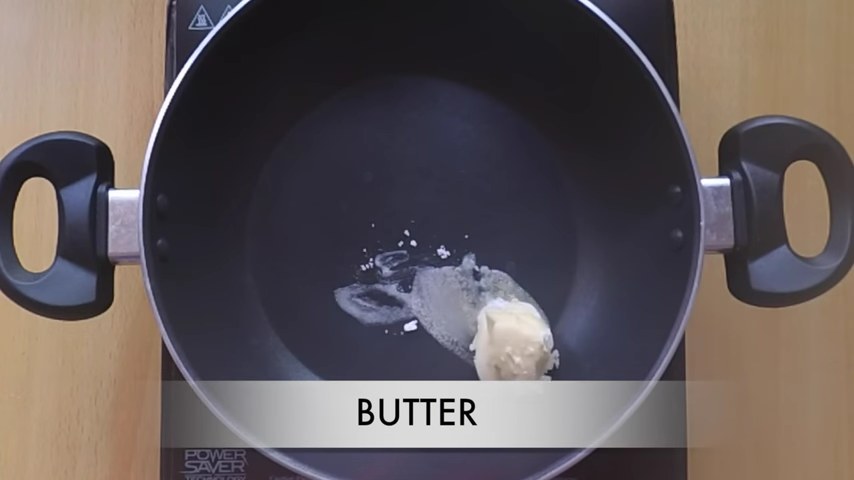
Heat butter in a wok.
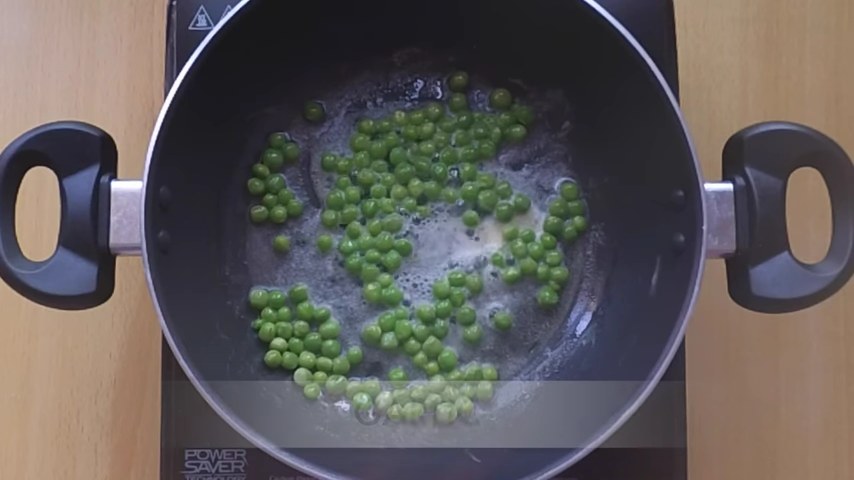
Add green peas and garlic. Cook for 1-2 minutes on a medium flame.
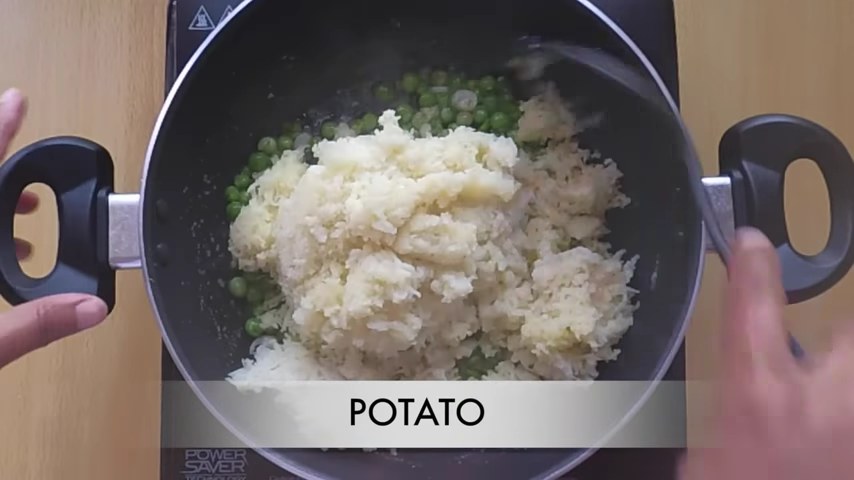
Add potatoes, mix it well.
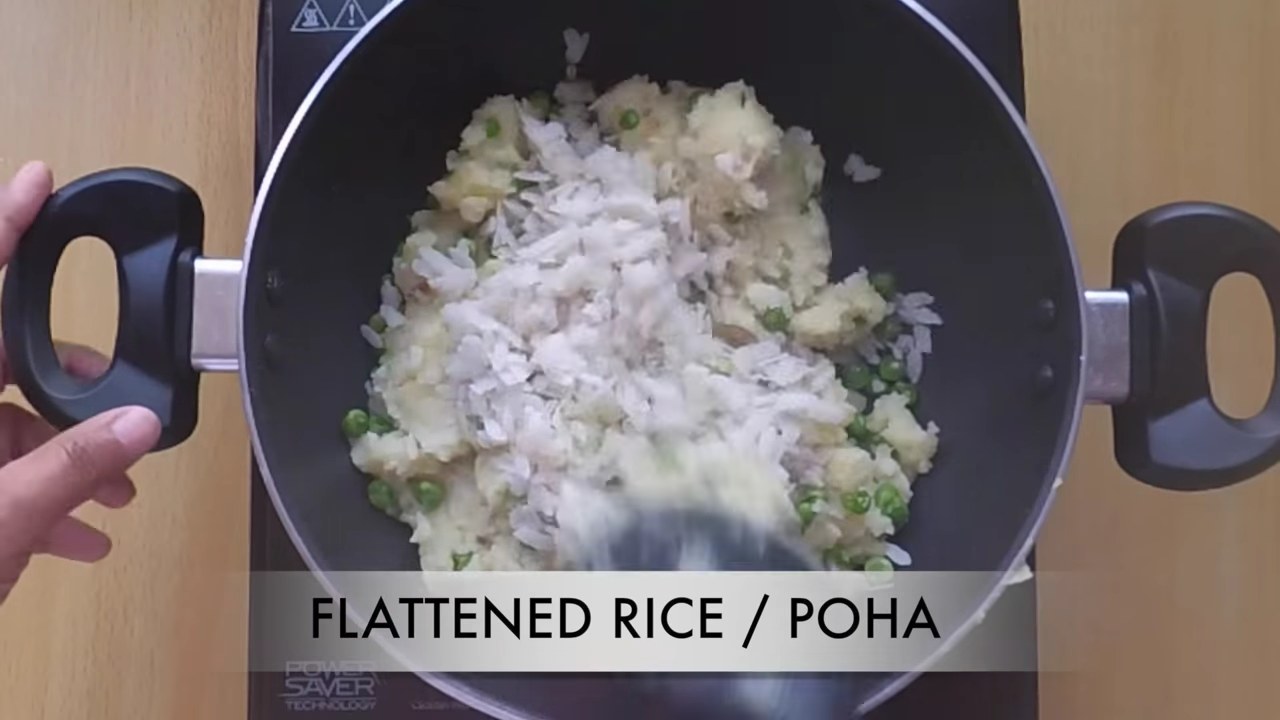
Add washed flattened rice, mix it well.
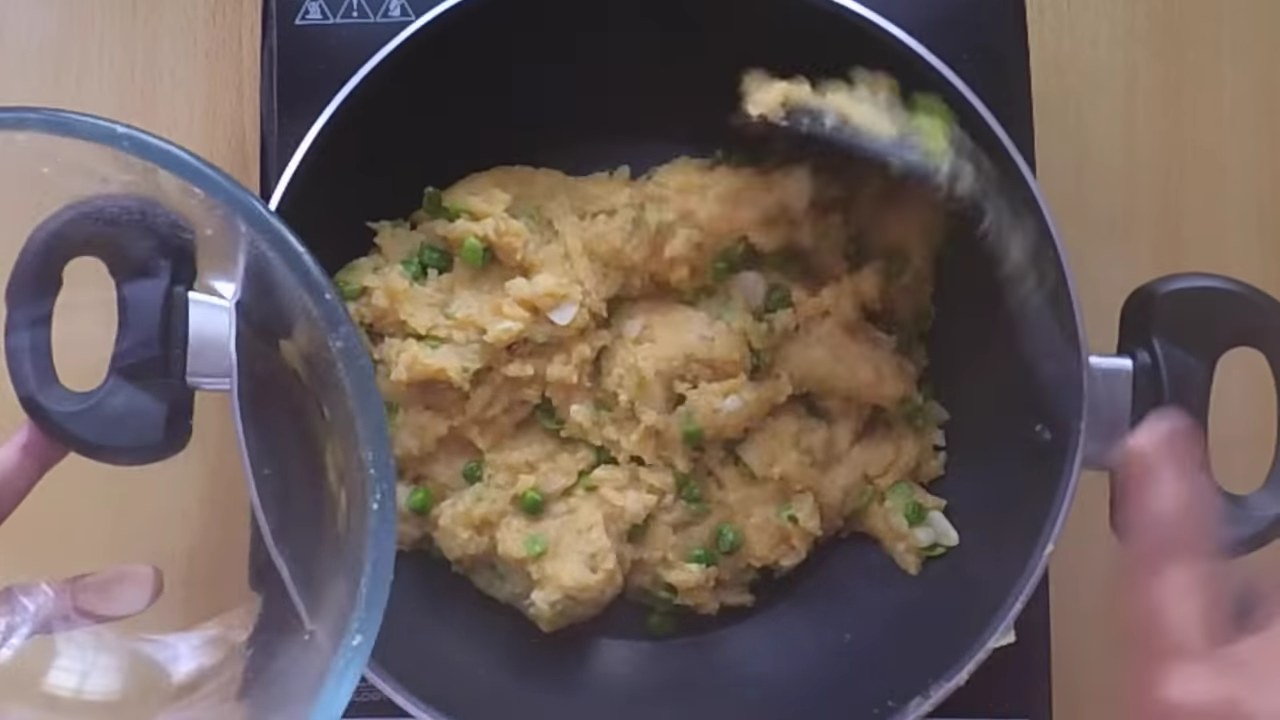
Add red chili powder, turmeric powder, pepper powder, cumin powder, dry mango powder and salt. Mix it well.
Cook for 2-3 minutes on a medium-low flame. Switch off the stove.
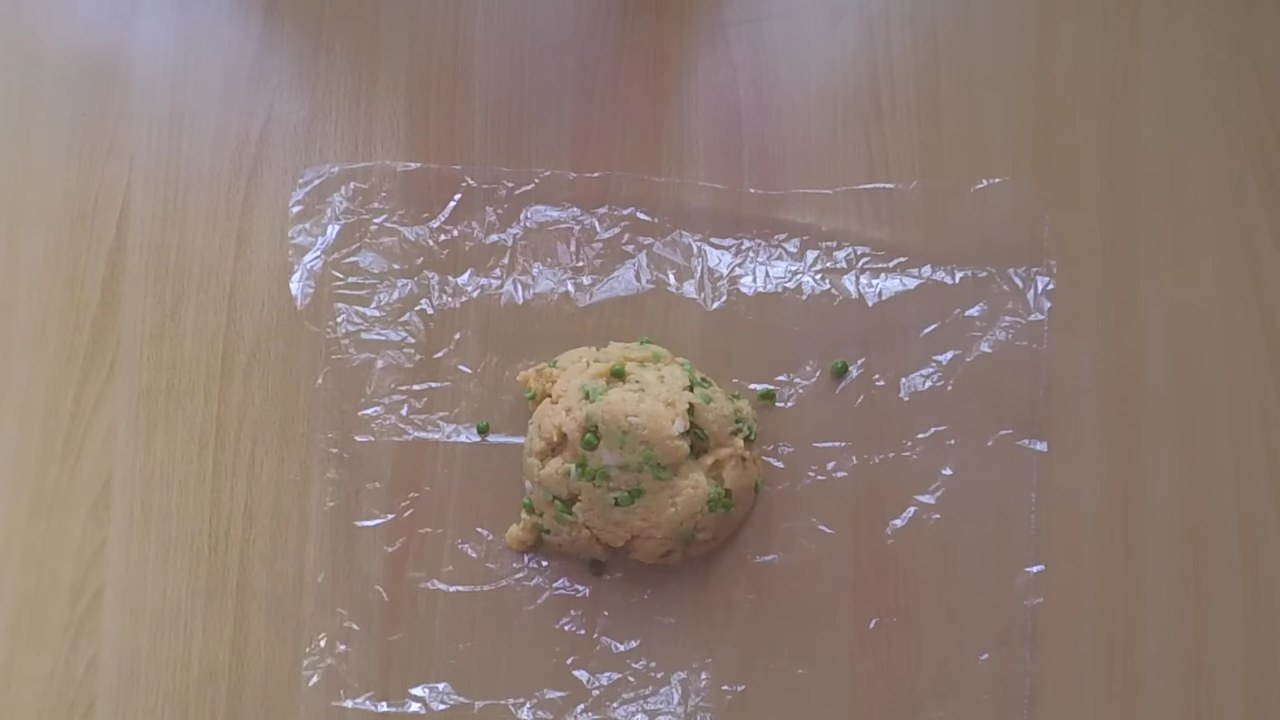
Let it cool at the room temperature. Transfer it to a polythene sheets.
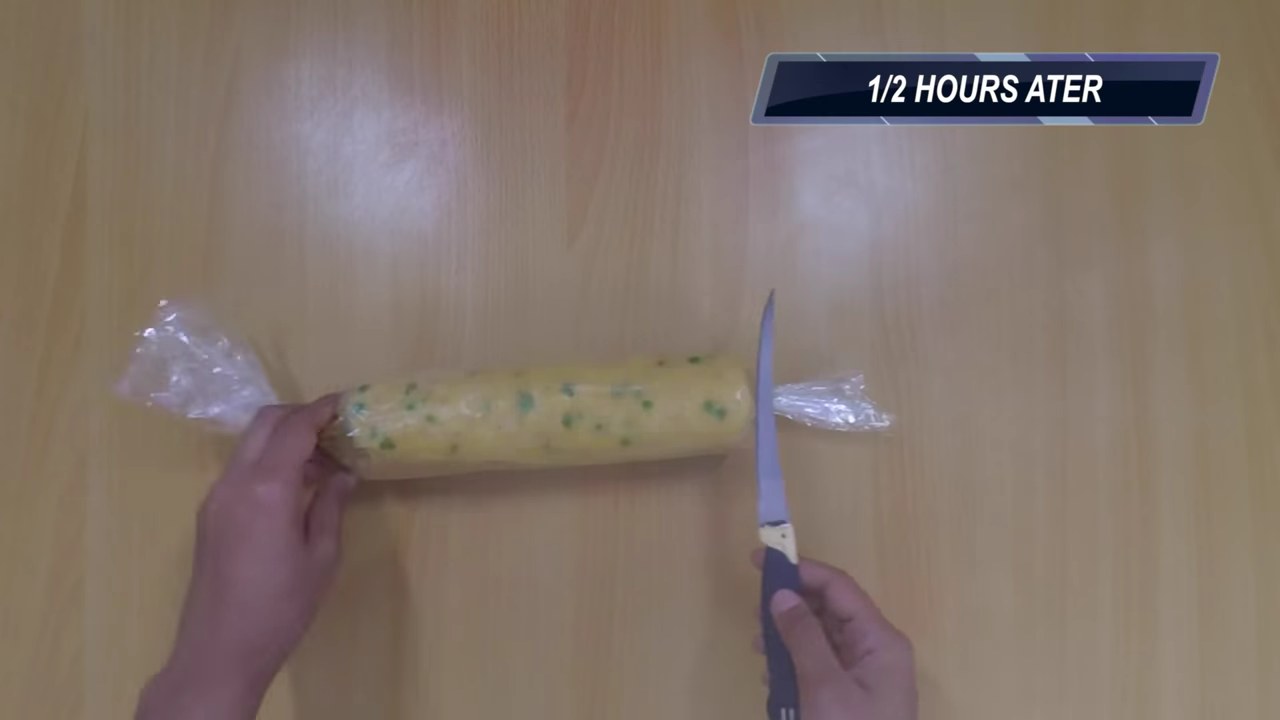
Roll and keep it in a refrigerator for half an hour. (See the video for better understanding)
Take out the rolled mixture from refrigerator and cut into tikki shape as shown below in the image.
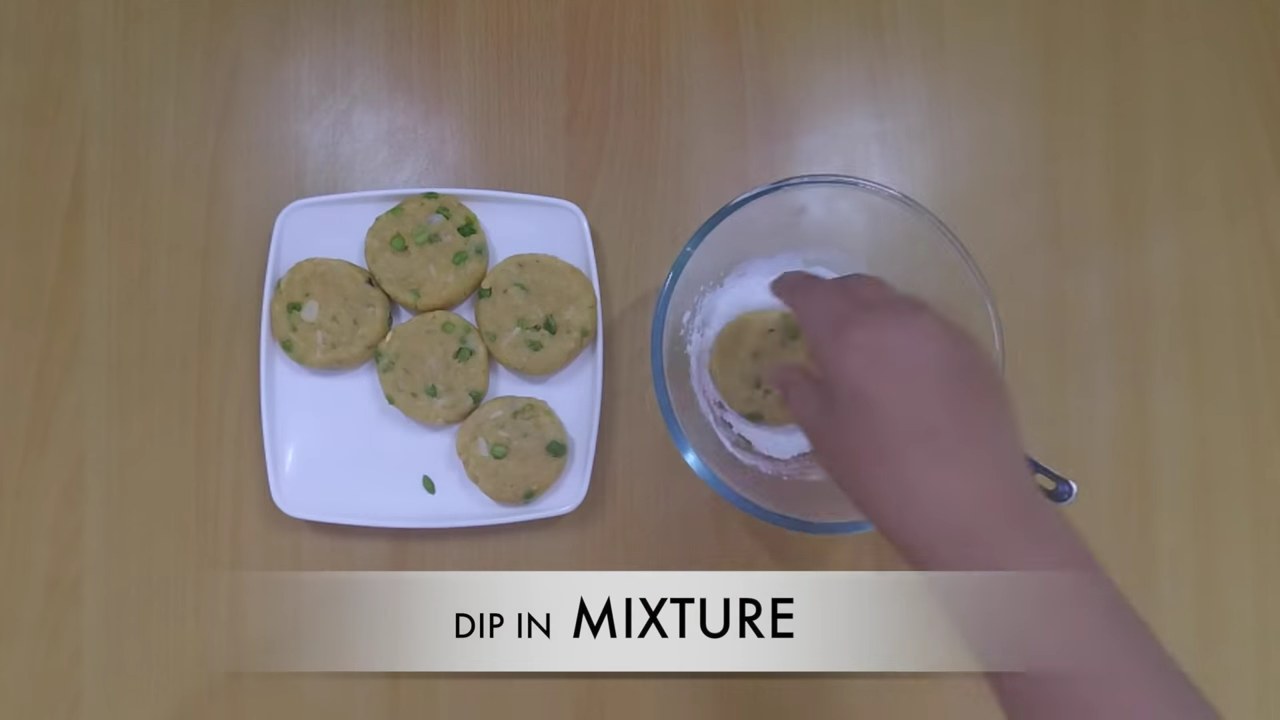
In a bowl, add 2 tbsp all purpose flour and 1 tbsp Corn flour. Mix it well. Now, dip the tikis in the flour to coat it from both the sides. Do the same with the rest of the tikkis.
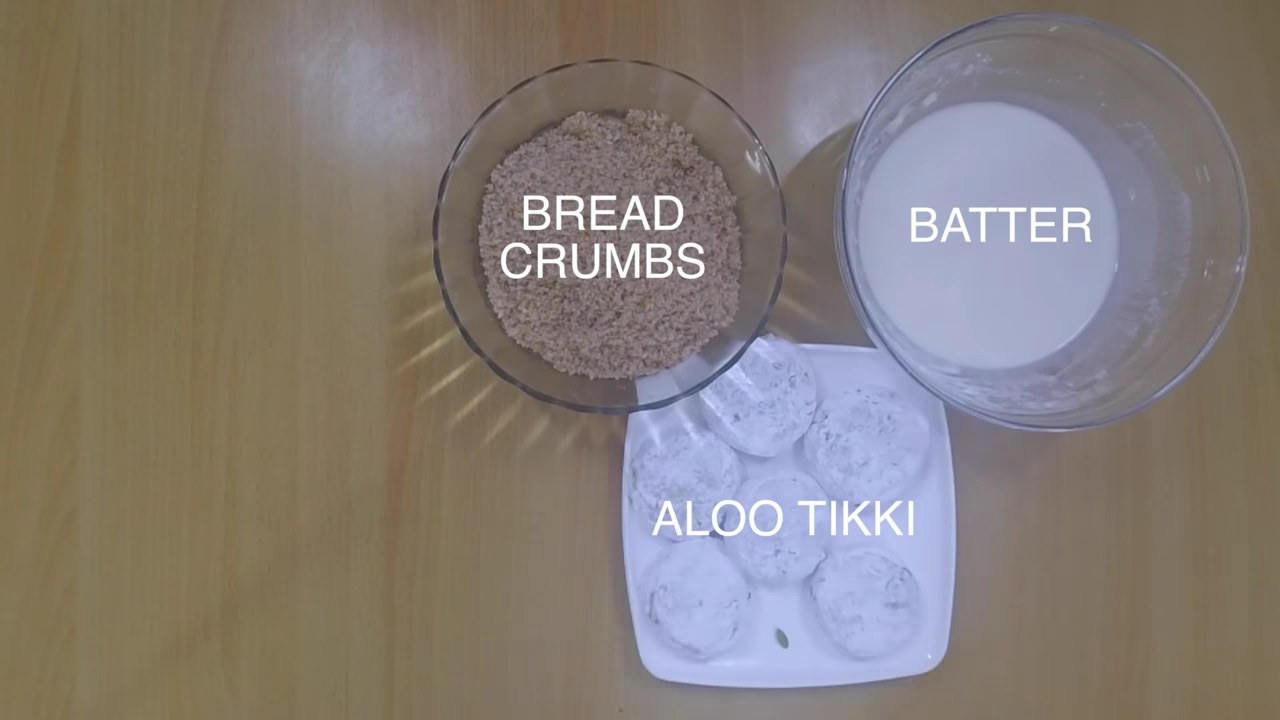
Now prepare liquid batter to coat the tikis. In a mixing bowl, add all purpose flour, corn flour, baking powder, vegetable oil and chilled water. Mix it well to make lumps free batter.
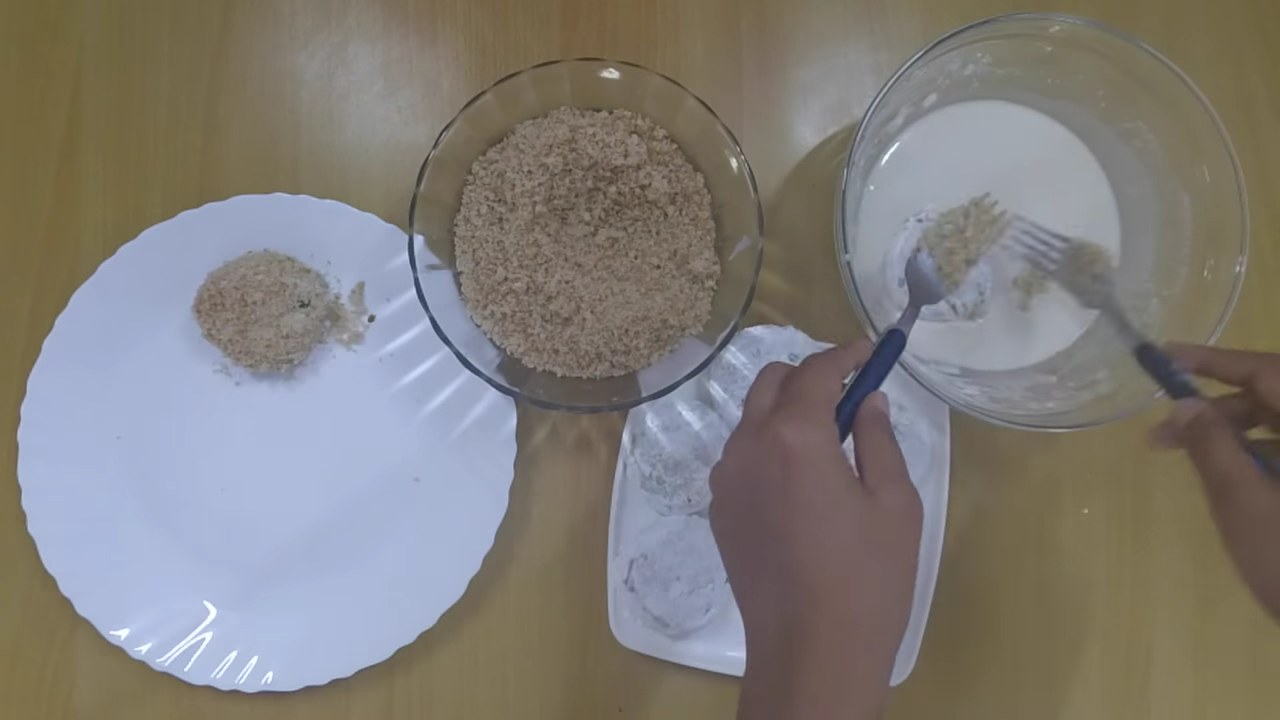
Now, Dip the tikis in the liquid batter then put it on the bread crumbs bowl. Coat the bread crumbs from both the sides. Do the same with the rest of tikis.
The tikis are ready for deep frying.
Heat oil in a wok and deep fry it on a medium to low flame till golden and crisp from both the sides. Take out the fried tikis on a tissue paper to get rid of the extra oil.
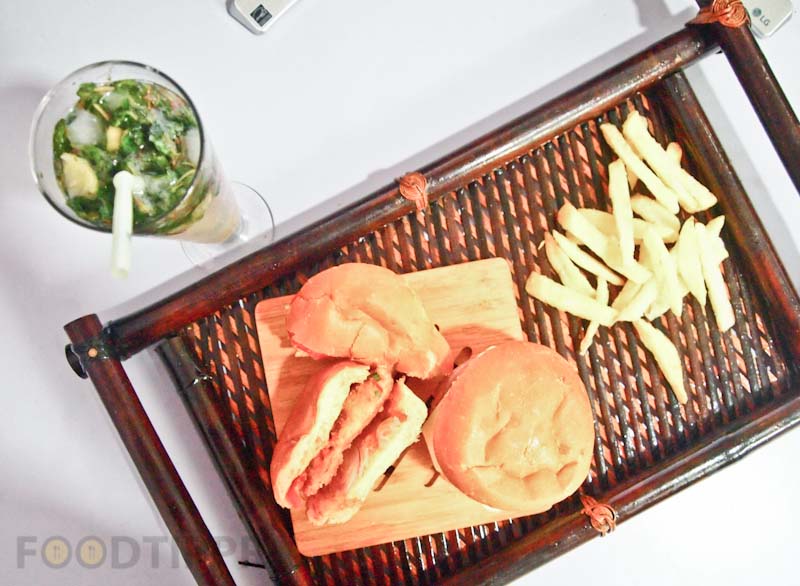
Cut the buns in to half, spread mayonnaise on one side, put onion ring, tiki and tomato slice. Pour some more mayonnaise and cheese slice. Cover it from the another half. Cook in the oven for 15-30 seconds before serving.
Watch the Video
Steps
Heat butter in a wok.
Add green peas and garlic. Cook for 1-2 minutes on a medium flame.
Add potatoes, mix it well.
Add washed flattened rice, mix it well.
Add red chili powder, turmeric powder, pepper powder, cumin powder, dry mango powder and salt. Mix it well.
Cook for 2-3 minutes on a medium-low flame. Switch off the stove.
Let it cool at the room temperature. Transfer it to a polythene sheets.
Roll and keep it in a refrigerator for half an hour. (See the video for better understanding)
Take out the rolled mixture from refrigerator and cut into tikki shape as shown below in the image.
In a bowl, add 2 tbsp all purpose flour and 1 tbsp Corn flour. Mix it well. Now, dip the tikis in the flour to coat it from both the sides. Do the same with the rest of the tikkis.
Now prepare liquid batter to coat the tikis. In a mixing bowl, add all purpose flour, corn flour, baking powder, vegetable oil and chilled water. Mix it well to make lumps free batter.
Now, Dip the tikis in the liquid batter then put it on the bread crumbs bowl. Coat the bread crumbs from both the sides. Do the same with the rest of tikis.
The tikis are ready for deep frying.
Heat oil in a wok and deep fry it on a medium to low flame till golden and crisp from both the sides. Take out the fried tikis on a tissue paper to get rid of the extra oil.
Cut the buns in to half, spread mayonnaise on one side, put onion ring, tiki and tomato slice. Pour some more mayonnaise and cheese slice. Cover it from the another half. Cook in the oven for 15-30 seconds before serving.
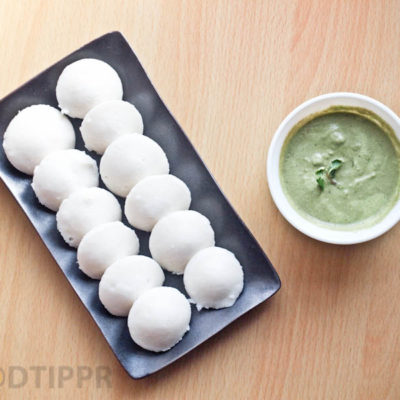
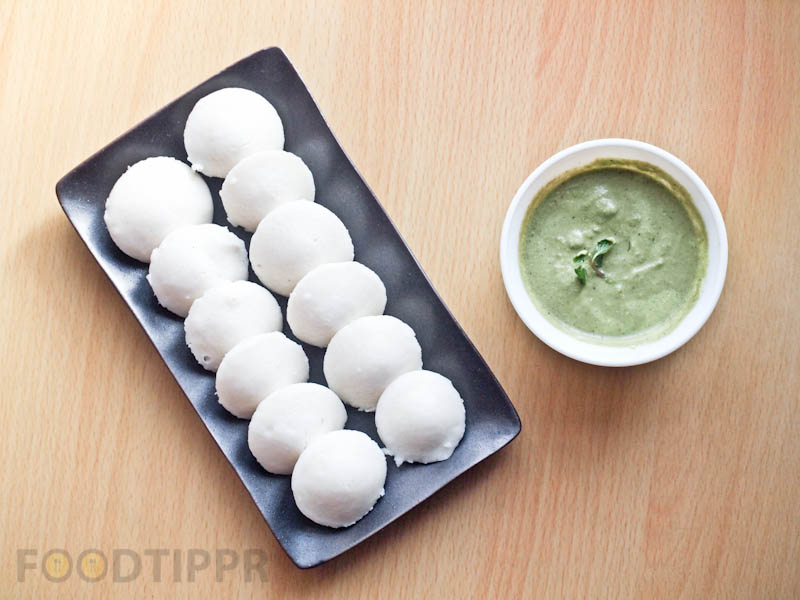
Presenting the recipe of delicious Idli. I love Idli for two main reasons.
#1. It is healthy, because it’s cooked in steam, and it’s full of carbs,
#2. and it’s full of carbs, which means it’s full of energy, which makes it a great breakfast recipe.
#3. and it is so easy to prepare. I mean if you are single, living alone, don;t have much time at hand, this should be your go-to meal.
I am less, utensils to handle, it’s made from rice, so you can keep your kitchen stocked all the time. In short, learn how to make it by following the step by step recipe mentioned below or watch the full video of the making of Idli.
Presenting the recipe of delicious Idli. I love Idli for two main reasons.#1. It is healthy, because it’s cooked in steam, and it’s full of carbs,#2. and it’s full of carbs, which means it’s full of energy, which makes it a great breakfast recipe.#3. and it is so easy to prepare. I mean if you are single, living alone, don;t have much time at hand, this should be your go-to meal.I am less, utensils to handle, it’s made from rice, so you can keep your kitchen stocked all the time. In short, learn how to make it by following the step by step recipe mentioned below or watch the full video of the making of Idli.
Prep Time10 minutesmins
Cook Time15 minutesmins
8 hourshrs
Total Time25 minutesmins
Course: Appetizer, Breakfast, lunch, Main Course, Side Dish
Cuisine: Indian
Keyword: idli, rice, southindianrecipe
Servings: 4
Ingredients
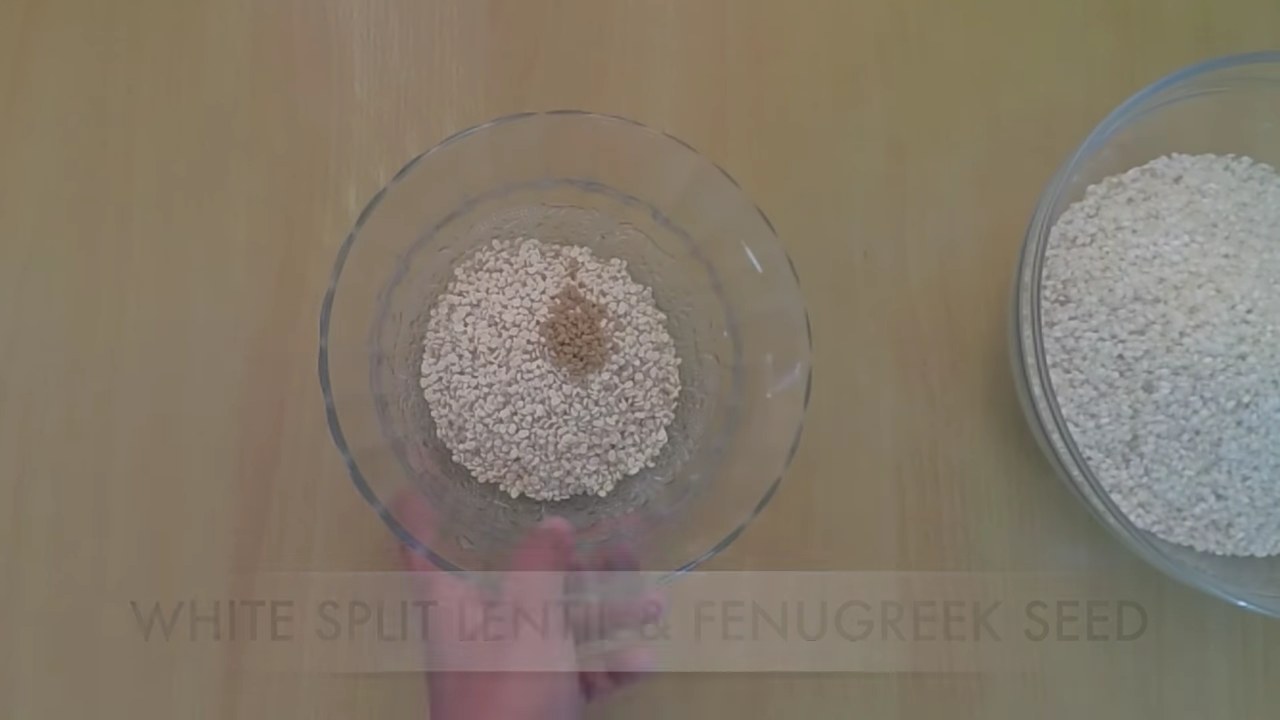
3cupIdli rice
1cupWhite split lentilsdhuli urad dal
1tspFenugreek seeds
to taste Salt
Instructions
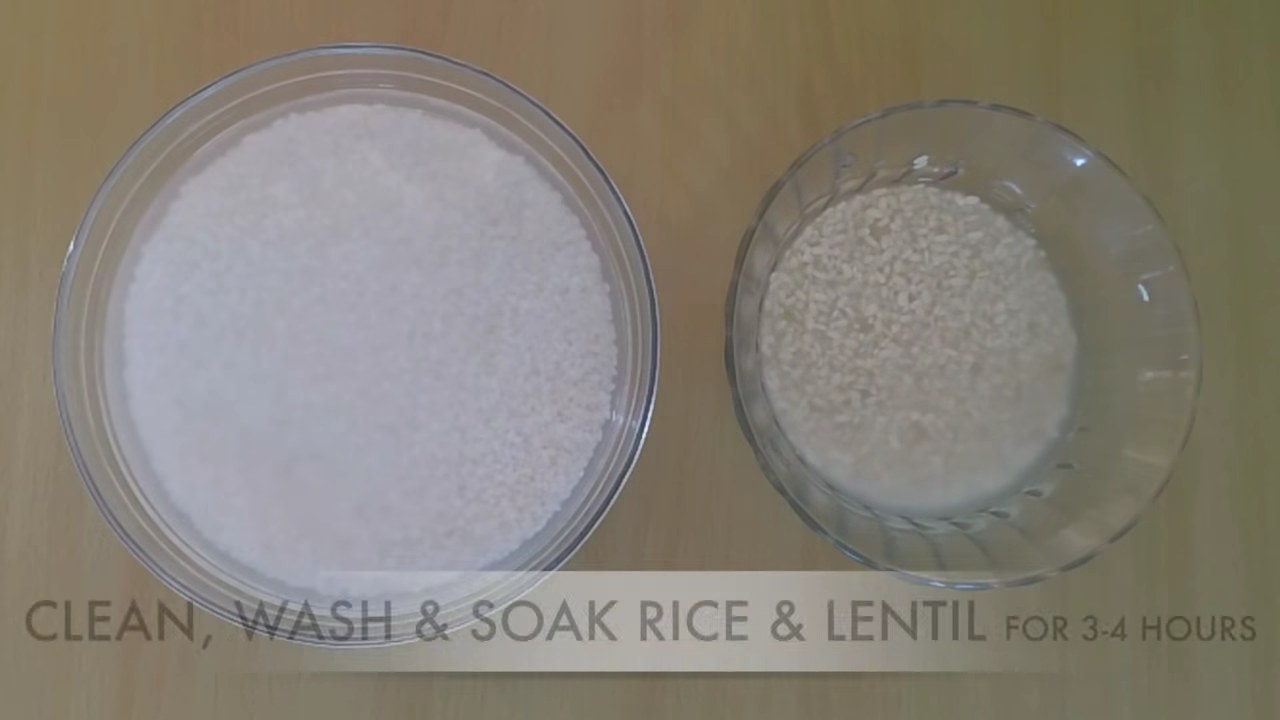
In a bowl, add idli rice.
In a separate bowl, add urad dal and fenugreek seeds.
Clean and wash both the rice and lentils separately. Keep it aside for 3-4 hours.
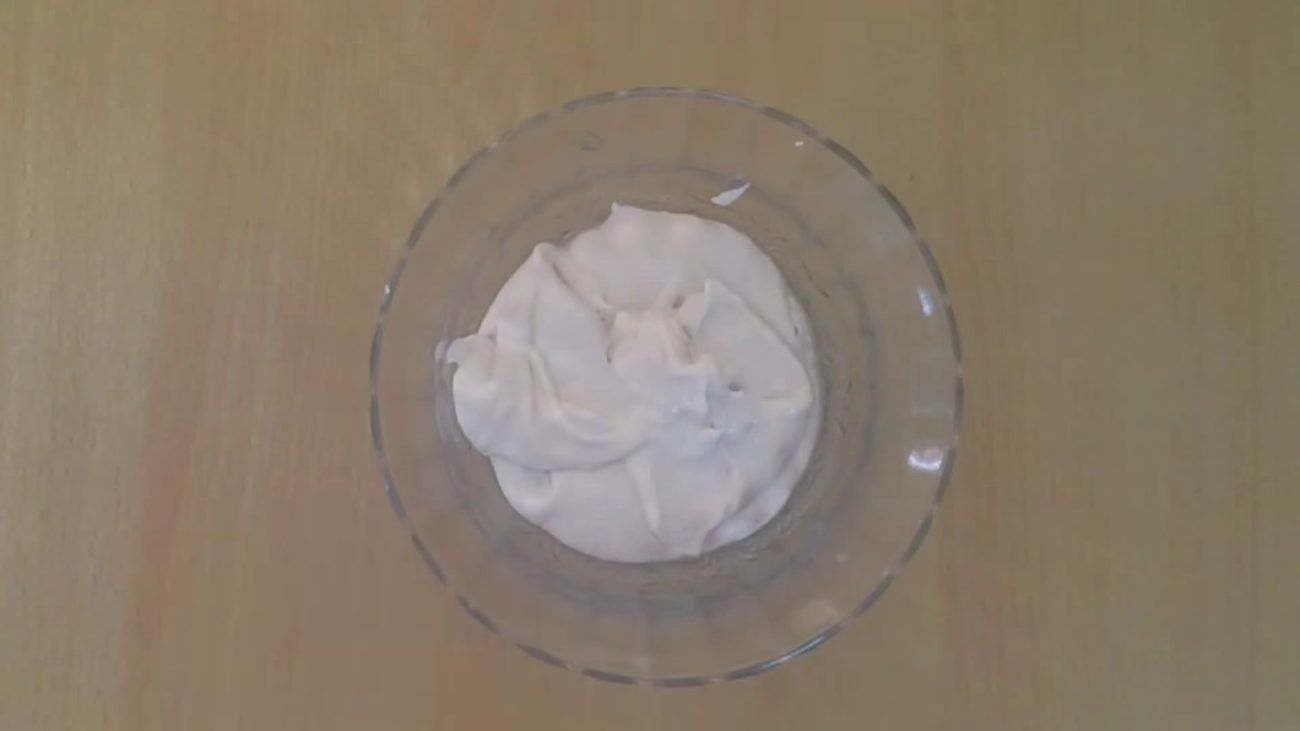
Grind the dal with fenugreek seeds separately.
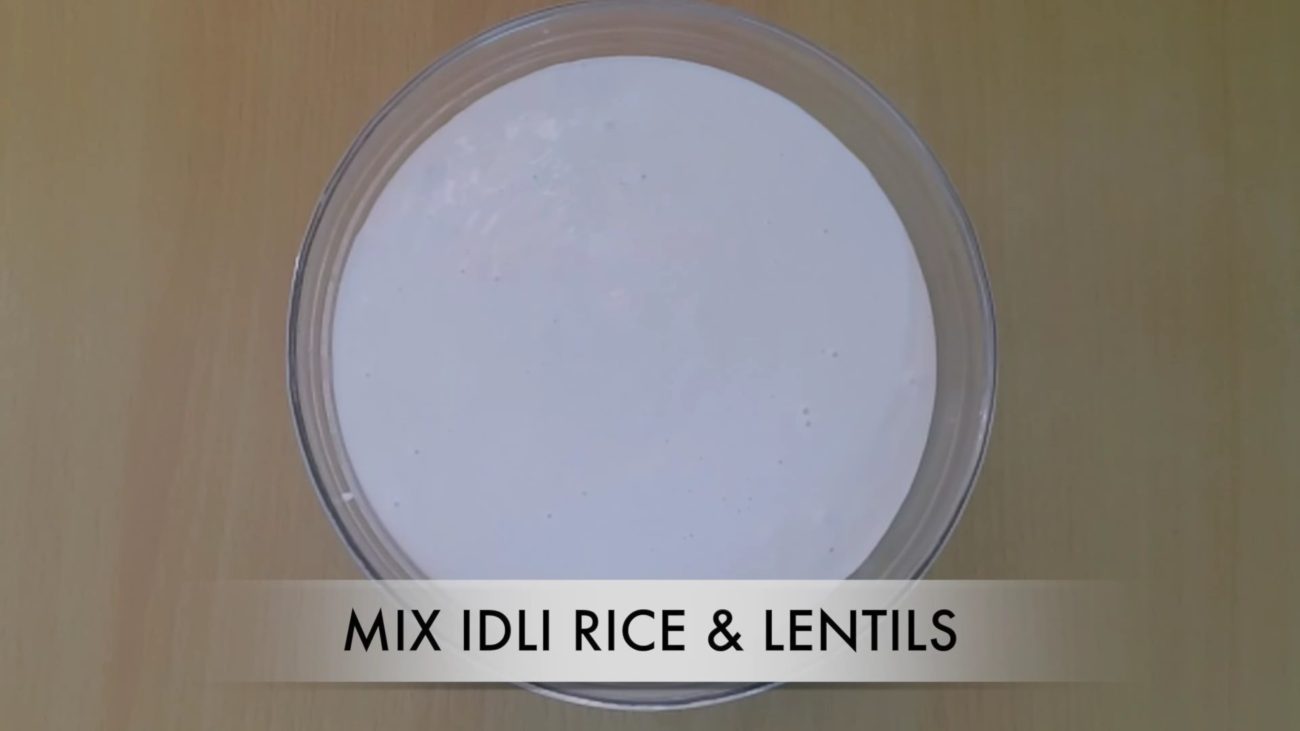
Grind Idli rice and transfer it to the second bowl. Mix ground rice and lentils separately. Cover and keep it aside for fermentation for 6 hours or overnight at a warm place.
The batter is ready after 6 hours.
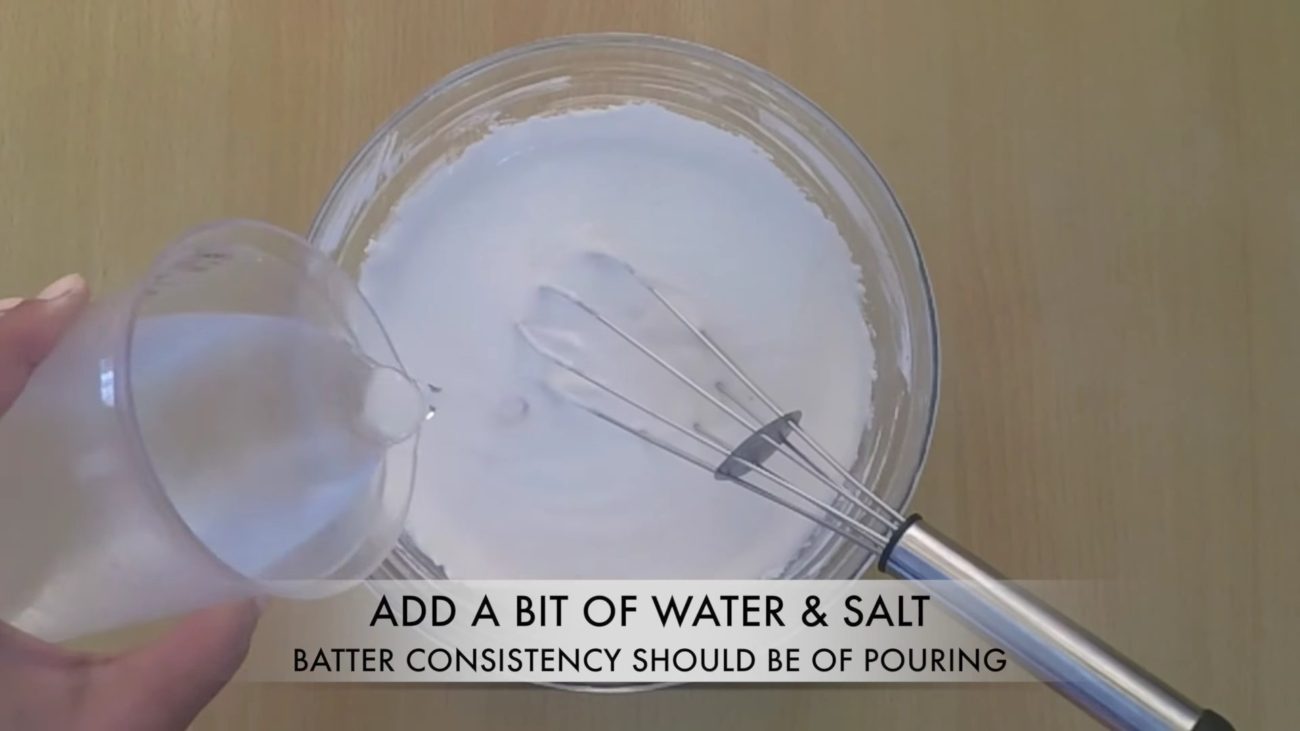
Add 50 ml of water and salt, mix it well.
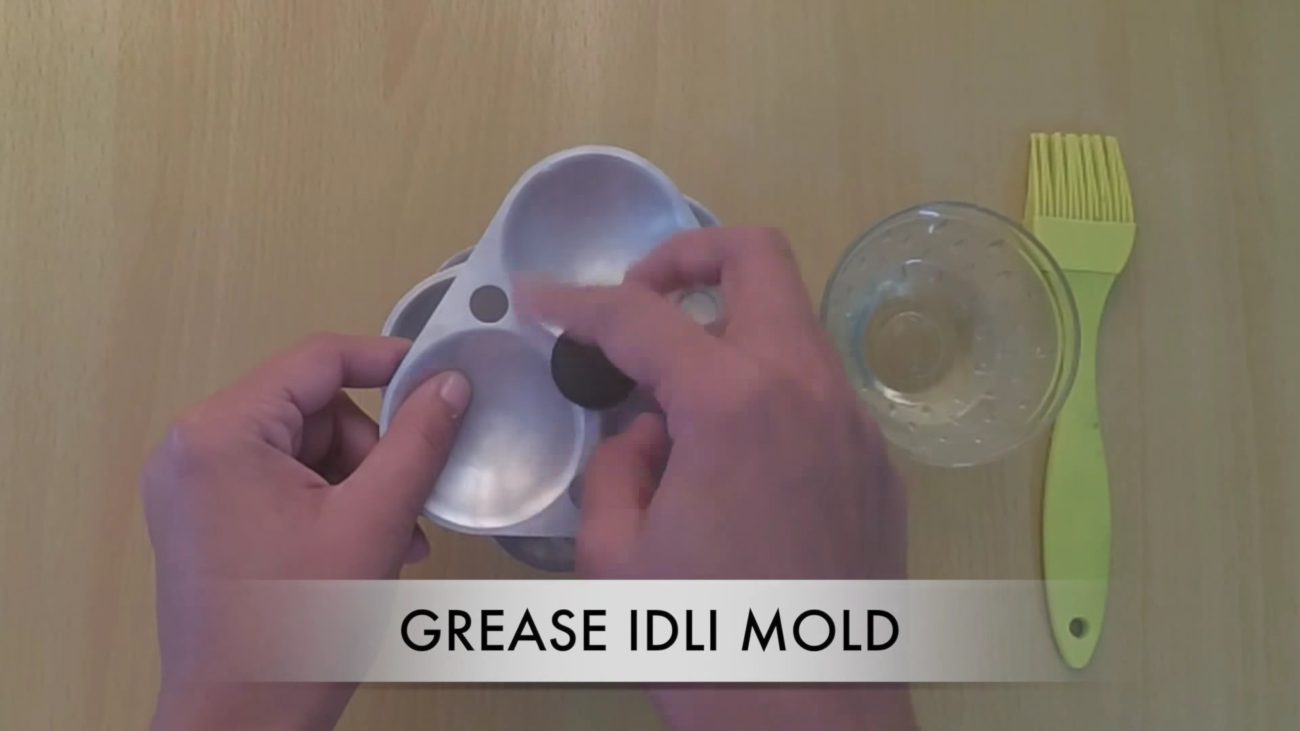
Grease idli mold with butter or vegetable oil.
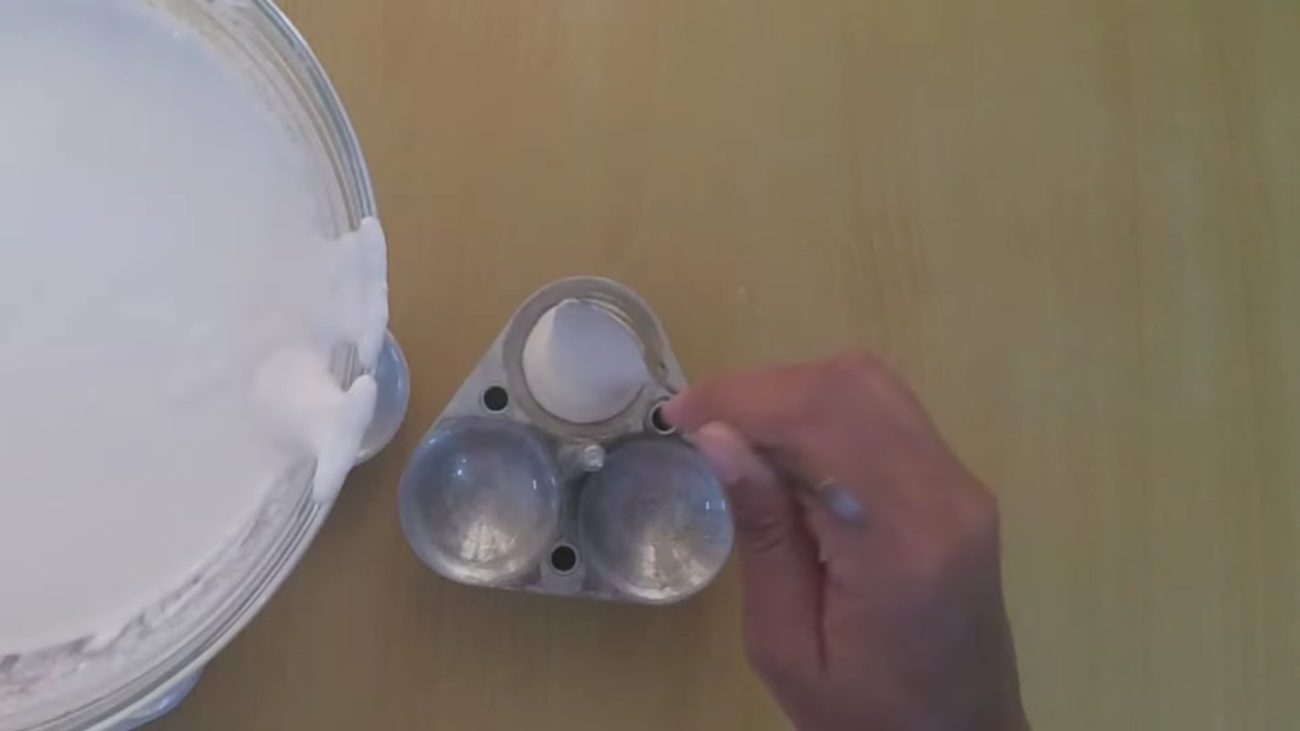
Pour a tbsp of batter into each mold.
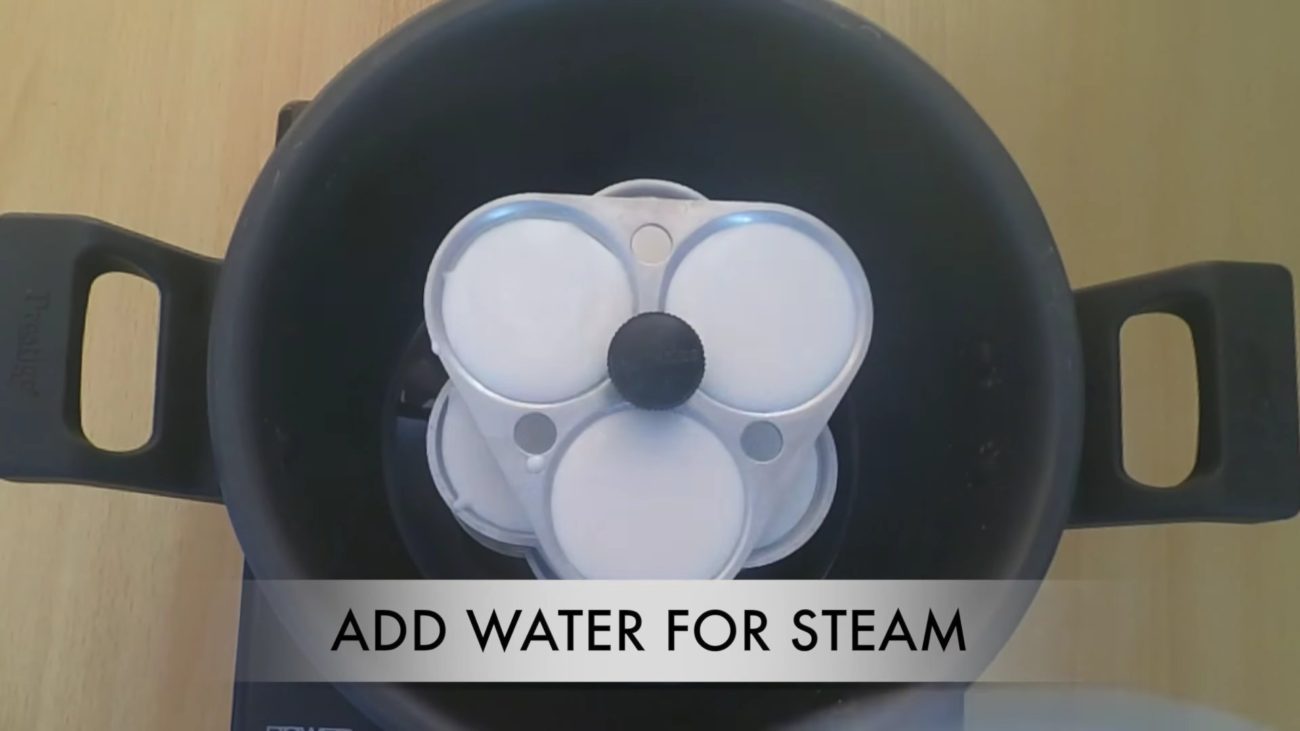
Put it in the steamer. Steam cook it for 12-15 minutes.
Cook cover for 15 minutes. switch off the stove.
Open steamer, take out the idli mold from the steamer and take out the idli with using a spoon.
Do the same with the rest of the batter.
Delicious and soft homemade idli is ready to serve.
Serve hot with green chutney,
Steps
In a bowl, add idli rice.
In a separate bowl, add urad dal and fenugreek seeds.
Clean and wash both the rice and lentils separately. Keep it aside for 3-4 hours.
Grind the dal with fenugreek seeds separately.
Grind Idli rice and transfer it to the second bowl. Mix ground rice and lentils separately. Cover and keep it aside for fermentation for 6 hours or overnight at a warm place.
The batter is ready after 6 hours.
Add 50 ml of water and salt, mix it well.
Grease idli mold with butter or vegetable oil.
Pour a tbsp of batter into each mold.
Put it in the steamer. Steam cook it for 12-15 minutes.
Cook cover for 15 minutes. switch off the stove.
Open steamer, take out the idli mold from the steamer, and take out the idli with using a spoon.
Do the same with the rest of the batter.
Delicious and soft homemade idli is ready to serve.
Serve hot with green chutney,
Pro Tip: Want more healthy recipes like this? Check the Healthy Recipes tag.
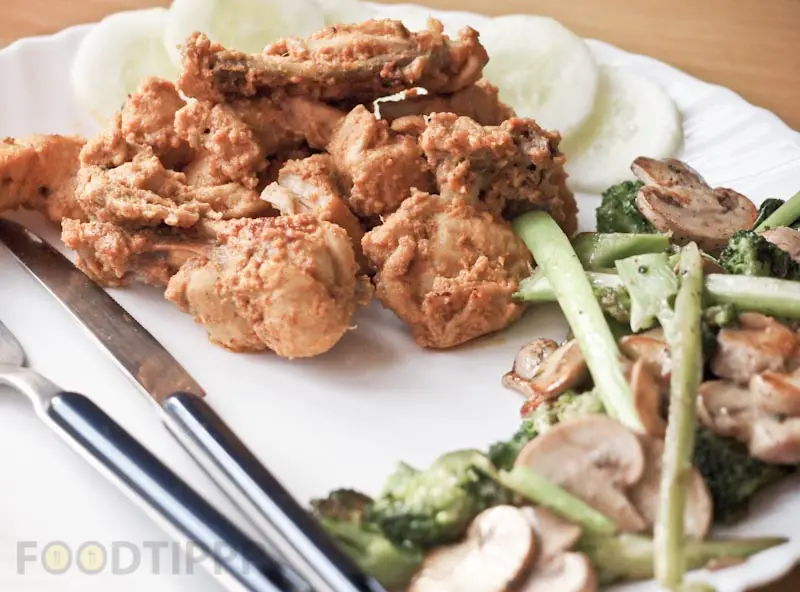
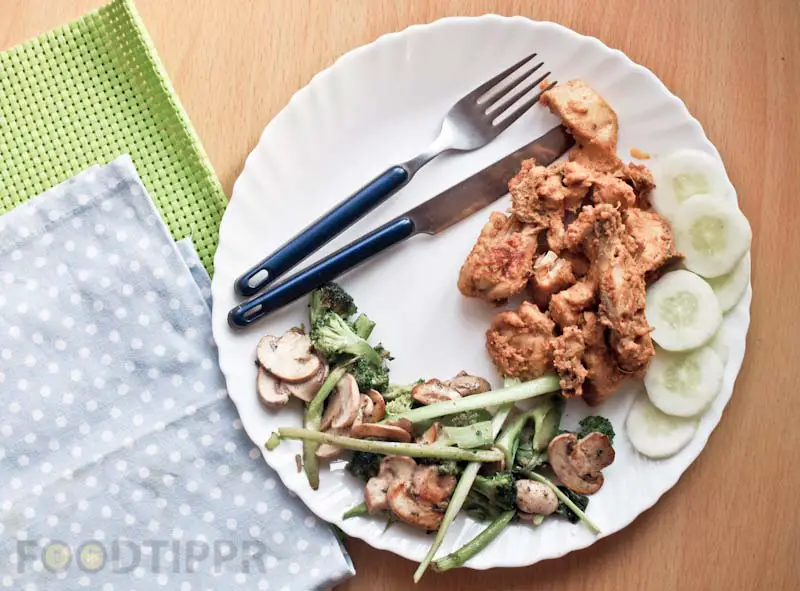
Check out the recipe of Chicken Pan fry with Broccoli & Mushrooms. If you are trying to lose fat, then a high protein diet is recommended.
Chicken Pan Fry is your best bet because it is both healthy and delicious. If you want to eat healthy to stay healthy, there is no reason you have to stay away from delicious food. You can still make delicious food which is healthy also.
I would recommend taking the chicken breast or boneless. 100 grams of Chicken contains around 25grams of protein and zero grams of Carbs, It contains a very small amount of good fats.
I’ve just used Broccoli and Mushrooms because they too have got a good amount of Proteins but you can add more vegetables since there is no harm from Green vegetables.
Follow the step by step process mentioned below or watch the full video of the Pan Fry Chicken.
Check out the recipe of Chicken Pan fry with Broccoli & Mushrooms. If you are trying to lose fat, then a high protein diet is recommended.Chicken Pan Fry is your best bet because it is both healthy and delicious. If you want to eat healthy to stay healthy, there is no reason you have to stay away from delicious food. You can still make delicious food which is healthy also.I would recommend taking the chicken breast or boneless. 100 grams of Chicken contains around 25grams of protein and zero grams of Carbs, It contains a very small amount of good fats.I’ve just used Broccoli and Mushrooms because they too have got a good amount of Proteins but you can add more vegetables since there is no harm from Green vegetables.
Prep Time10 minutesmins
Cook Time20 minutesmins
30 minutesmins
Course: Appetizer, lunch, Main Course, Side Dish, Snack
Cuisine: Indian
Keyword: chicken, protein
Servings: 2
Ingredients
300gramChicken
1/2cupCurd
1tbspGinger-garlic paste
1tspRed chili powder
1/2tspTurmeric powder
1/2tspGaram masala powder
1/2tspCumin powder
to taste Salt
1/2tspChat masala powder
1juice of a lemon Lemon
1tbspOlive Oil / Canola Oil
Instructions
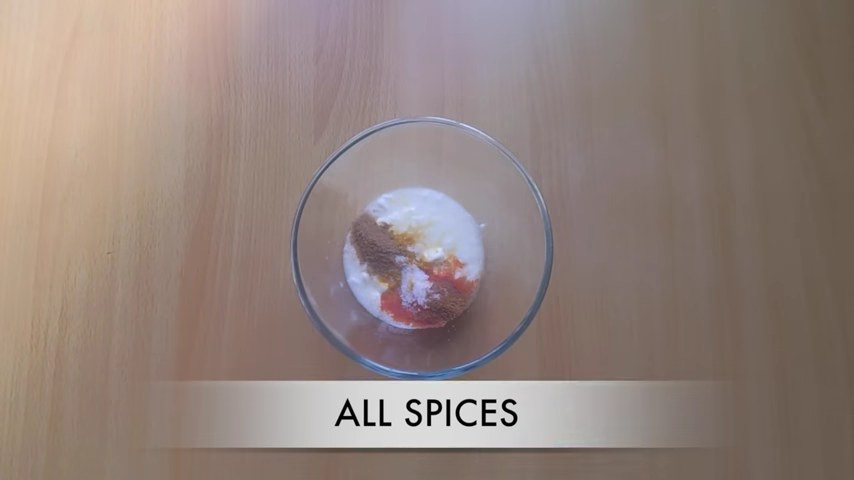
In a mixing bowl, add curd and all the spices mentioned above in the table. Mix it well.
The batter is ready for marination.
Clean and wash the chicken. Add washed chicken in the bowl. Mix it well and keep it aside for 3 hours to marinate chicken.
Now, we have to fry it.
Heat oil in a wok and add chicken along with the leftover curd.
Cook covered on a medium to low flame for 15 minutes. Keep stirring in between the process.
The chicken is ready. Transfer it to a plate and serve hot with your favorite salads and chutney.
Steps
In a mixing bowl, add curd and all the spices mentioned above in the table. Mix it well.
The batter is ready for marination.
Clean and wash the chicken. Add washed chicken in the bowl. Mix it well and keep it aside for 3 hours to marinate chicken.
Now, we have to fry it.
Heat oil in a wok and add chicken along with the leftover curd.
Cook covered on a medium to low flame for 15 minutes. Keep stirring in between the process.
The chicken is ready. Transfer it to a plate and serve hot with your favorite salads and chutney.
Pro Tip: Want more healthy recipes like this? Check the Healthy Recipes tag.
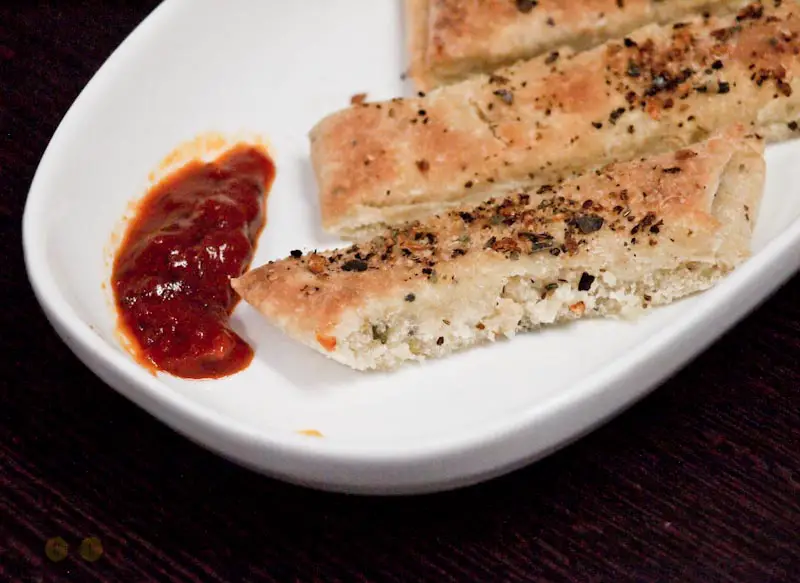
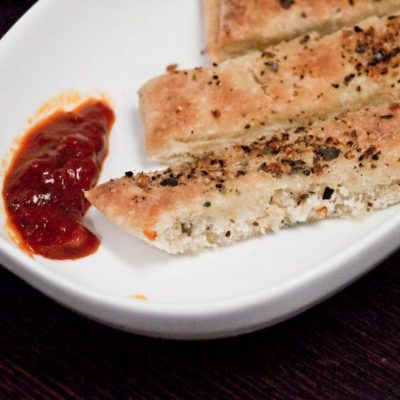
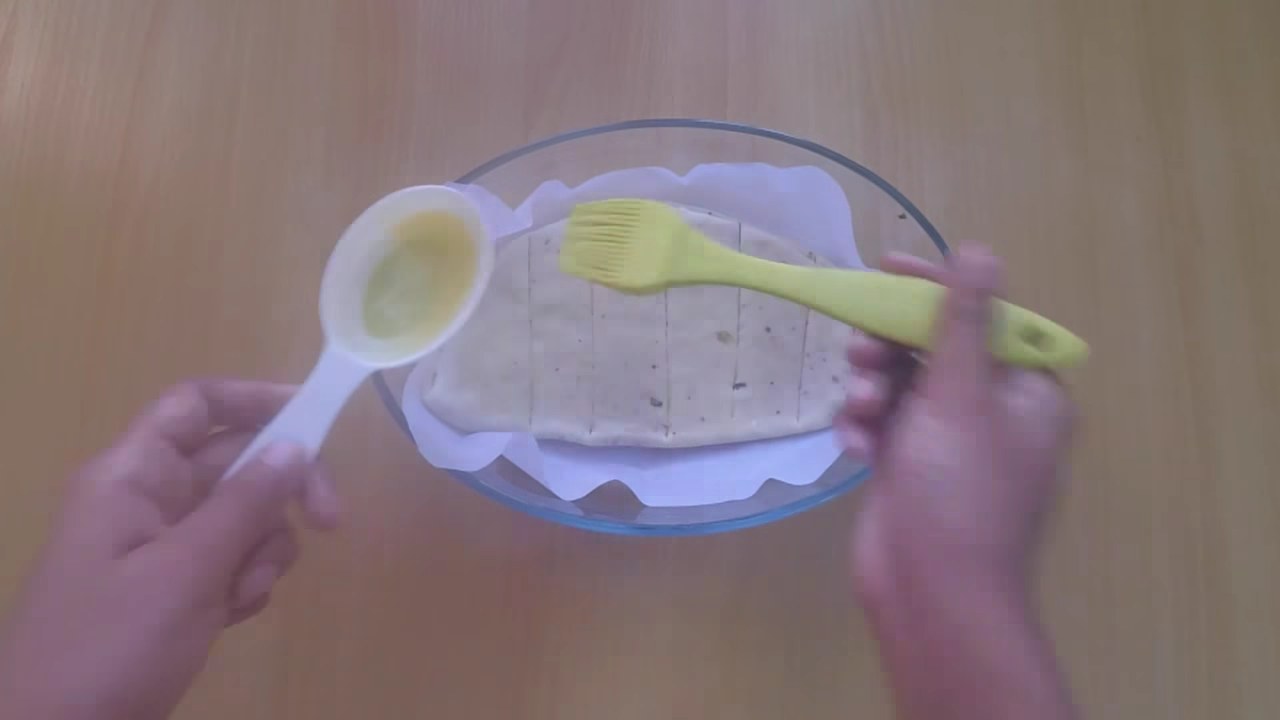
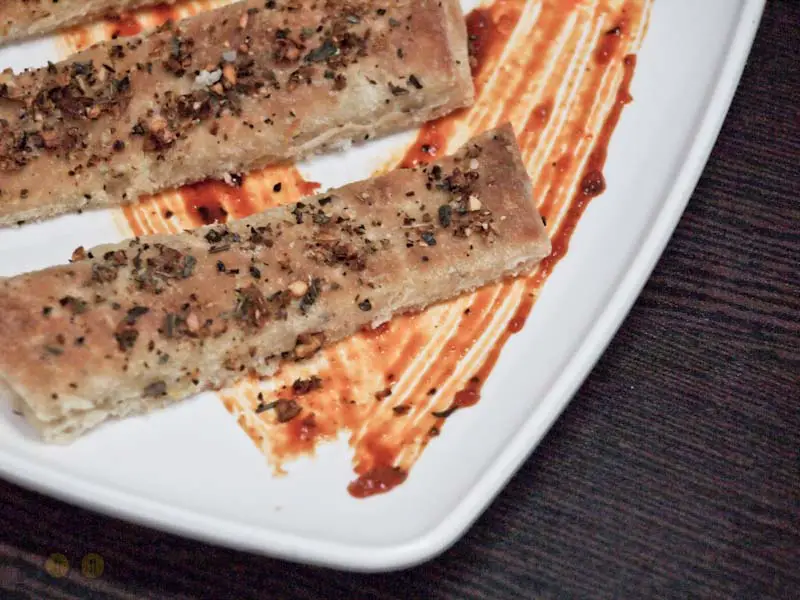
Check out the recipe of Garlic Bread. I know how crazy people can be for a piece of bread, put some aroma of garlic in the bread and I become crazy too.
Now, you can make Garlic Bread at home easily by following this recipe I’ve posted below. It’s super easy.
Also, check out the videos that I’ve recorded while preparing the Garlic Bread recipe. We publish new videos on our YouTube Channel almost every other day. So make sure you keep coming back for more amazing recipes.
Check out the recipe for Garlic Bread. I know how crazy people can be for a piece of bread, put some aroma of garlic in the bread and I become crazy too.Now, you can make Garlic Bread at home easily by following this recipe I’ve posted below. It’s super easy.Also, check out the videos that I’ve recorded while preparing the Garlic Bread recipe. We publish new videos on our YouTube Channel almost every other day. So make sure you keep coming back for more amazing recipes.
Prep Time10 minutesmins
Cook Time25 minutesmins
Total Time35 minutesmins
Course: Appetizer, Breakfast, Side Dish, Snack
Cuisine: Italian
Keyword: bread, garlic, garlicbread
Servings: 2
Ingredients
1cupAll-purpose flourMaida
1/ 4cupVegetable oil
2tbspGarlicchopped
1tbspAll-purpose seasoning
1tspOregano herbs
1/2tspSalt
1tspSugar
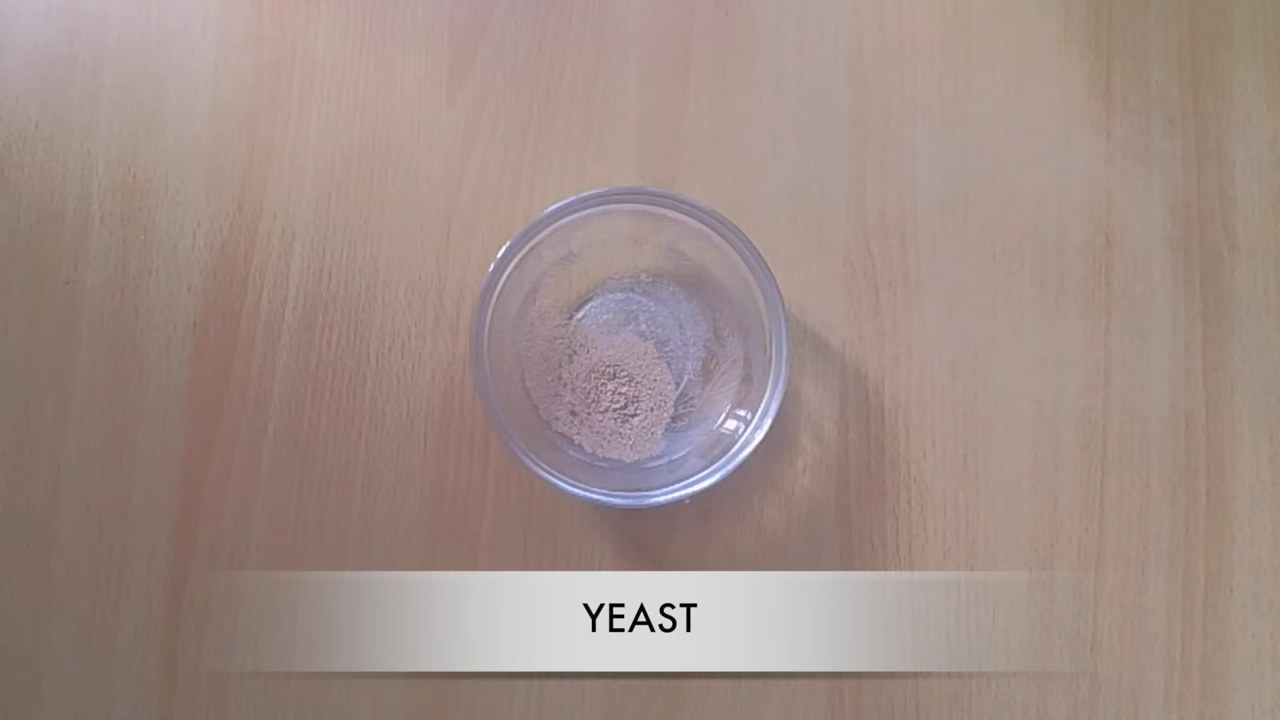
1tbspYeast
to knead the flour Water
1tspGarlic
1tspOregano herbs
1tspAll purpose seasoning
1tbspButter
Instructions
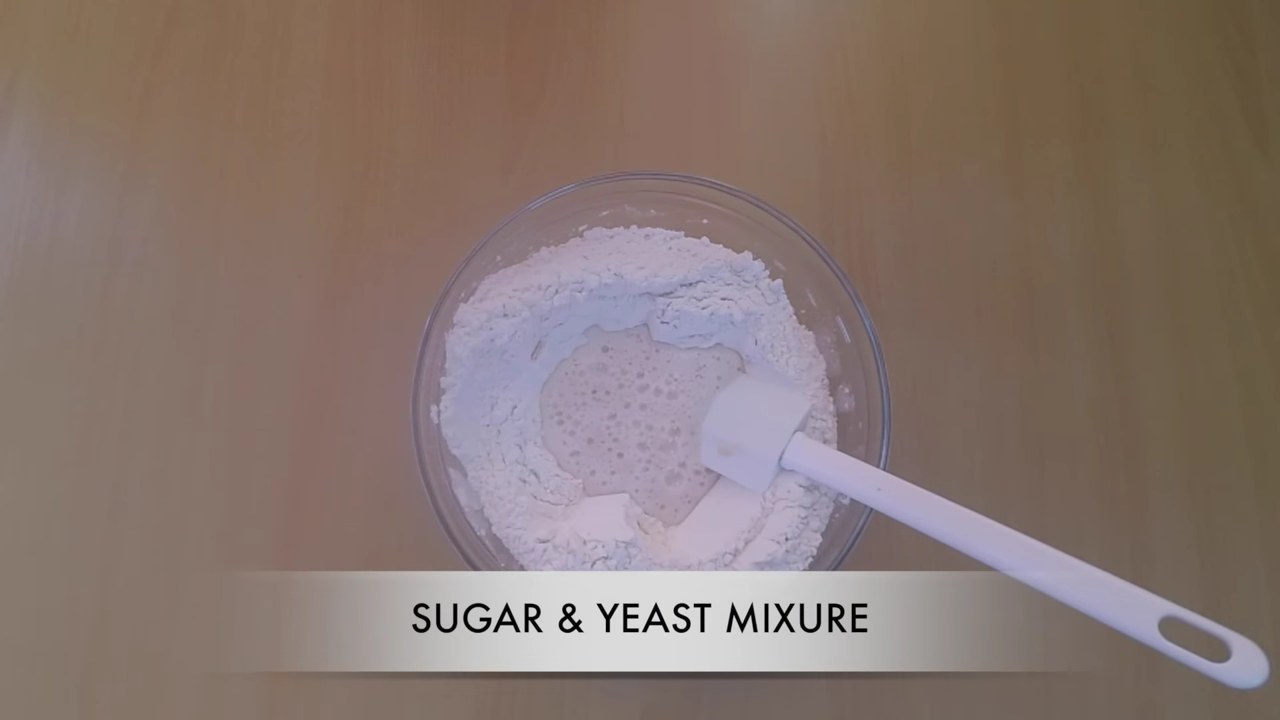
In a small bowl, add 3 tbsp luke-warm water, add yeast and sugar. Cover and keep it aside for 15 minutes to get the yeast activates.
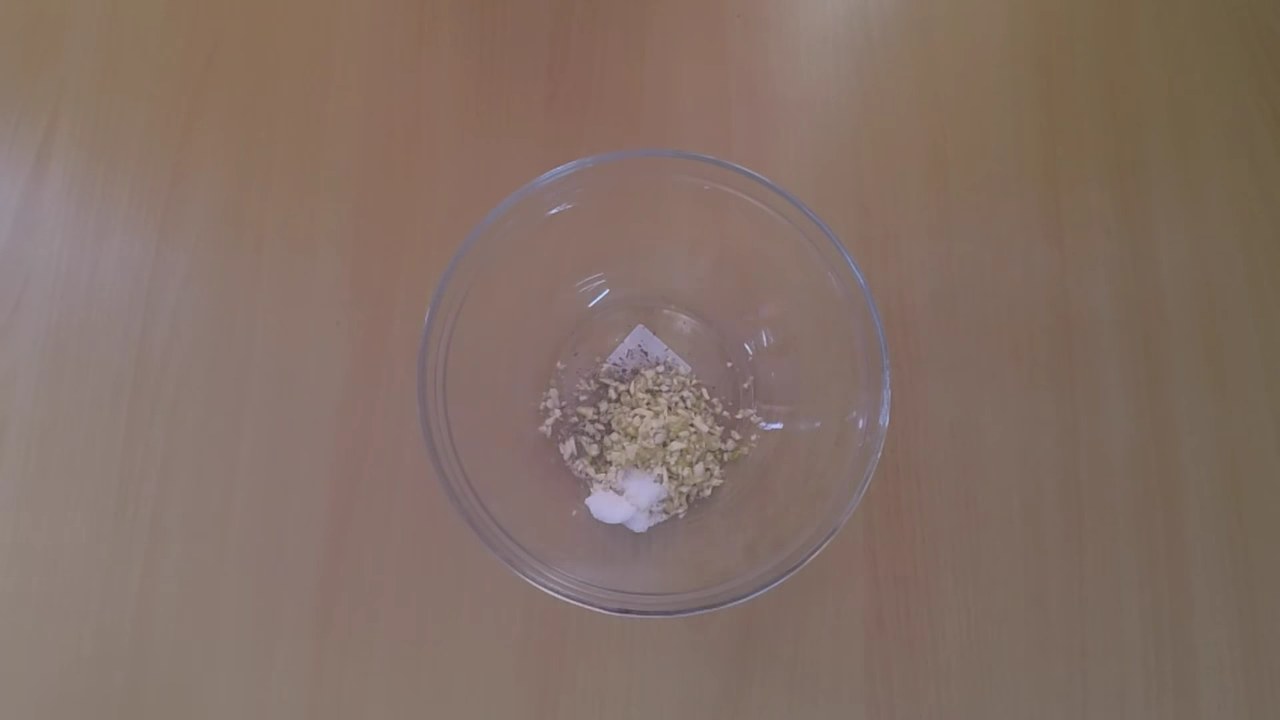
In a mixing bowl, add oregano herbs, all-purpose seasoning, garlic, salt, and all-purpose flour.
Mix it well.
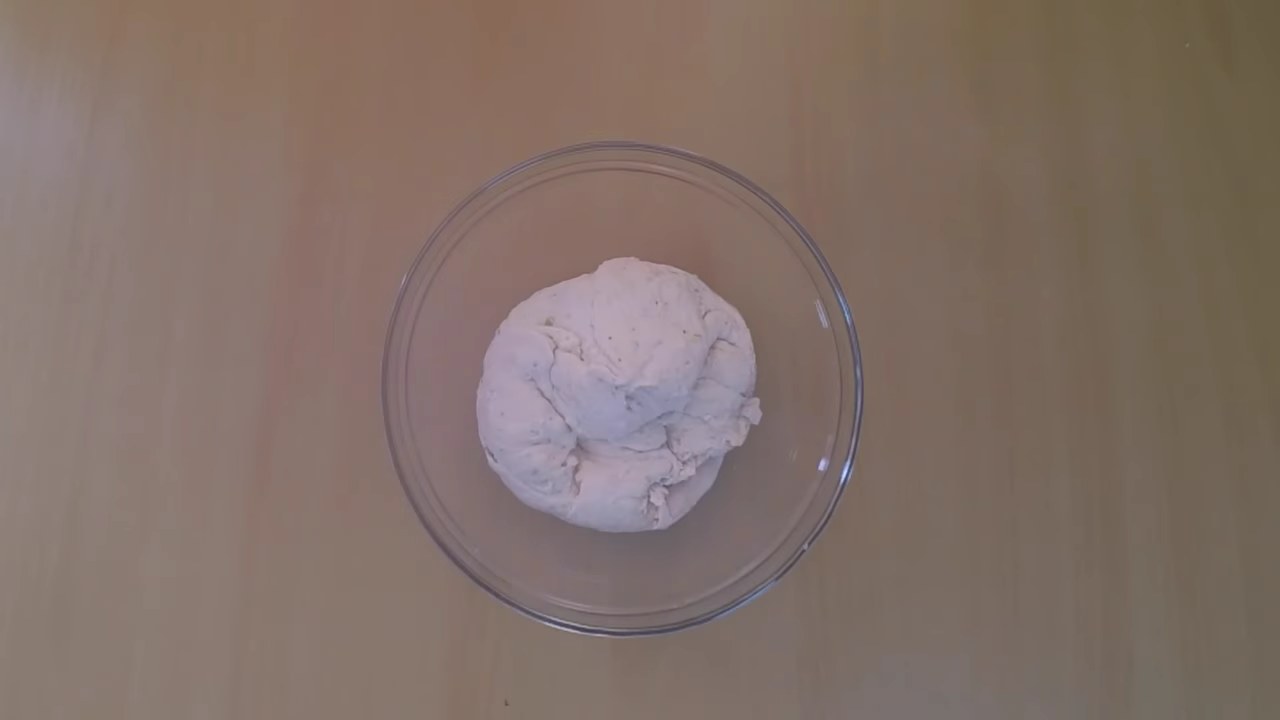
Add yeast-sugar mixture. Add water and knead the flour well to make a soft dough.
The dough is ready.
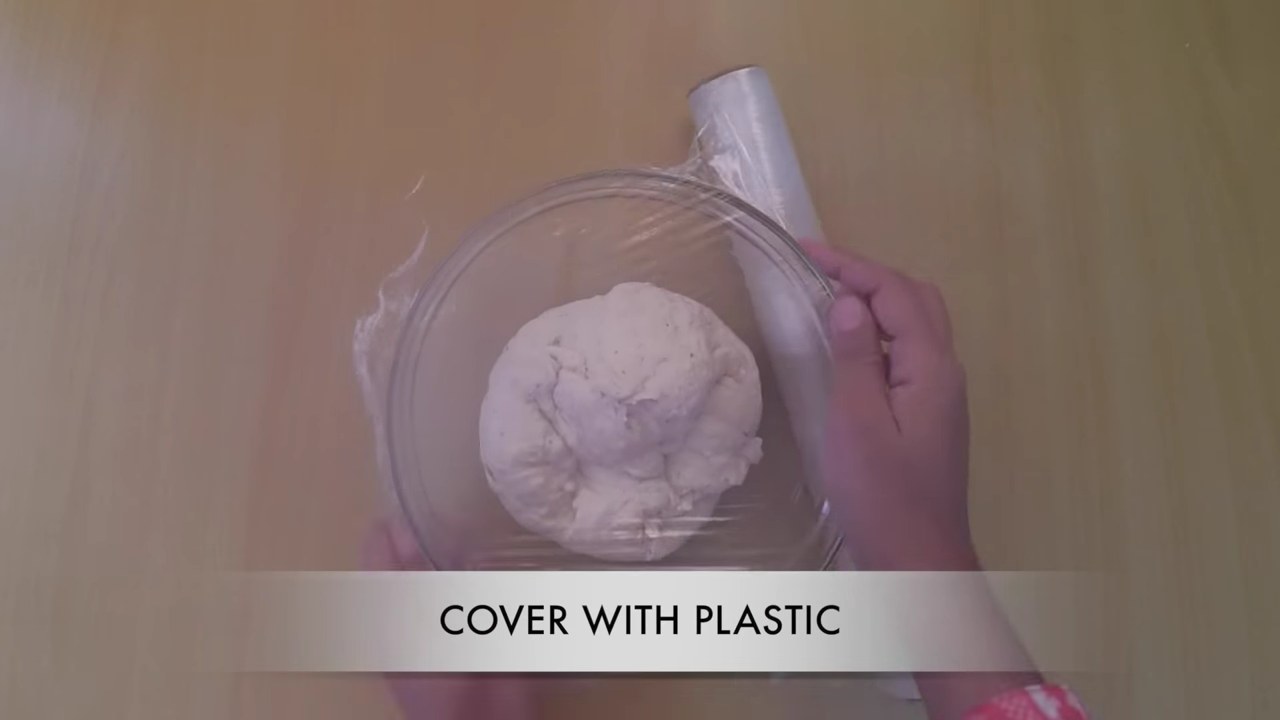
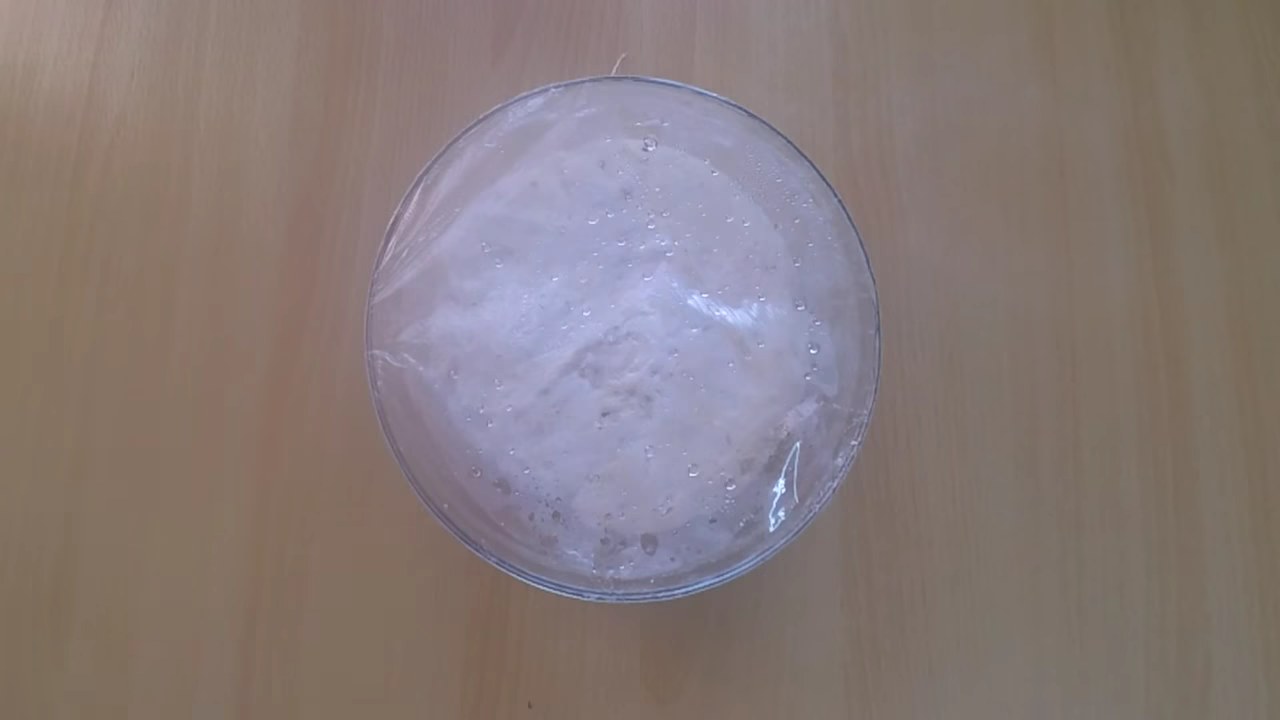
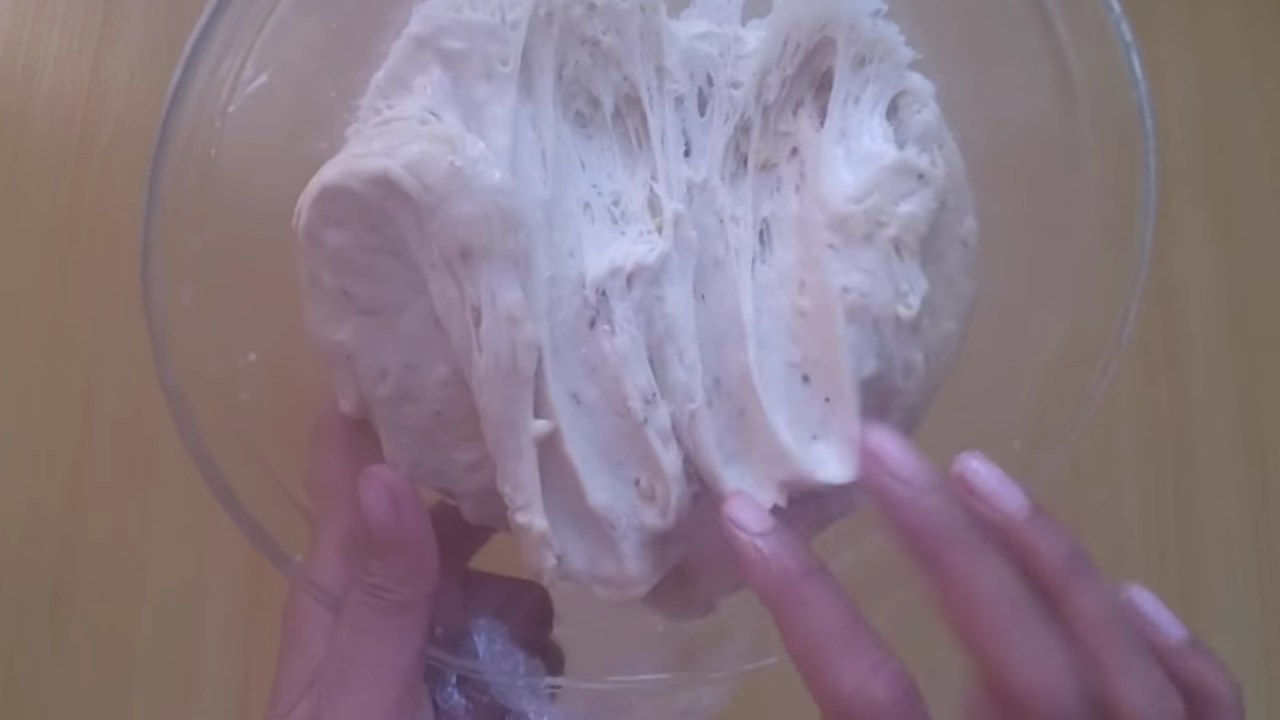
Cover it with a plastic sheet and keep it aside for 2 hours to get the dough double in size.
After two hours, the dough is doubled.
Knead well and divide the dough into two equal portions.
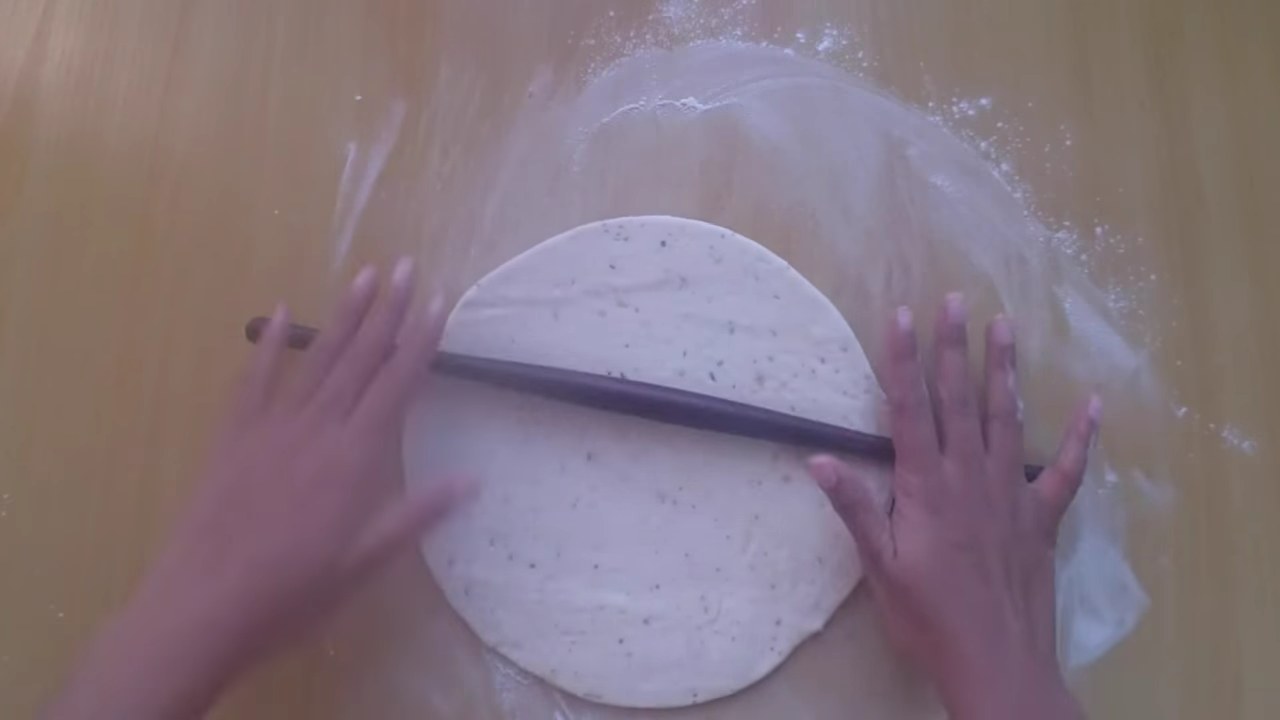
Take one portion of the dough, dust with flour, and roll it into a circle of 8-9 inches in diameter with using a rolling pin.
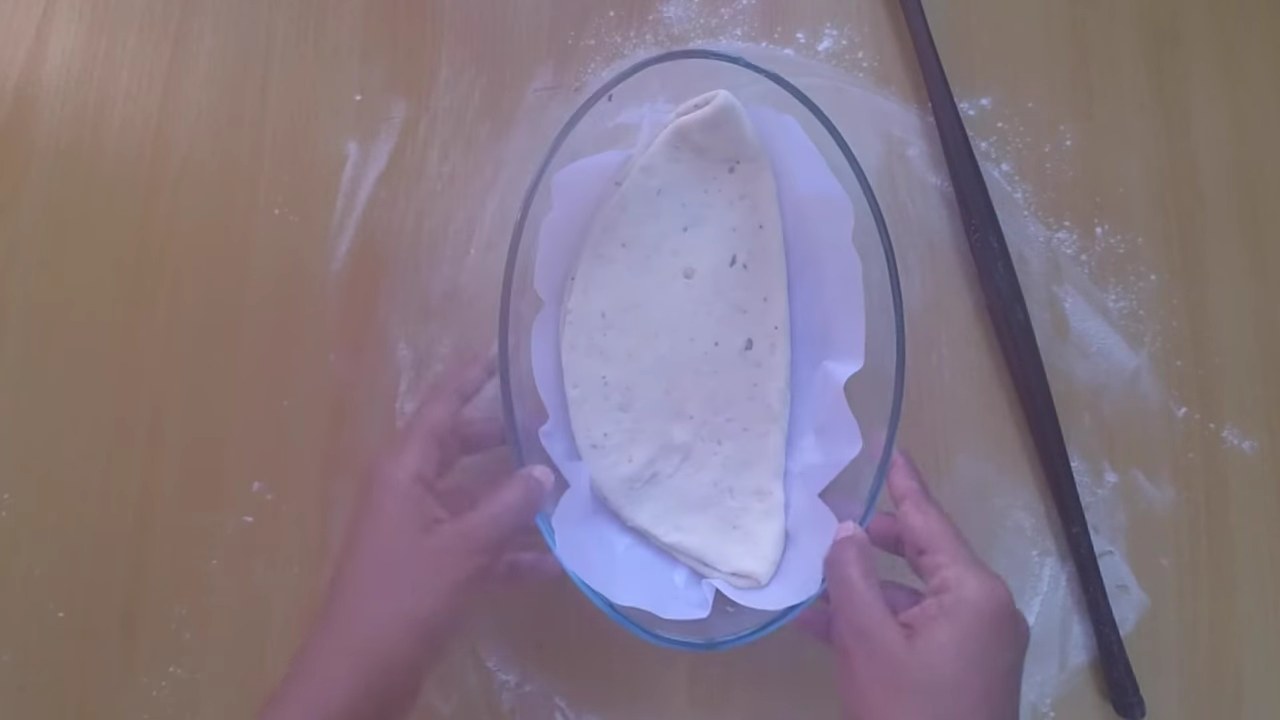
Fold it into half as shown below in the image.
Put it on the butter paper or in the baking tray.
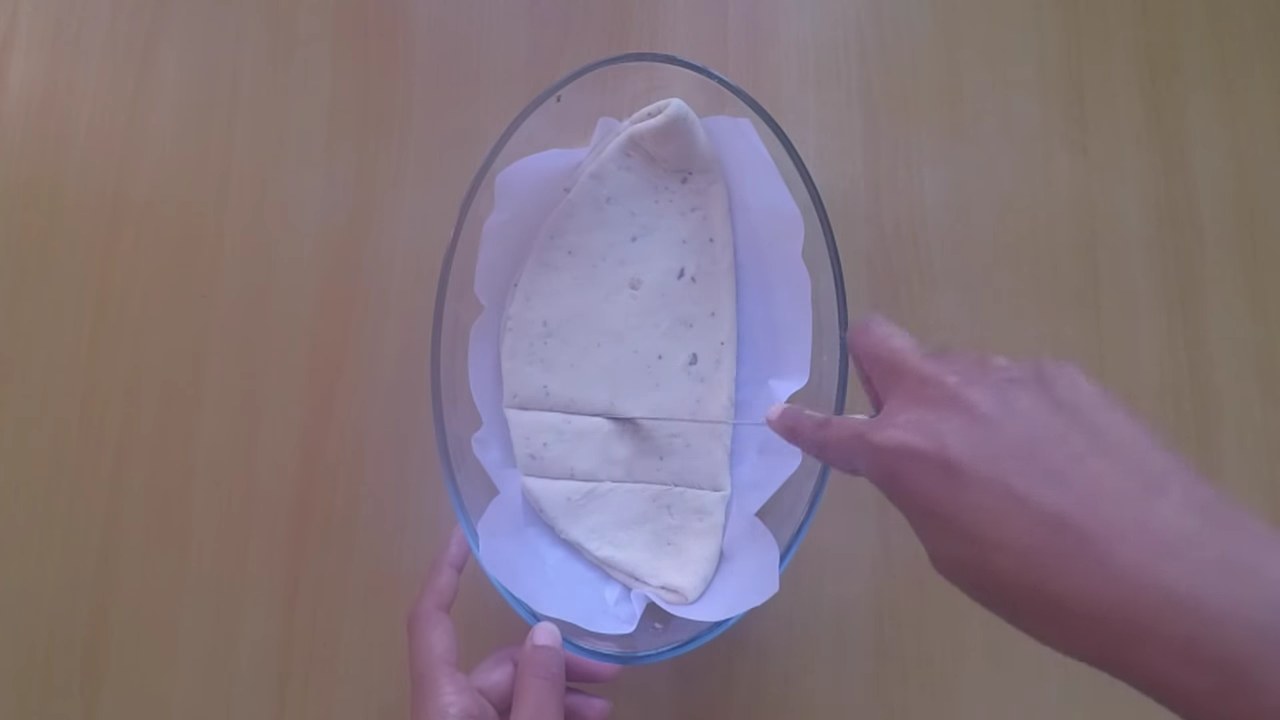
Make it horizontal cut with using a knife. You can prefer the video for better understanding. Preheat the microwave oven at 170C.
Apply butter on it.
Spread all-purpose seasoning, oregano herbs, and garlic on the bread. Bake it for 20 minutes at 170C. Delicious homemade garlic bread is ready to serve.
Steps
In a small bowl, add 3 tbsp luke-warm water, add yeast and sugar. Cover and keep it aside for 15 minutes to get the yeast activates.
In a mixing bowl, add oregano herbs, all-purpose seasoning, garlic, salt, and all-purpose flour.
Mix it well.
Add yeast-sugar mixture. Add water and knead the flour well to make a soft dough.
The dough is ready.
Cover it with a plastic sheet and keep it aside for 2 hours to get the dough double in size.
After two hours, the dough is doubled.
Knead well and divide the dough in two equal portions.
Take one portion of the dough, dust with flour, and roll it into a circle of 8-9 inches in diameter with using a rolling pin.
Fold it into half as shown below in the image.
Put it on the butter paper or in the baking tray.
Make it horizontal cut with using a knife. You can prefer the video for better understanding. Preheat the microwave oven at 170C.
Apply butter on it.
Spread all-purpose seasoning, oregano herbs, and garlic on the bread. Bake it for 20 minutes at 170C. Delicious homemade garlic bread is ready to serve.
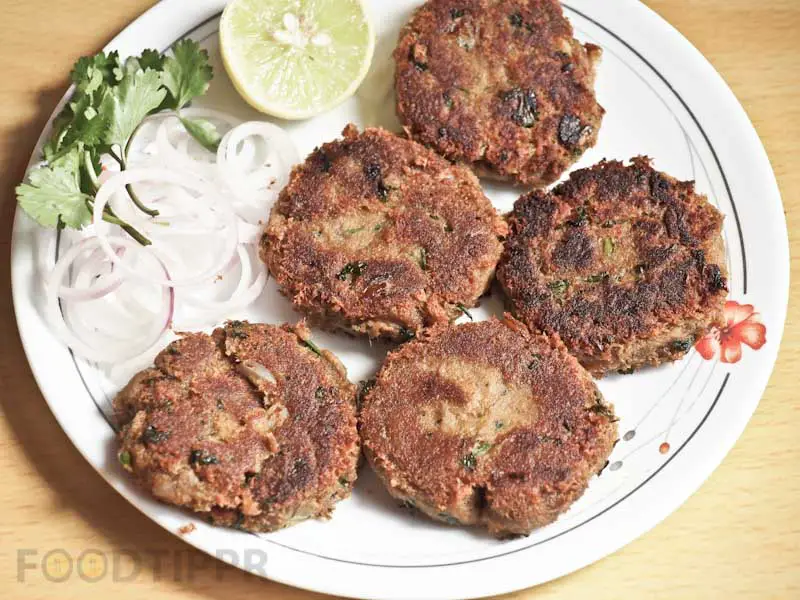
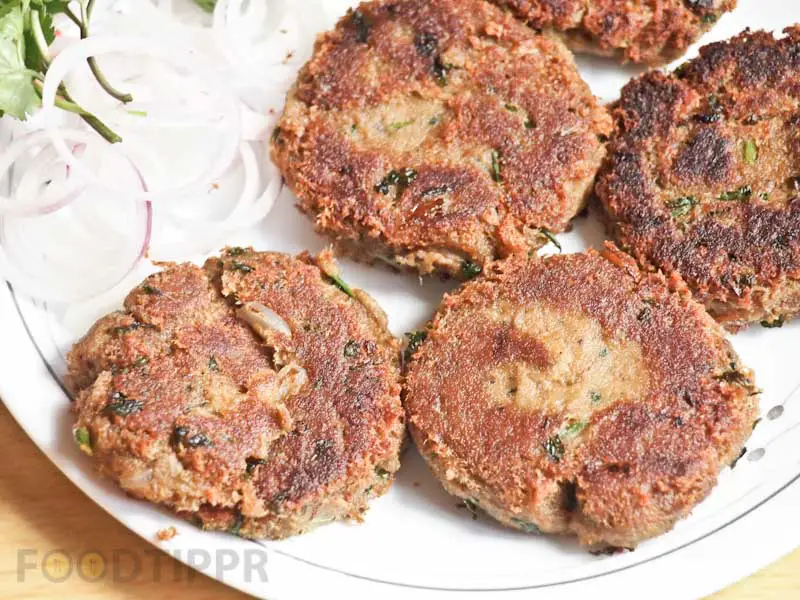
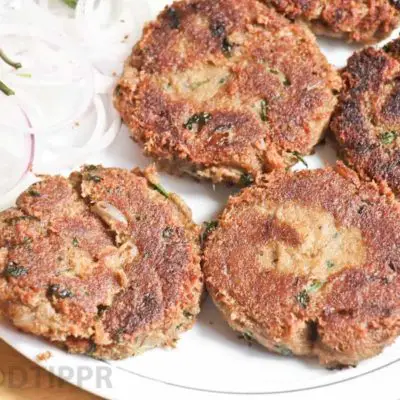
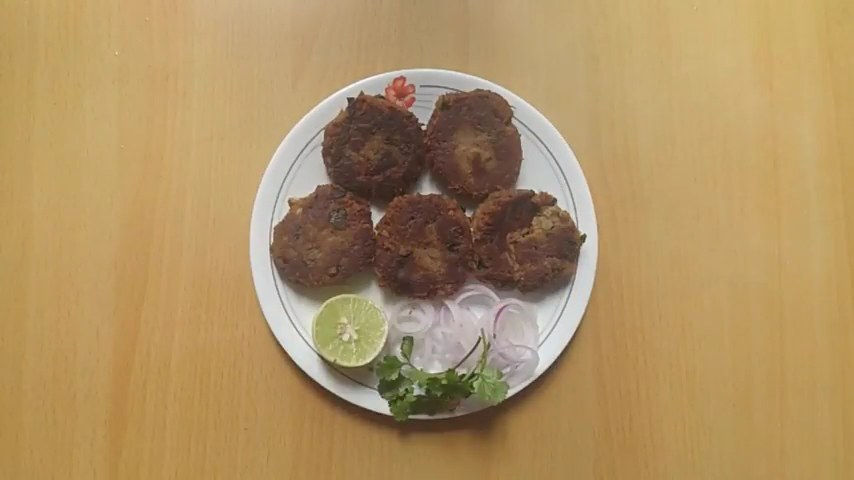
Check out the recipe of Delicious Shammi Kebabs. This is the Authentic recipe you will find only on Foodtippr.com.
It’s been most awaited recipe of Foodtippr because I had to wait for a long time to verify the ingredients with my Aunt, who is a master at making this recipe. And, I didn’t want to compromise on that, so, sorry for the delays.
Anyway, now that the recipe is made, the has family tasted, and approved, it has been finally published. And all I can say is, please do make time to prepare this at Home.
Everyone is going to love it.
Pro Tip: You can make them and refrigerate in the fridge, and you got yourself a delicious, ready to cook kebabs you can enjoy anytime.
Watch the video we created while preparing the recipe, I hope you will enjoy it as well.
Check out the recipe of Delicious Shammi Kebabs. This is the Authentic recipe you will find only on Foodtippr.com.It’s been most awaited recipe of Foodtippr because I had to wait for a long time to verify the ingredients with my Aunt, who is a master at making this recipe. And, I didn’t want to compromise on that, so, sorry for the delays.Anyway, now that the recipe is made, the has family tasted, and approved, it has been finally published. And all I can say is, please do make time to prepare this at Home.Everyone is going to love it.Pro Tip: You can make them and refrigerate in the fridge, and you got yourself a delicious, ready to cook kebabs you can enjoy anytime.
Prep Time10 minutesmins
Cook Time30 minutesmins
Total Time40 minutesmins
Course: Breakfast, Side Dish, Snack
Cuisine: Indian
Keyword: kebab, nawab, shamikebab
Ingredients
15-16clovesGarlic
1inchpiece Ginger
6-7Cloves
1/2inchpiece Cinnamon stick
4Cardamom green
1tspCumin seeds
1tspBlack pepper
1flower Mace
1/8of a piece Nutmeg
2Cardamom brown
10-12Whole red chili
1tspTurmeric powder
to taste Salt
3Onionchopped
4Green chilies
1cupchopped Coriander leaves
1/2cupMustard oil
2tbspRefined oil
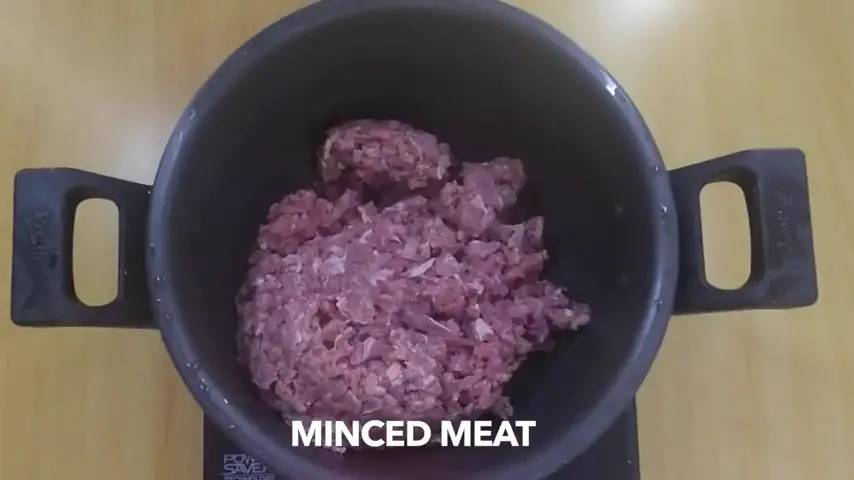
750gramMinced meat
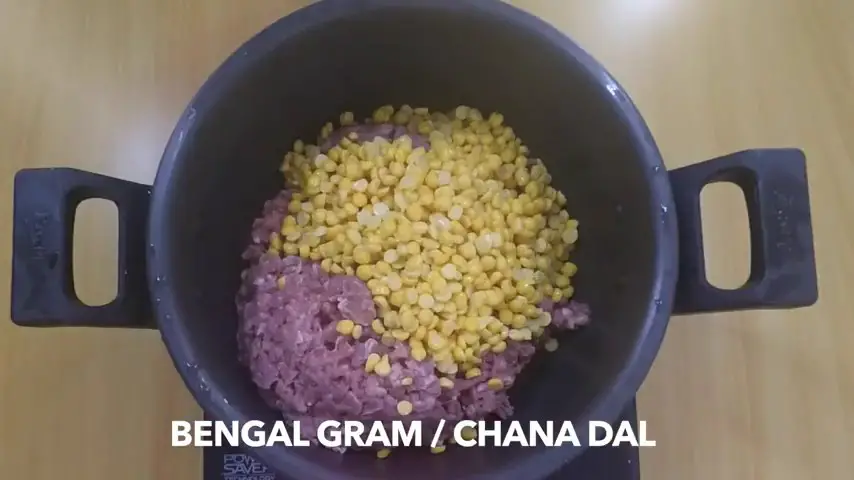
1cupsoaked Bengal gramChana dal
200mlWater
Instructions
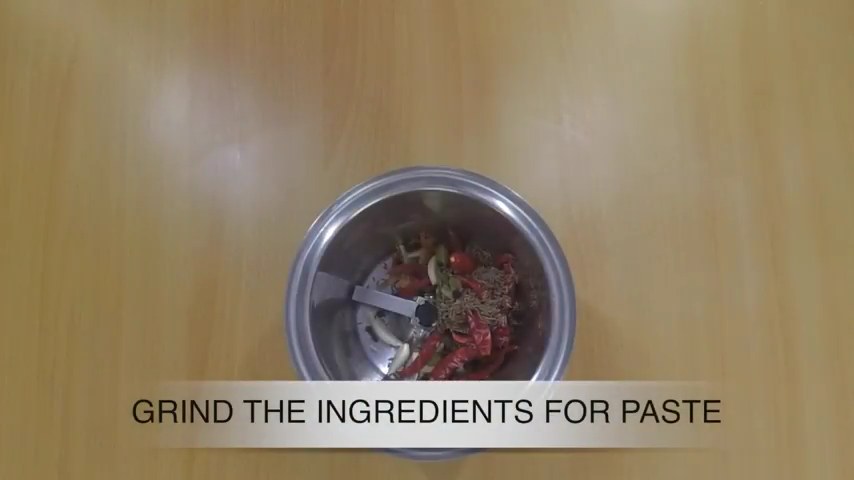
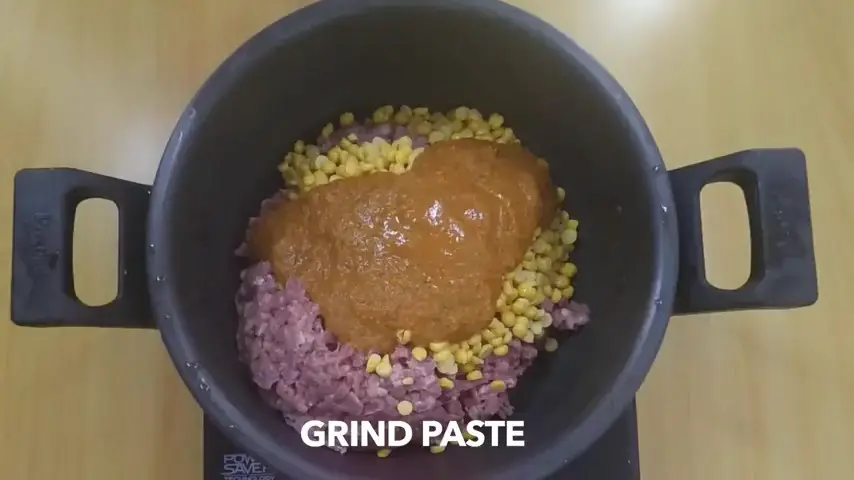
Grind all the ingredients together mentioned above in the table ” Ingredients for ground paste”. You can add water while grind it to make fine paste.
Now the spices are ground.
In a pressure cooker, add minced meat.
Add soaked chana dal.
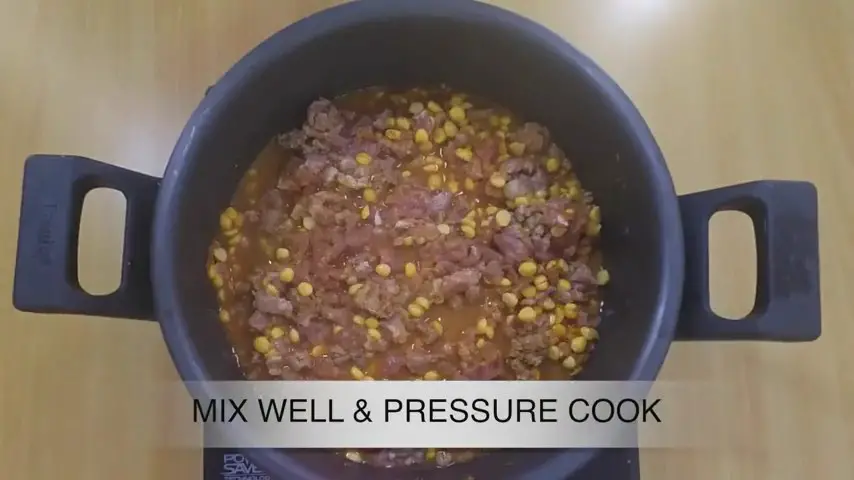
Add ground paste, turmeric powder, Salt,and water. Mix it well.
Pressure cook it on a high flame for one whistle, then keep the flame low and cook for 10-15 minutes. Switch off the stove.
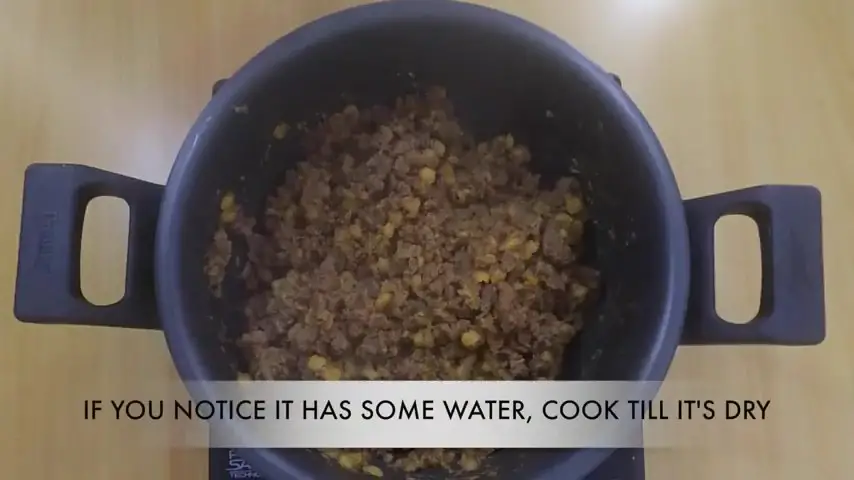
Open cooker, if you notice it has some water, cook till it’s dry up. Let it cool at the room temperature.
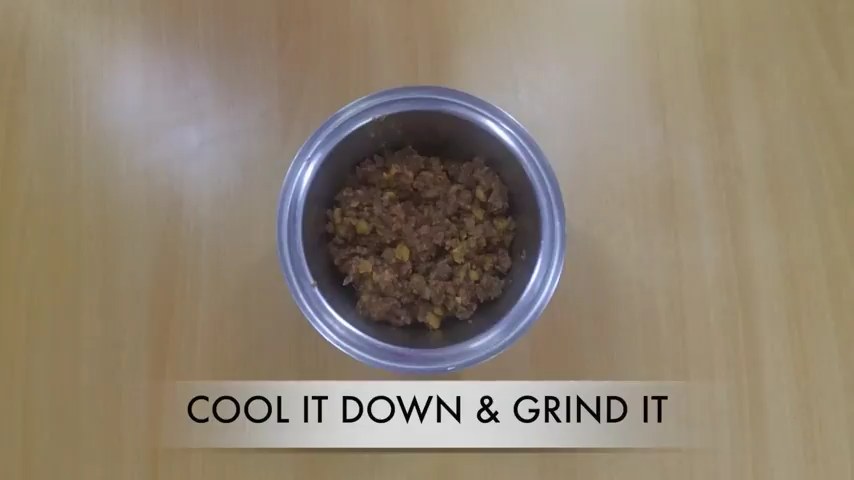
Cool down and grind it. Don’t add water while grinding it.
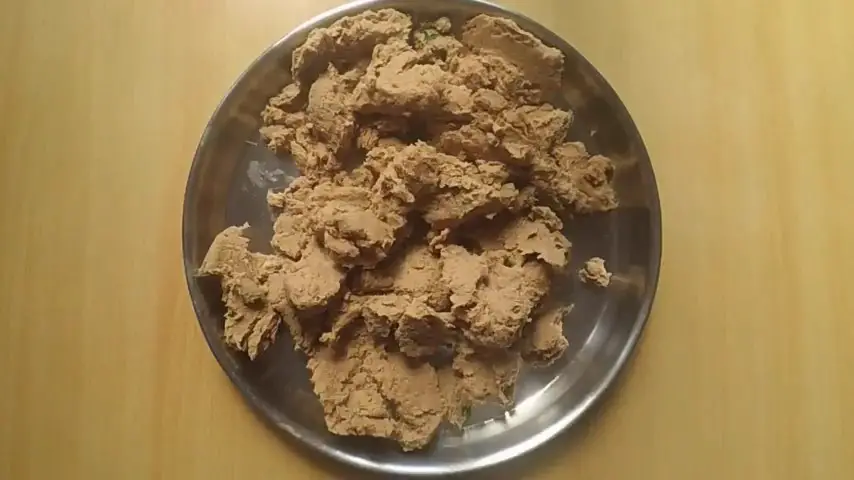
Now the mixture is grinded.
Transfer it in a bowl.
Heat mustard oil in a pan, add chopped onion.
Add green chili and fry till it is translucent in color.
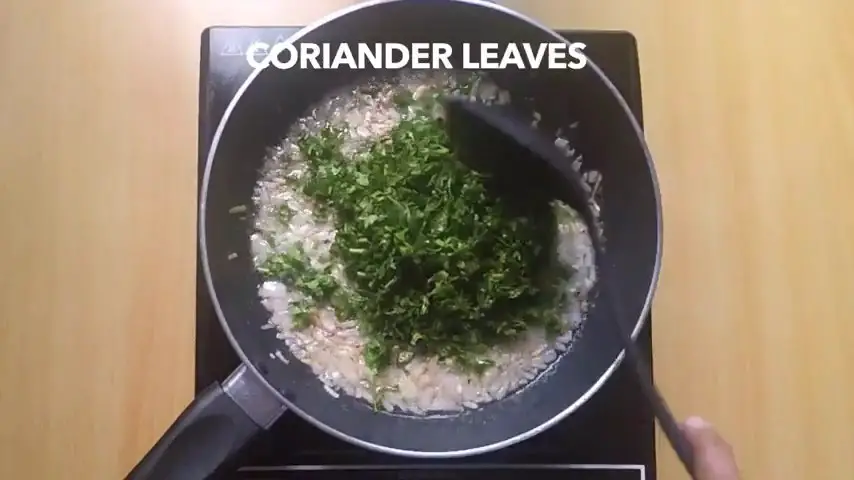
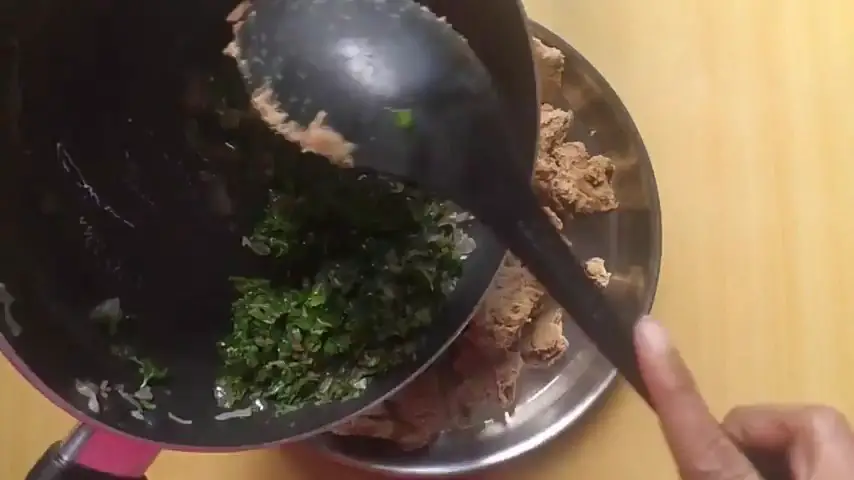
Switch off the stove. Add chopped coriander leaves.
In a thal, add ground meat, and fried onion. Mix it well
Check salt, if need add it.
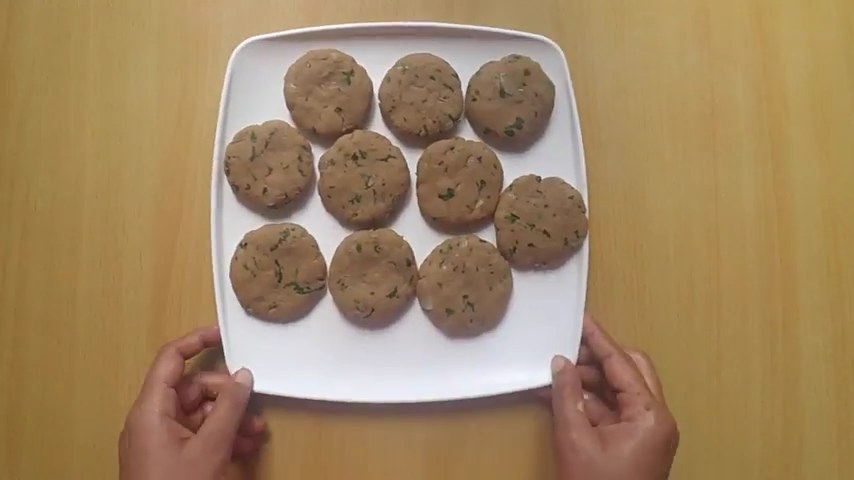
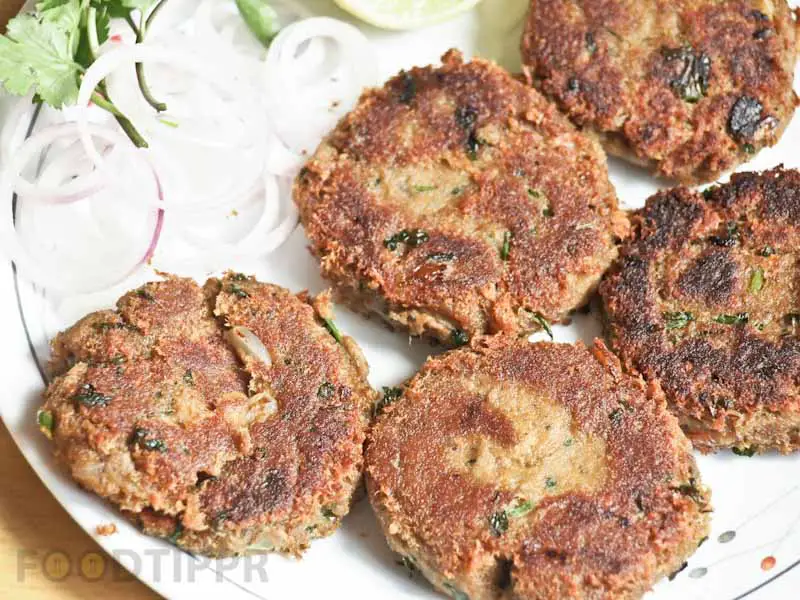
Make small kebab from the mixture as shown below in the picture.
Heat oil in a pan and shallow fry it on a low flame till both the sides are light golden in color. When one side is golden in color, flip it and cook from the other sides. Delicious shami kebab is ready to serve.
Do the same with the rest of the mixture.
Serve hot with puris and lemon.
Steps
Grind all the ingredients together mentioned above in the table ” Ingredients for ground paste”. You can add water while grinding it to make a fine paste.
Now the spices are ground.
In a pressure cooker, add minced meat.
Add soaked chana dal.
Add ground paste, turmeric powder, salt, and water. Mix it well.
Pressure cook it on a high flame for one whistle, then keep the flame low and cook for 10-15 minutes. Switch off the stove.
Open cooker, if you notice it has some water, cook till it’s dry up. Let it cool at room temperature.
Cooldown and grind it. Don’t add water while grinding it.
Now the mixture is ground.
Transfer it in a bowl.
Heat mustard oil in a pan, add chopped onion.
Add green chili and fry till it is translucent in color.
Switch off the stove. Add chopped coriander leaves.
In a thal, add ground meat, and fried onion. Mix it well
Check salt, if need adds it.
Make small kebabs from the mixture as shown below in the picture.
Heat oil in a pan and shallow fry it on a low flame till both sides are light golden in color. When one side is golden in color, flip it, and cook from the other sides. Delicious shami kebab is ready to serve.
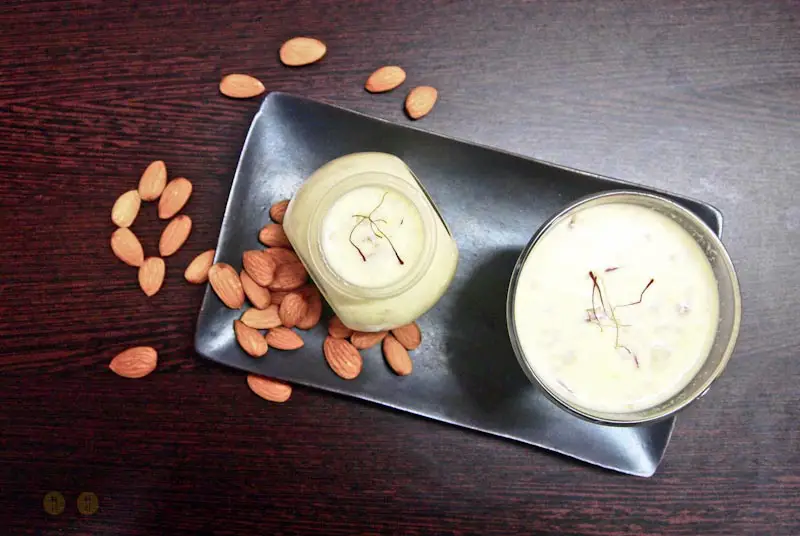
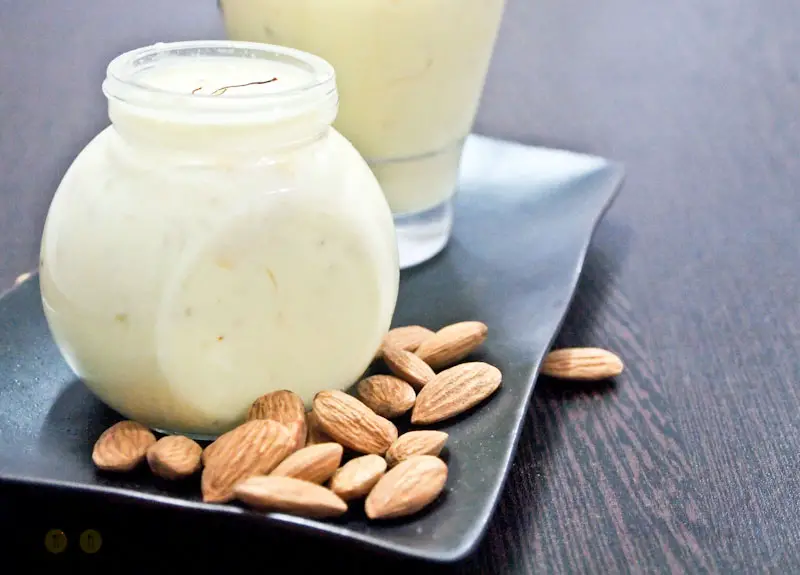
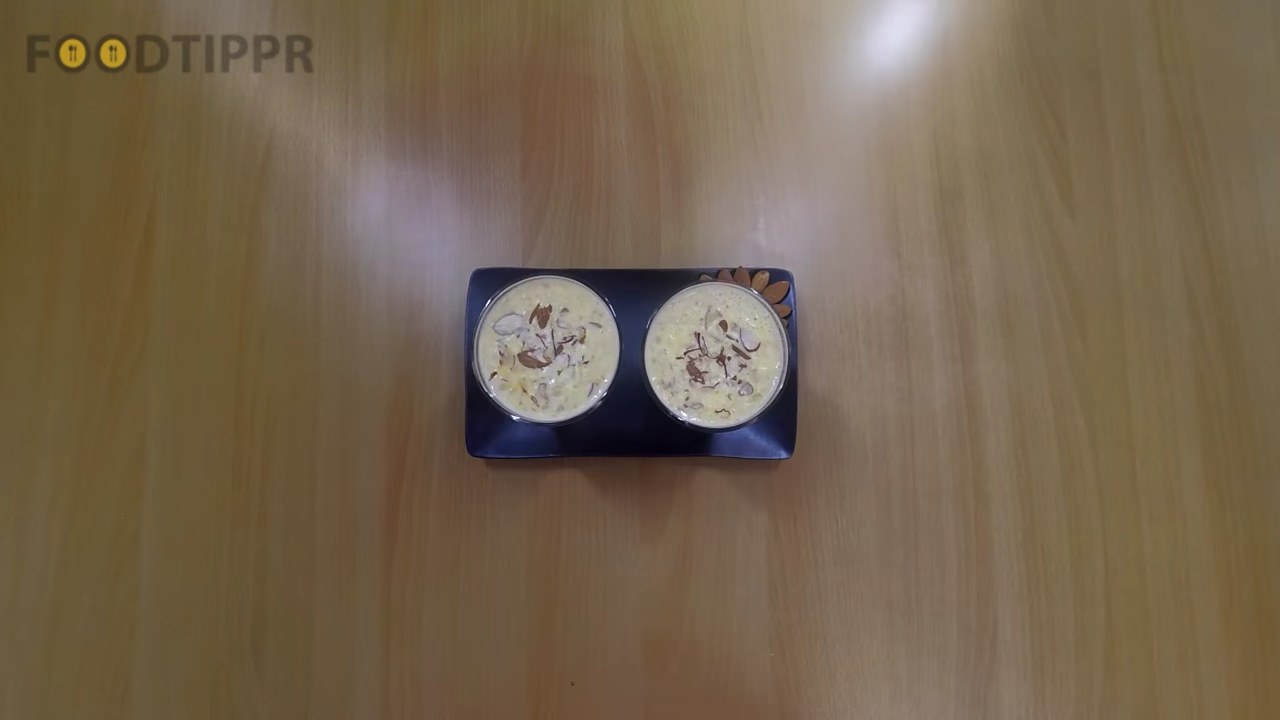
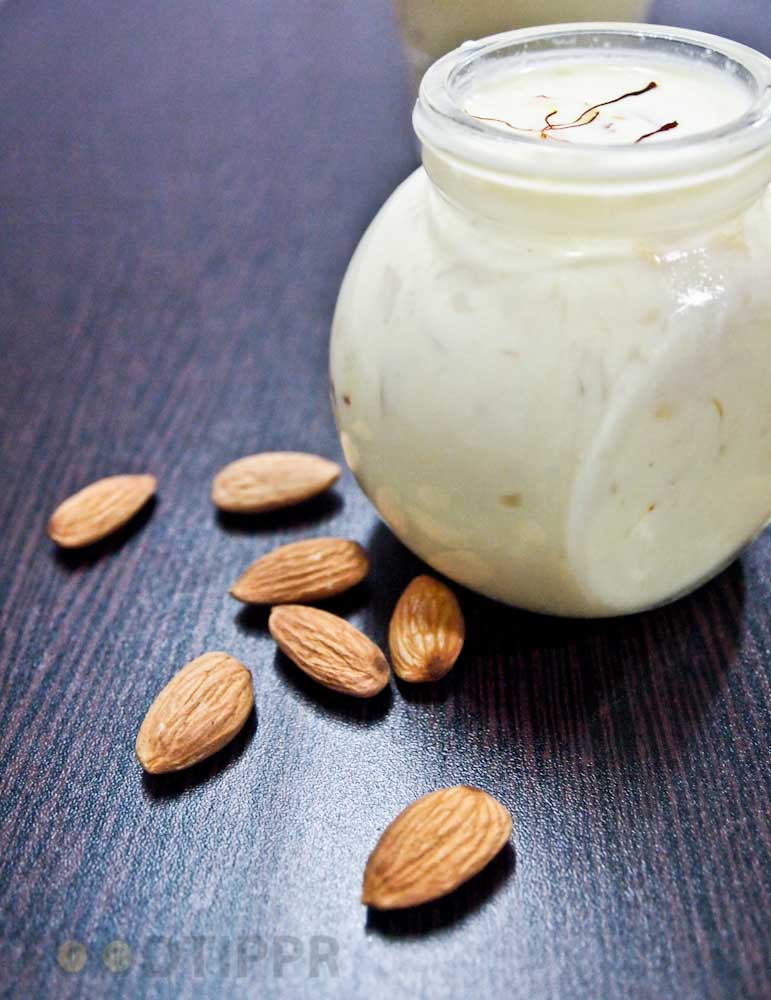
Presenting the Delicious Kesar Badam Milk. Milk is Delicious, as well as Healthy. The Nutrients is provided is essential for the human body.
Alright, let’s just talk about its deliciousness, because, this is why you are here right?
Okay so, this is the quickest recipe ever for the delicious drink that can be prepared under 10 minutes. A Perfect drink after an amazingly delicious dinner (anything you make from Foodtippr will be amazing, I can guarantee you that)
Anyways, follow the step by step process documented below and prepare this delicious for yourself, and your companion.
Or just watch the video. And yes, keep visiting for more amazing recipes.
Presenting the Delicious Kesar Badam Milk. Milk is Delicious, as well as Healthy. The Nutrients is provided is essential for human body.Alright, let’s just talk about it’s deliciousness, because, this is why you are here right?Okay so, this is the quickest recipe ever for the delicious drink that can be prepared under 10 minutes. A Perfect drink after an amazingly delicious dinner (anything you make from Foodtippr will be amazing, I can guarantee you that)Anyways, follow the step by step process documented below and prepare this delicious for yourself, and your companion.
Prep Time5 minutesmins
Cook Time20 minutesmins
Total Time25 minutesmins
Course: Drinks
Cuisine: Indian
Keyword: almond, badammilk, milk
Servings: 2
Ingredients
1litre Milk
20-25Almonds
20srands Saffron / Kesar
2-3tbspSugar
Instructions
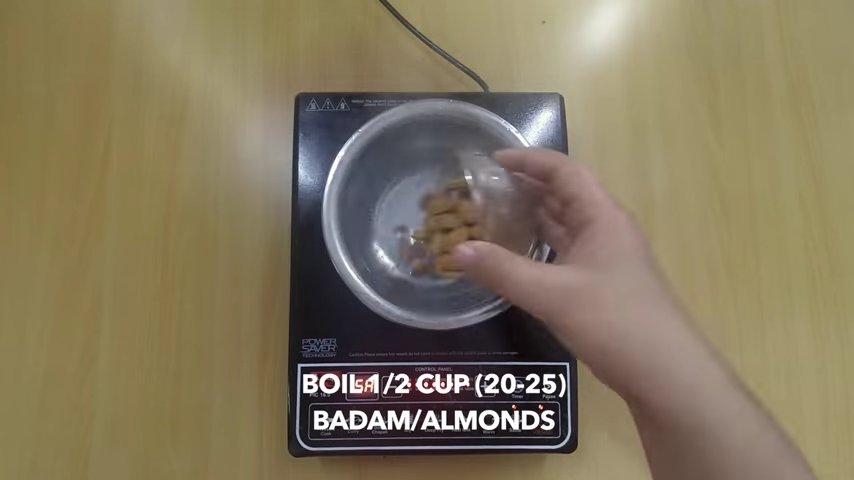
n a wok, add water and almonds. Let it boil for 8-10 minutes. Switch off the stove.
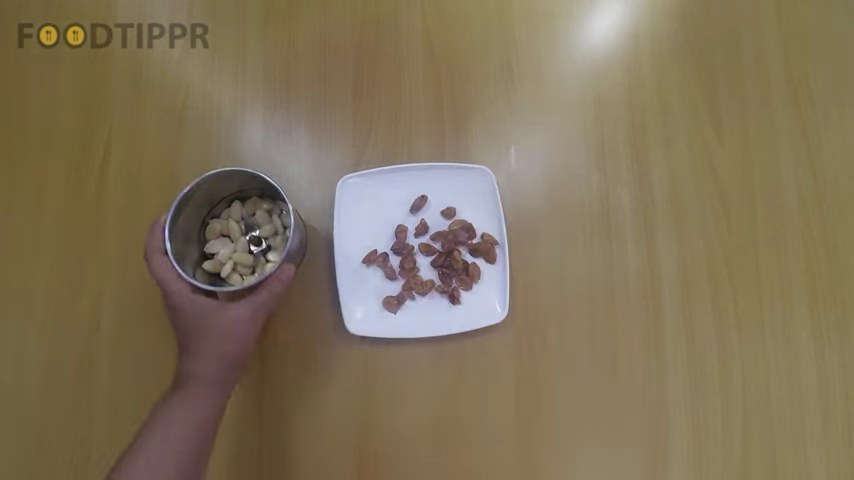
Peel off the skin of almonds.
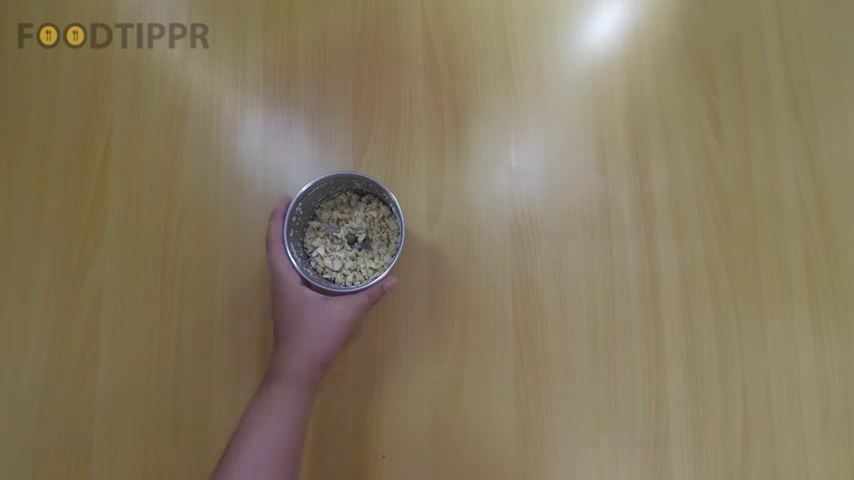
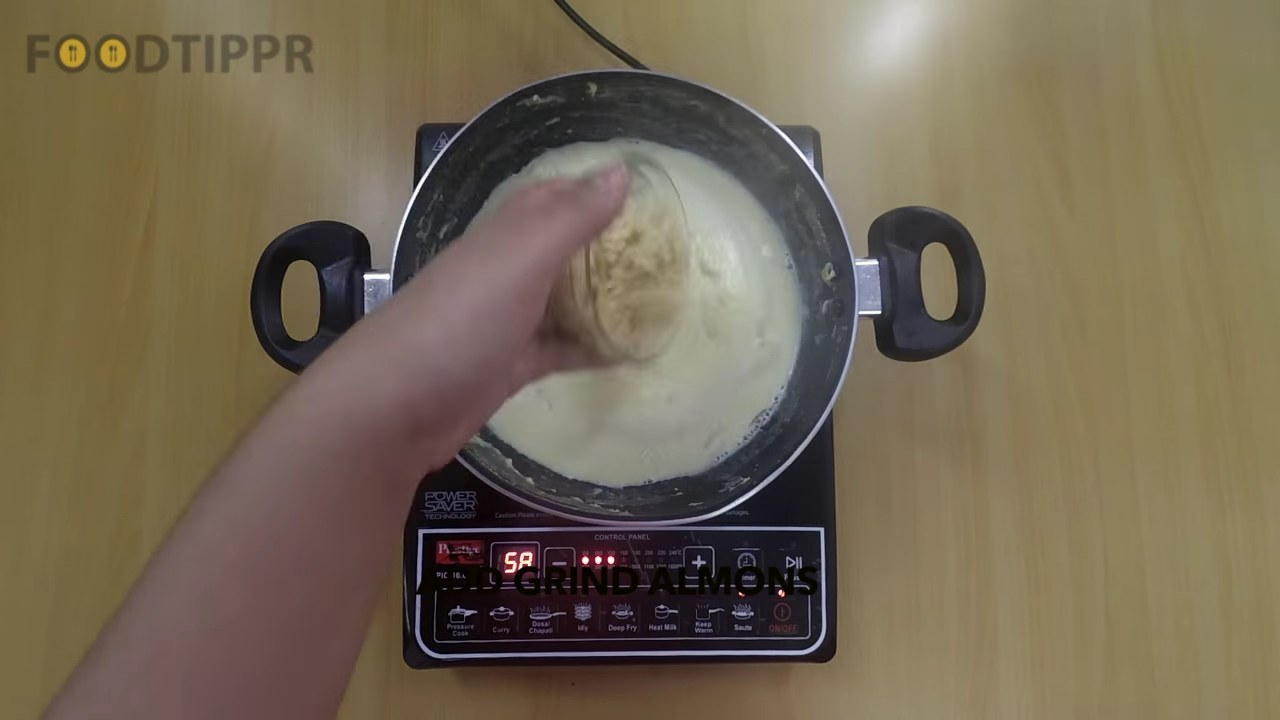
Grind almonds coarsely.
Done. Keep it aside.
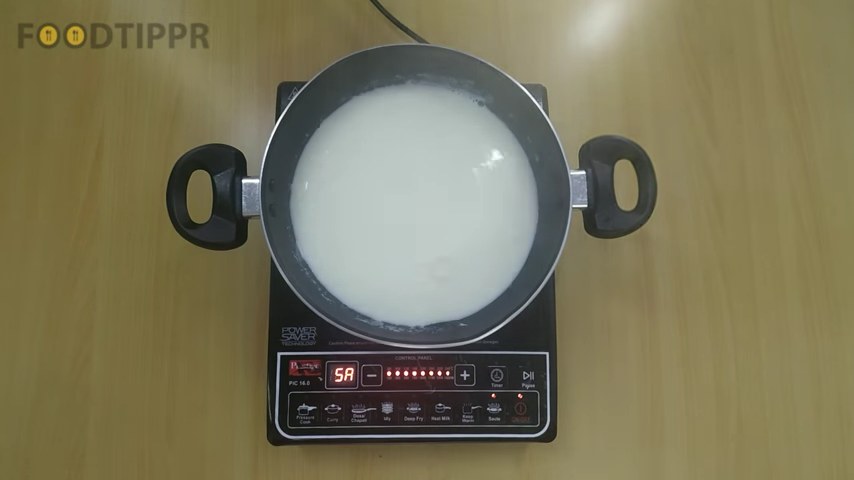
In a wok/kadai add milk, and let it boil
Add 10-12 saffron to it. let it boil for 10-15 minutes or till the milk is reduced by half.
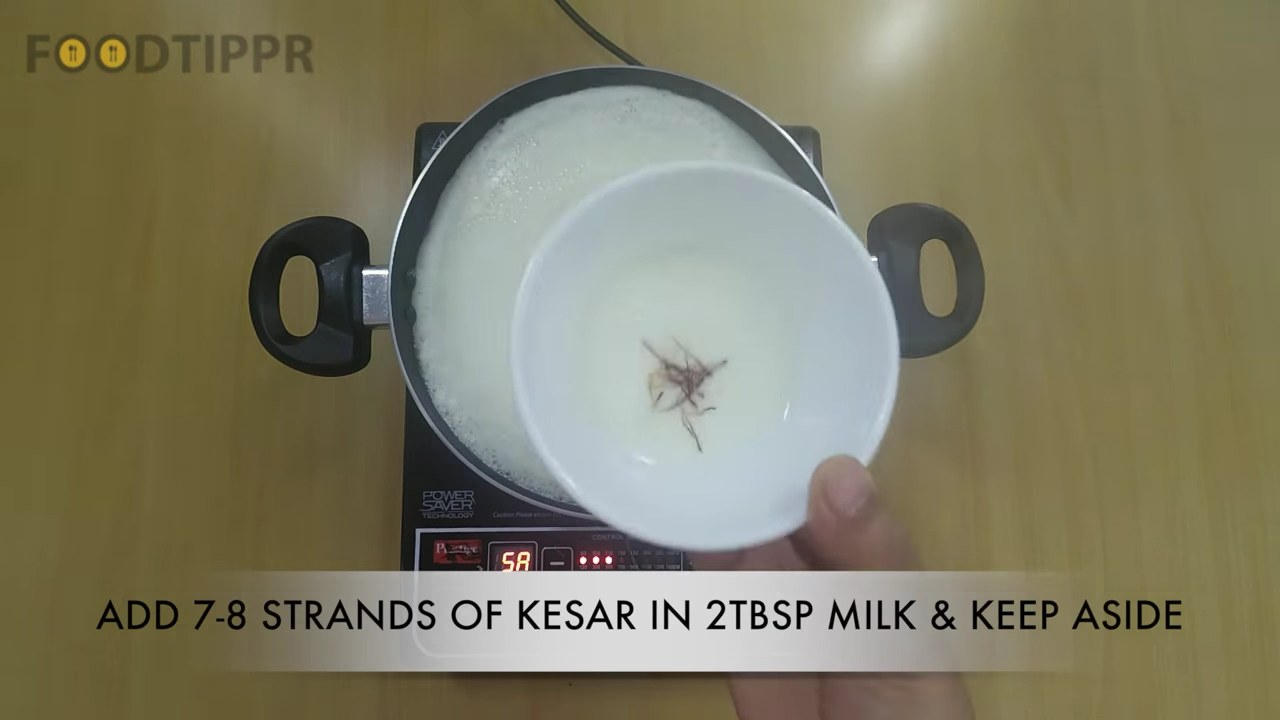
In a small bowl, add 2 tbsp lukewarm milk and add 8-10 saffron. Keep it aside for 10 minutes.
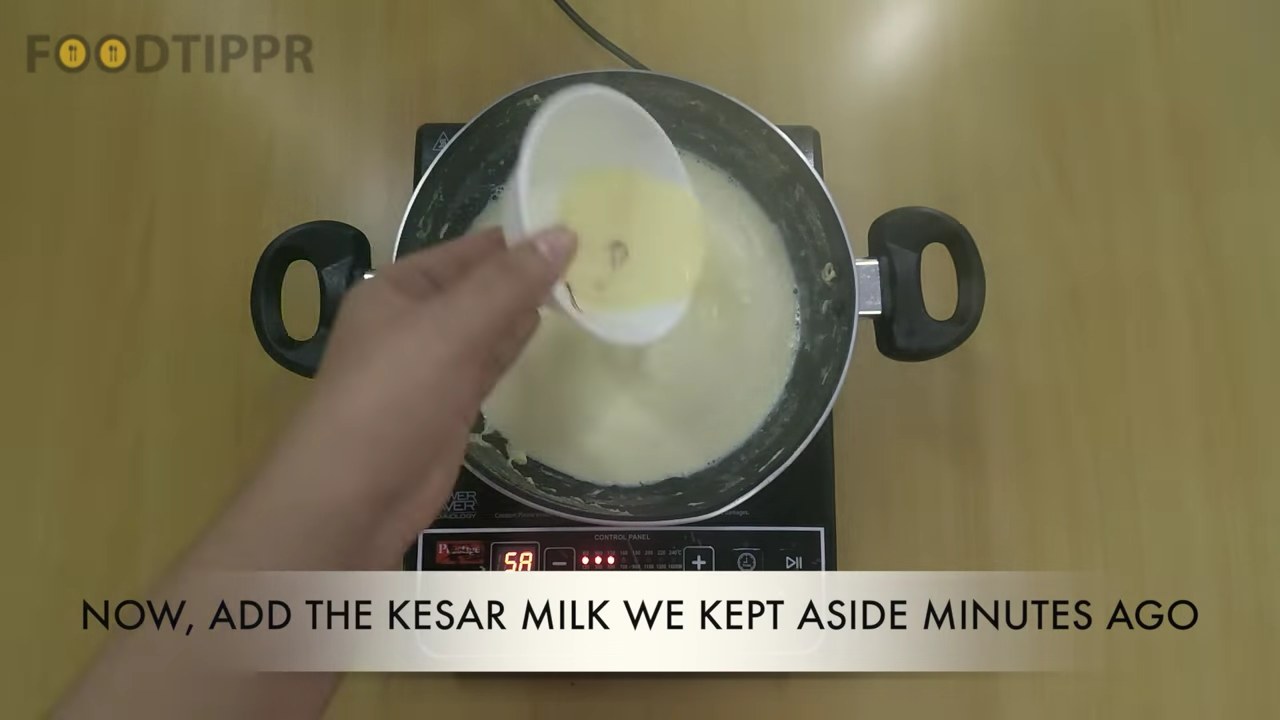
Add soaked saffron in the milk and mix it well.
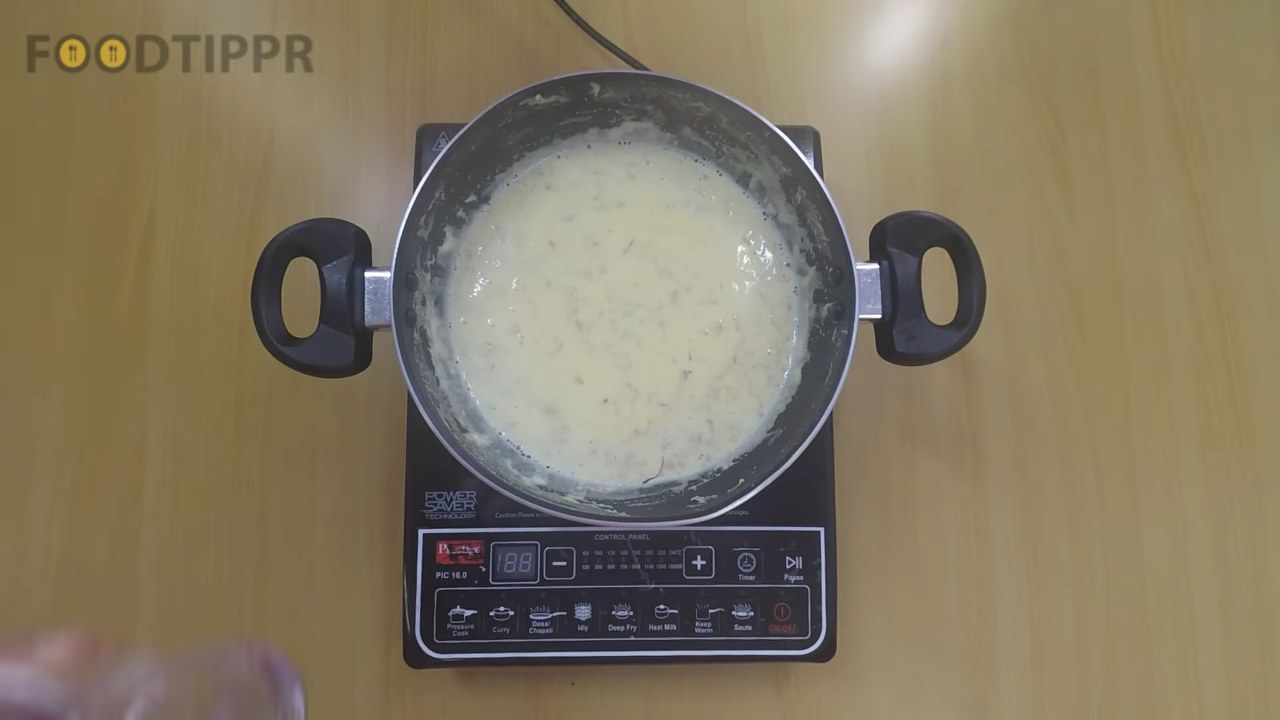
Add sugar and coarsely ground almonds. Cook for another 4-5 minutes.
Switch off the stove. Delicious kesar badam milk is ready.
Serve chilled.
Steps
In a wok, add water and almonds. Let it boil for 8-10 minutes. Switch off the stove.
Peel off the skin of almonds.
Grind almonds coarsely.
Done. Keep it aside.
In a wok/Kadai add milk, and let it boil
Add 10-12 saffron to it. let it boil for 10-15 minutes or till the milk is reduced by half.
In a small bowl, add 2 tbsp lukewarm milk and add 8-10 saffron. Keep it aside for 10 minutes.
Add soaked saffron in the milk and mix it well.
Add sugar and coarsely ground almonds. Cook for another 4-5 minutes.
Switch off the stove. Delicious Kesar badam milk is ready.

")


")